Как установить raspbian на raspberry pi
Содержание:
- Игры
- Подключение Raspberry Pi.
- How do I mount directories from other Linux/Unix/BSD servers? How do I mount an NFS share?
- loop-mounting images
- Raspberry Pi Resources
- Should you use Raspberry Pi OS 64-bit?
- Информация о системе Raspberry Pi OS 64-бит
- Installing
- So Many Raspberry Pi Operating Systems!
- Develop Internet of Things Projects With Raspberry Pi
- How to Rebuild NOOBS
- The Best Raspberry Pi Desktop Operating Systems
- Установка операционной системы на Raspberry Pi
- How to Install Raspberry Pi OS 64-bit
- Характеристики Raspberry Pi 4 Model B
- Написание изображения
- Сборка корпуса для Raspberry Pi 3
- Is there documentation available for Raspbian?
- No space left on device, but I have plenty of free space on my SD card. What do I do?
- SD-карта, USB-накопитель или сетевая мультизагрузка?
- 15 – CentOS
- Is there documentation available for Raspbian?
- Заключение
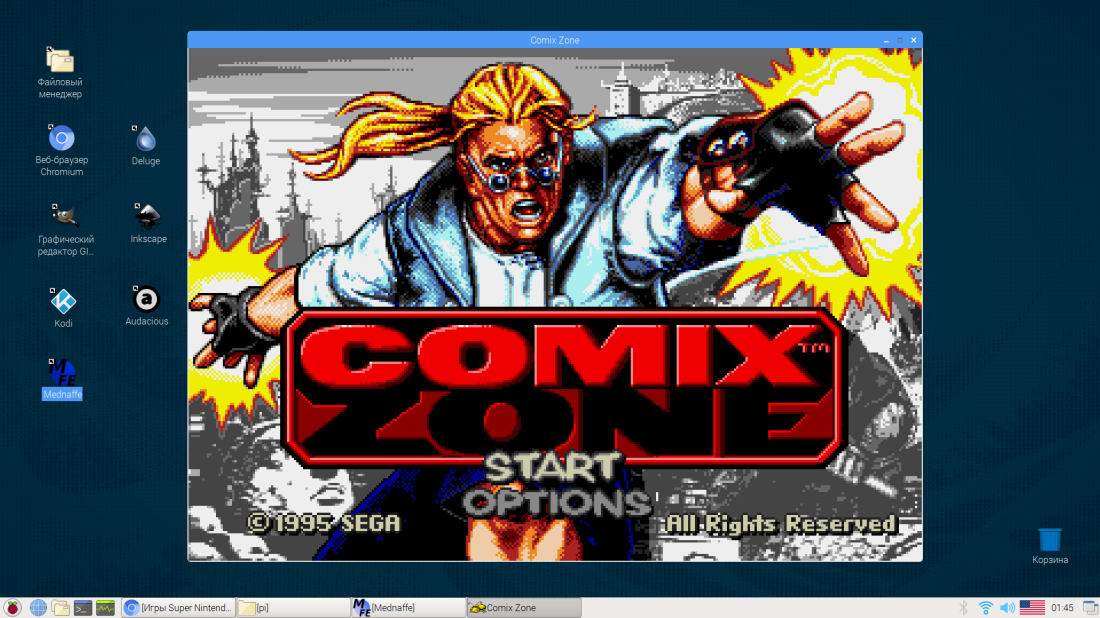
Игры
Конечно, сложно назвать Raspberry Pi игровой платформой, однако поиграть на нём вполне возможно. Речь по большей части идёт о запуске игр, выходивших на старых приставках. Долгие попытки собрать что-то вроде RetroPie в виде отдельного приложения (а не целой ОС) не увенчались успехом. Поиск отдельных приложений для каждой приставки тоже довольно нудное дело, поэтом остановился на Mednafen:
apt install mednafen
Первым делом переходим в «Global Settings» и выбираем Video Driver sdl вместо opengl (ну нет у «Малины» нормальной поддержки OpenGL). После этого образы игр (ROMs) начнут нормально работать (не все, конечно).
Можно добавлять игры в интерфейс Mednaffe и запускать их оттуда, а можно даже не запускать Mednaffe — просто открывать файл с образом игры, как любой другой, двойным кликом (не для всех платформ сработает).
Играть в приставочные игры на клавиатуре неудобно, а под рукой как раз есть геймпад от Xbox 360. Контроллер работает без дополнительных драйверов, остаётся только настроить кнопки. Для этого в Mednaffe открываем раздел «Systems», переходим к нужной приставке, открываем подраздел «Input», нажимаем «Controller Setup». Выбираем «Port 1» (первый контроллер), делаем двойной клик в столбце Key и нажимаем на геймпаде кнопку, соответствующую надписи в столбце Action/Button (для каждой строки).
Несколько «родных» игр, заслуживающих внимания, тоже можно установить. Например, Битва за Веснот (напоминает HOMM III) и OpenTTD (напоминает SimCity 2000). Обе игры переведены на русский язык.
apt install wesnoth openttd
Подключение Raspberry Pi.
Ну все, пожалуй, переходим к первому включению платы. Подключаем:
Обратите внимание, для дисплея, который я использую — два кабеля. HDMI — для передачи видео-сигнала и micro-USB для питания и передачи данных тачскрина
Основным моментом при первом включении платы будет установка операционной системы на карту памяти. Разберем этот процесс для ПК с Windows. А для самой Raspberry используем ОС Raspberry Pi OS, ранее называвшуюся Raspbian. Выбор сегодня остановим именно на ней, поскольку это самый распространенный вариант, подходящий для большинства задач. Основана она, как и большинство систем, доступных для Raspberry, на Debian GNU/Linux.
На сегодняшний день в разработке находится официальная версия Android’а от Google, но есть неофициальные адаптированные версии, по крайней мере, для версий 3B и 3B+ точно.
Переходим на страницу загрузок — ссылка. И заодно скачиваем Raspberry Pi Imager for Windows, утилиту для создания загрузочной карты. Ссылки на Raspberry Pi OS чуть ниже:
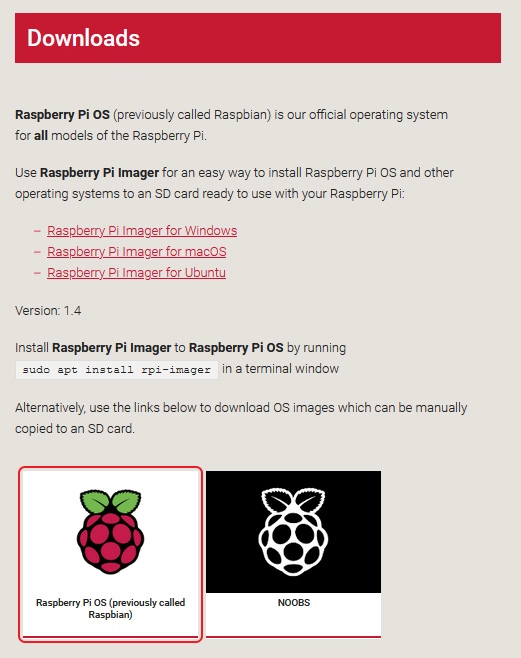
Также можно скачать образ ОС и непосредственно через Raspberry Pi Imager, об этом .
Доступно 3 версии:
- Raspberry Pi OS (32-bit) with desktop and recommended software
- Raspberry Pi OS (32-bit) with desktop
- Raspberry Pi OS (32-bit) Lite
2020-08-20-raspios-buster-armhf.img
И после этого запускаем Raspberry Pi Imager. Также существует рекомендация предварительно отформатировать MicroSD в FAT. Основное окно Imager выглядит так:
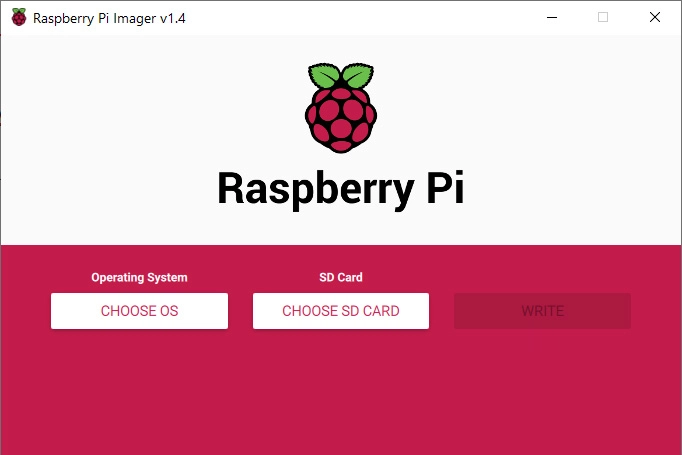
Максимально простой интерфейс, близкий к совершенству для утилиты, которая выполняет загрузку образа на карту:
- кнопка выбора файла
- кнопка выбора карты
- кнопка запуска процесса
Нажав на Choose OS первым пунктом видим, что можно было не скачивать вручную образ ОС, а сделать это через Imager:
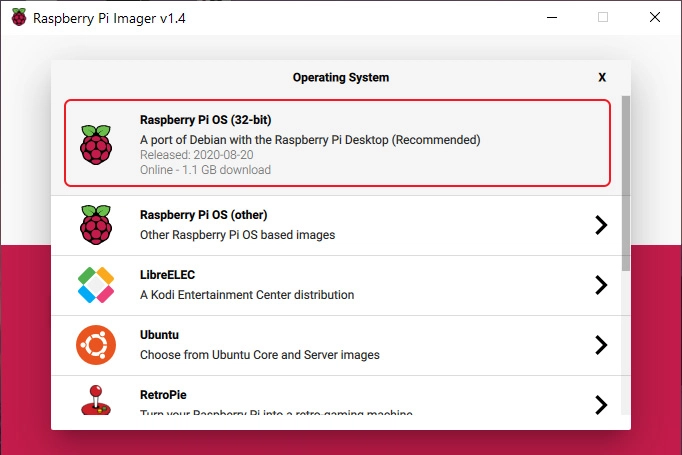
Но поскольку он уже скачан, то спускаемся в самый низ списка и выбираем скачанный файл:

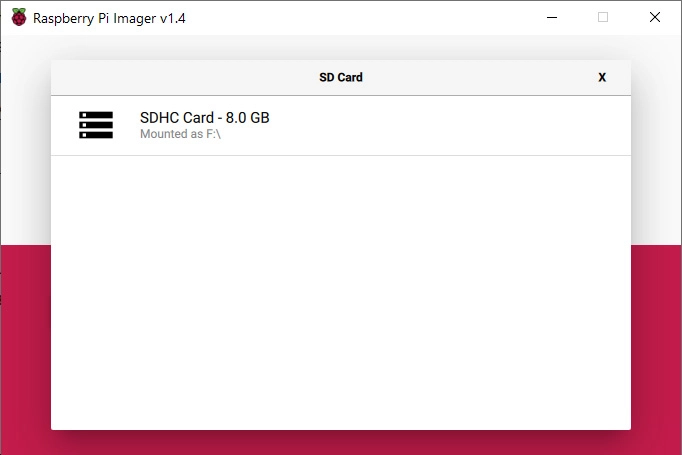
Далее идем в Choose SD Card. И тут самым важным является не промахнуться и не выбрать случайно один из жестких дисков. В этом случае с данными придется попрощаться, что чаще всего влечет за собой кучу проблем.
Пару лет назад я делал аналогичную утилиту — для создания загрузочной карты
Там правда использовался Android, но это не важно в данном случае. Так вот ключевым моментом было максимально защитить пользователя от ошибочного выбора диска
Неудивительно, что создатели Raspberry Pi Imager также этим озадачились, поэтому скорее всего среди доступных вариантов не будет ничего «лишнего»:
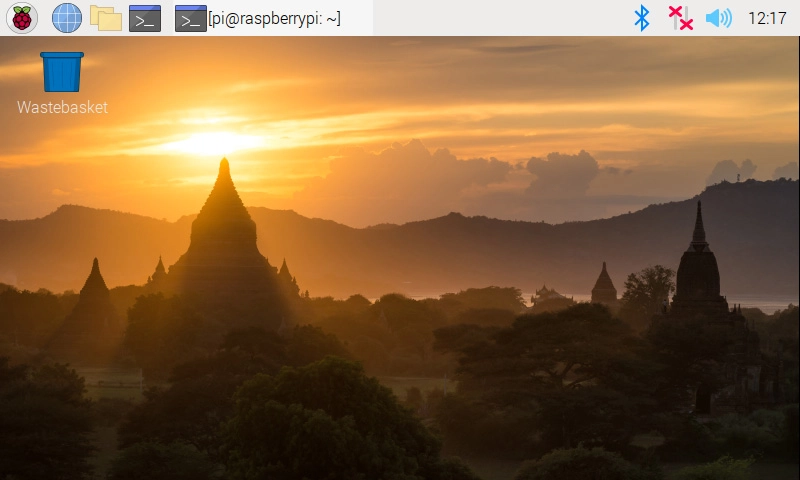
Нажимаем Write и ожидаем завершения записи. По окончанию процесса вставляем созданную карту в Raspberry и, в общем-то, все готово для запуска. Подаем питание и в итоге нас приветствует классический рабочий стол:
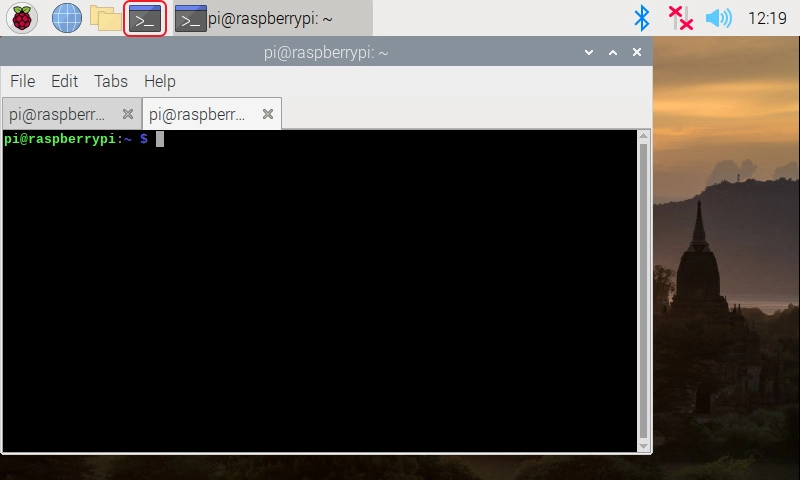
Интерфейс стандартный, интуитивно понятный. Можно запустить консоль — ключевой элемент управления для Linux-систем:
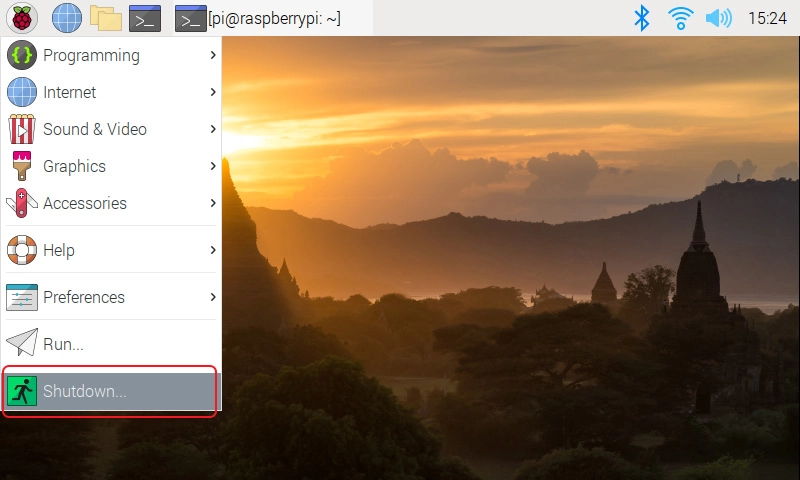
Кстати рекомендуется выключать плату не просто обрывом питания, а через меню ОС:
Итак, сегодняшние цели — подключение Raspberry Pi и установка ОС — выполнены, в последующих статьях поэтапно займемся и другими вопросами, связанными с этой платой. Пишите любые вопросы в комментарии или на наш форум, поможем с вопросами и решением проблем!
First, you need a server that can use the Network File System (NFS). Let’s assume you have a server named adelaide at 192.168.222.34 and it has a share called public that you want to mount at /public on your Pi.
First, install the necessary packages. I use aptitude, but you can use apt-get instead if you prefer; just put apt-get where you see aptitude:
sudo aptitude install nfs-common portmap
(nfs-common may already be installed, but this will ensure that it installs if it isn’t already)
On the current version of Raspbian, rpcbind (part of the portmap package) does not start by default. This is presumably done to control memory consumption on our small systems. However, it isn’t very big and we need it to make an NFS mount. To enable it manually, so we can mount our directory immediately:
sudo service rpcbind start
To make rpcbind start automatically at boot:
sudo update-rc.d rpcbind enable
Now, let’s mount our share:
Make a directory for your mount. I want mine at /public, so:
mkdir /public
Mount manually to test (remember, my server is adelaide at 192.168.222.34 and the share is public):
mount -t nfs 192.168.222.34:/public /public
(my server share path) (where I want it mounted locally)
Now, to make it permanent, you need to edit /etc/fstab to make the directory mount at boot. I added a line to the end of /etc/fstab:
192.168.222.34:/public /public nfs rsize=8192,wsize=8192,timeo=14,intr 0 0
The rsize and wsize entries are not strictly necessary but I find they give me some extra speed.
There are ways you can refer to your server by name instead of by its IP address like we did above. Have a look at /etc/hosts for a starting point. The rest is left as an exercise for the reader.
loop-mounting images
# fdisk -l 2020-02-13-raspbian-buster-lite.img
Disk 2020-02-13-raspbian-buster-lite.img: 1,7 GiB, 1849688064 bytes, 3612672 sectors
Units: sectors of 1 * 512 = 512 bytes
Sector size (logical/physical): 512 bytes / 512 bytes
I/O size (minimum/optimal): 512 bytes / 512 bytes
Disklabel type: dos
Disk identifier: 0x738a4d67

Device                               Boot  Start     End Sectors  Size Id Type
2020-02-13-raspbian-buster-lite.img1        8192  532479  524288  256M  c W95 FAT32 (LBA)
2020-02-13-raspbian-buster-lite.img2      532480 3612671 3080192  1,5G 83 Linux

# mount -o loop,offset=$((8192*512)) 2020-02-13-raspbian-buster-lite.img mountpoint
Raspberry Pi Resources
Not sure where to start?Understand everything about the Raspberry Pi, stop searching for help all the time, and finally enjoy completing your projects.Watch the Raspberry Pi Bootcamp course nowMaster your Raspberry Pi in 30 daysDon’t want the basic stuff only? If you are looking for the best tips to become an expert on Raspberry Pi, this book is for you. Learn useful Linux skills and practice multiples projects with step-by-step guides.Download the e-bookVIP CommunityIf you just want to hang out with me and show your support, you can also join the Patreon community. I share behind-the-scenes content there and give you early access to my content. You’ll also get a shoutout when you join.More details hereNeed help to build something with Python?Create, understand and improve any Python script for your Raspberry Pi.Learn the essentials, step-by-step, without losing time understanding useless concepts.Get the e-book nowYou can also find all my recommendations for tools and hardware on this page.
This tutorial doesn’t work anymore? Report the issue here, so that I can update it!
Should you use Raspberry Pi OS 64-bit?
Your Raspberry Pi Model
There is no point in installing a 64-bit operating system on a 32-bit processor.So, the first thing to do is to check if your Raspberry Pi model is compatible.
If you have a Raspberry Pi 3, 4 or 400, it should be ok.For older versions, you probably have a 32-bit processor, so it’s not worth the effort to switch to the beta version.Get a Raspberry Pi 4 on Amazon at the best price, you won’t regret it. Older models will be limited for many projects, it’s time for an update
Known issues
As I told you, the Raspberry Pi 64-bits system is still in beta.It comes with a bunch of known issues, as stated on the official forum:
- There is no hardware video acceleration in VLC or Chromium
- libraspberrypi0, libraspberrypi-dev and libraspberrypi-doc have been moved out of /opt/vc/* and into /usr/* instead (making it more standard). Any code built against these libraries will require changing to refer to a more standard location (/usr/lib/ rather than /opt/vc/lib)
- In consequence, many packages that expect libGLESv2.so libEGL etc will require rebuilding.
- raspberrypi-bootloader and raspberrypi-kernel contain useless non-64bit binaries and is missing the work done to minimize the delay between files being deleted and installed to /boot
- There is no Wolfram Mathematica built for AArch64
- Minecraft shim layer requires rebuilding
- VLC needs a rebuild (not available)
- VNC server not rebuilt yet for 64bit
You can also expect other bugs depending on the apps you use.Depending on what you intend to do with your installation, you’ll need to make a choice between stability and potential performances.
To be honest, I haven’t seen any issue with YouTube on the 64-bit version. I got no drop in 1080p. So, I don’t know if this list of bugs is really up-to-date or not.
If you find any other issue not listed here, you can check if it has already been reported on GitHub. If an issue hasn’t been reported, post a new one – it will help the developers improve the system.
Performances
If you have a recent Raspberry Pi model and don’t mind the known issues and other bugs, the main advantage of this version is the performances you can expect.Really?
The issue is that most apps on Raspberry Pi OS 64-bit are still built for a 32-bit system. So even with a 64-bit processor on a recent Raspberry Pi model you might not see a major improvement in performances.
In theory, performances should be slightly better on a 64-bit operating system, even with 32-bit apps. But don’t expect a major boost.You’ll see better results for apps that require many calculations to run, but it won’t change anything if the limiter is the available RAM or the SD card speed.
The time to boot was 10% faster on the 64-bit version – it’s only a few seconds saved, so it’s not a big deal.
Master Python on Raspberry PiSale: 10% off today.Get the eBook.Do more with your Raspberry Pi, learn the useful concepts and take the shortcuts.You miss half of the fun of using a Raspberry Pi if you don’t know anything about Python.Download here
Other options
As you may have noticed by now, I’m currently not excited about this Raspberry Pi OS version. I hope they improve it soon, so we can use the full potential of the recent Raspberry Pi models. However, it doesn’t seem to be a priority for the developers.
If you are looking for a 64-bit operating system, you should probably try one of these great options:
- Manjaro
- Gentoo
- Ubuntu
All the links go to my tutorials for these systems. You’ll find a stable 64-bit version of each on their official websites, and truly experience better performances with it.
By the way, I also compared Manjaro, Ubuntu, Raspberry Pi OS and Twister OS in this YouTube video if you want a quick overview:
https://www.youtube.com/watch?v=BdM3N1Ja1-cVideo can’t be loaded because JavaScript is disabled: Raspberry Pi OS Comparison: Ubuntu vs Manjaro vs Twister OS vs Raspberry Pi OS (https://www.youtube.com/watch?v=BdM3N1Ja1-c)
Twister OS is based on Raspberry Pi OS, so not yet available in 64-bit.
If you have any comment, suggestion or just want to chat with us about this tutorial,you can post your messages in the community on Patreon. See you there!
Информация о системе Raspberry Pi OS 64-бит
Настраиваем язык, время, сеть и т. д. и убедившись, что ОС обновлена, мы извлекаем некоторую информацию:
pi@raspberrypi:~ $ cat /proc/cpuinfo
processor : 0
BogoMIPS : 108.00
Features : fp asimd evtstrm crc32 cpuid
CPU implementer : 0x41
CPU architecture: 8
CPU variant : 0x0
CPU part : 0xd08
CPU revision : 3
…
Hardware : BCM2835
Revision : d03114
Serial : 10000000694c8ae2
Model : Raspberry Pi 4 Model B Rev 1.4
|
1 |
pi@raspberrypi~$catproccpuinfo processor BogoMIPS108.00 Featuresfp asimd evtstrm crc32 cpuid CPU implementer0x41 CPU architecture8 CPU variant0x0 CPU part0xd08 CPU revision3 … HardwareBCM2835 Revisiond03114 Serial10000000694c8ae2 ModelRaspberry Pi4ModelBRev1.4 |
У нас есть Raspberry Pi 4 Model B Rev 1.4 с 8 ГБ памяти (редакция: d03114), образ поставляется с 64-битным ядром Linux:
pi@raspberrypi:~ $ uname -a
Linux raspberrypi 5.4.42-v8+ #1319 SMP PREEMPT Wed May 20 14:18:56 BST 2020 aarch64 GNU/Linux
|
1 |
pi@raspberrypi~$uname-a Linux raspberrypi5.4.42-v8+#1319 SMP PREEMPT Wed May 20 14:18:56 BST 2020 aarch64 GNU/Linux |
и мы получаем 64-битные rootfs.
pi@raspberrypi:~ $ file /bin/busybox
/bin/busybox: ELF 64-bit LSB shared object, ARM aarch64, version 1 (SYSV), dynamically linked, interpreter /lib/ld-linux-aarch64.so.1, for GNU/Linux 3.7.0, BuildID[sha1]=fdf7b3dd496e8fd678a0bda5540f9fae4d313d8f, stripped
|
1 |
pi@raspberrypi~$filebinbusybox binbusyboxELF64-bit LSB shared object,ARM aarch64,version1(SYSV),dynamically linked,interpreterlibld-linux-aarch64.so.1,forGNULinux3.7.0,BuildID[sha1]=fdf7b3dd496e8fd678a0bda5540f9fae4d313d8f, stripped |
Все отлично!
Installing
In normal circumstances, you can just power on your Pi and cross your fingers.
If you don’t have a display attached you can monitor the Ethernet card leds to guess activity. When it finally reboots after installing everything you will see them going out and on a few times when Raspbian configures it on boot.
If you do have a display, you can follow the progress and catch any possible errors in the default configuration or your own modifications.
If you have a serial cable, then remove ‘console=tty1’ at then end of the file.
Note: During the installation you’ll see various warning messages, like «Warning: cannot read table of mounted file systems» and «dpkg: warning: ignoring pre-dependency problem!». Those are expected and harmless.
So Many Raspberry Pi Operating Systems!
Want one more suggestion? Find out how to use Twister OS with your Raspberry Pi.
You can do almost anything with a Raspberry Pi, from running a low budget space program to streaming PC games.
While the hardware is good, the Raspberry Pi’s success rests in the wide selection of operating systems available.
With Linux-based operating systems, the legendary RISC OS, Kodi, and even Windows 10 IoT Core, the choice is considerable. Simply choose an operating system, confirm board compatibility, and download.
Ready to go? Here’s how to install a Raspberry Pi operating system and then you can check out this handy Raspberry Pi commands cheat sheet.
12 Useful Ways to Reuse an Old Router (Don’t Throw It Away!)
Old router cluttering up your drawers? Here’s how to repurpose your old router and save some money instead of throwing it away!
Read Next
About The Author
Christian Cawley
(1530 Articles Published)
Deputy Editor for Security, Linux, DIY, Programming, and Tech Explained, and Really Useful Podcast producer, with extensive experience in desktop and software support.
A contributor to Linux Format magazine, Christian is a Raspberry Pi tinkerer, Lego lover and retro gaming fan.
More
From Christian Cawley
Develop Internet of Things Projects With Raspberry Pi
The Raspberry Pi is a great Internet of Things (IoT) platform, thanks to its size, connectivity, and power.
22. Windows 10 IoT Core
Different to the Windows 10 you know, Windows 10 IoT Core OS for Raspberry Pi 3 has no desktop environment. Its purpose is as an Internet of Things development OS. For the best results you’ll need to connect remotely to the Windows 10 IoT Core device from a different PC.
From here, you can deploy software from Visual Studio to it. A Raspberry Pi under Windows 10 IoT Core will also run Python apps. Just remember: Installing Windows 10 IoT Core on Raspberry Pi isn’t a replacement for Linux.
23. Android Things
For more IoT fun, consider Android Things, an IoT development platform version of Android. Use it to connect apps through Google services, access hardware such as displays ands cameras via the Android framework, develop in Android Studio.
A smart alternative to Windows IoT Core, Android Things is a Raspberry Pi 3 operating system only.
How to Rebuild NOOBS
Note that this will require a minimum of 6GB free disk space.
Run Build Script
Buildroot will then build the software and all dependencies, putting the result in the directory.
Buildroot by default compiles multiple files in parallel, depending on the number of CPU cores you have.
If your build machine does have a quad core CPU, but relatively little RAM, you may want
to lower the number to prevent swapping:
- «Build options» -> «Number of jobs to run simultaneously»
If your build machine also has some QT5 components, it is useful to before building to ensure the QT4 component versions are selected.
The Best Raspberry Pi Desktop Operating Systems
It’s estimated that there are over 80 Linux-based distributions for the Raspberry Pi. Most of these are for universal and desktop use.
Note that several operating systems (including Raspbian and Ubuntu MATE) can be installed via the NOOBS installer. Using that tool, you’ll also find media center software and emulation suites, both of which you can find below.
1. Raspbian
Recommended by the Raspberry Pi Foundation, Raspbian is the first stop on the journey of learning with the Pi. Raspbian is packed full of tools and features to make the best universal use of your PCB (printed computer board). It’s also a great introduction to Linux.
Raspbian is part of most Raspberry Pi distros and is compatible with every version of the computer.
2. Ubuntu MATE
If you prefer the more straightforward Linux feel, Ubuntu MATE is available for the Raspberry Pi 2 and later. Featuring support all of the Pi’s hardware including the GPIO and USB booting, Ubuntu MATE has raspi-config pre-installed. Steam Link and Minecraft: Pi Edition are optional extras.
Ubuntu MATE is available for the Raspberry Pi Model B 2, 3, and 3+. See what we thought of Ubuntu MATE on the Raspberry Pi 3.
3. DietPi
Arguably the lightest Raspberry Pi distro available, DietPi runs on a highly optimized version of Debian. DietPi images are as small as 400MB in size, making it three times lighter than the slimline Raspbian Lite.
We took an in-depth look at DietPi to see what’s on offer. DietPi is available for all Raspberry Pi models.
4. Arch Linux ARM
Most Raspberry Pi distros are based on Raspbian, itself a derivative of Debian. Arch Linux is an increasingly popular Linux flavor, aimed at competent users—so it’s not ideal for beginners. Once you’ve got to grips with Raspbian, however, Arch Linux is ideal.
Versions of Arch Linux ARM are available for all Raspberry Pi B boards (original, Pi 2, 3, and 4).
5. FydeOS: Chromium OS for Raspberry Pi
Based on the same code as Google’s Chrome OS, Chromium OS can be installed on netbooks, laptops… and the Raspberry Pi. With Chromium OS installed, you’ll have access to the same cloud-based tools found on Chrome OS.
See our guide on installing Chromium OS on Raspberry Pi with FydeOS.
6. Windows 10 ARM
If you’re looking for a challenge and want to install Windows 10 on your Raspberry Pi 3, you can.
This is thanks to the WOA Deployer, which installs the ARM release of Windows 10 to microSD. This can then be used to boot your Raspberry Pi with Windows 10!
7. Android
Amazingly, it’s also possible to run Android on a Raspberry Pi. That shouldn’t come as much of a surprise—Android seems to run on almost anything, from PCs to set-top boxes. You can even build an Android tablet from scratch for Raspberry Pi.
Various Android builds are available for the Pi, giving you access to the vast collection of Android apps and games. There may be some compatibility issues, but overall stability is good.
Установка операционной системы на Raspberry Pi
Первым делом нам понадобится операционная система (ОС), на которой будет работать наша плата Raspberry Pi, самым популярным и универсальным вариантом ОС для нее сейчас является операционная система Raspberry Pi OS (которая раньше называлась Raspbian).
Актуальный вариант
Начинающим лучше выбирать вариант NOOBS — в этом случае вы попадете на страницу, где вам предложат скачать приложение Imager — которое очень упрощает установку нужной ОС на SD карту для платы Raspberry Pi. Там же находится и ссылка на видео (оно длительностью всего 45 секунд), на котором подробно объясняется как правильно установить ОС для Raspberry Pi с помощью приложения Imager. Вот это видео:
Если же вы более «продвинутый» пользователь, то можно выбрать первый вариант (не NOOBS), в этом случае вы попадете на страницу, где вам предложат скачать один из вариантов Raspberry Pi OS — начиная от самого продвинутого до варианта Lite, который вы потом можете установить на SD карту.
Если же вы прокрутите первоначальную страницу загрузок (https://www.raspberrypi.org/downloads./) вниз, то вы увидите там доступные альтернативные операционные системы для Raspberry Pi.
Устаревший вариант
Если же вам по какой-нибудь причине (а они возможны) необходимо установить не свежую версию Raspberry Pi OS, а ее устаревший вариант Raspbian, то вам необходимо скачать к себе на компьютер архив с образом этой ОС (где его лучше сейчас скачать — к сожалению не знаю) и распаковать скачанный архив (с помощью Winrar или Winzip, к примеру).
После скачивания этой программы установите ее, после этого вы увидите как ее значок появится у вас на рабочем столе.
Чтобы установить операционную систему Raspbian на SD карту, выполните следующую последовательность шагов:
1. Распакуйте скачанный архив ‘Raspbian Jessie’ на рабочий стол своего компьютера, после этого вы увидите файл образа операционной системы как показано на рисунке ниже. Вы должны иметь как минимум 5 Гб свободного места на диске ‘C’ своего компьютера чтобы выполнить эту операцию.
2. Вставьте SD карту в свой компьютер – в соответствующий слот или с помощью USB адаптера если у вас нет такого слота.
3. Произведите форматирование вашей SD карты, для этого выберите опцию быстрого форматирования, установите тип файловой системы ‘FAT32’ и нажмите кнопку ‘Start’ для начала процесса форматирования.
4. После завершения процесса форматирования запустите ранее скачанное приложение “win32diskimager”.
5. В этой программе выберите SD карту, файл образа операционной системы и нажмите на кнопку ’WRITE’ как показано на следующем рисунке.
6. После завершения процесса записи безопасно извлеките SD карту из вашего компьютера.
После этого можете вставлять SD карту в вашу Raspberry Pi и приступать к настройке ОС для нее. Этот процесс мы подробно описали в следующей статье.
How to Install Raspberry Pi OS 64-bit
Download Raspberry Pi OS 64-bit
On the official website and in the Raspberry Pi Imager, you’ll only find the 32-bit version. You need to go directly to this link to find the latest versions available.
Click on the folder for the latest version available and download the ZIP file in it.
Installation
Once downloaded, you can flash the image file on your SD card with Balena Etcher or Raspberry Pi Imager as usual.
Check my tutorial on how to install Raspberry Pi OS here if you need any advice about this.
Master your Raspberry Pi in 30 daysSale: 10% off today.Download the eBook.Uncover the secrets of the Raspberry Pi in a 30 days challenge.Learn useful Linux skills and practice multiples projects.Get it Now!
Overview
On the first boot, you won’t see a difference compared to a 32-bit installation. The welcome wizard will show up as usual, and you’ll find the same applications pre-installed as on Raspberry Pi OS Desktop.
As the image is over 6 months old during writing, there are a lot more updates for the 64-bit version. I have updated from 10.5 to 10.8 (whereas the 32-bit OS is already in 10.8).While updating, there is no doubt we are on a 64-bit OS.
Another thing you will notice is that a few apps are missing in the “Recommended Software” tool. For example, there is no Minecraft Pi or Mathematica that you can install directly from there.These software packages don’t have a build available for the 64-bit operating system.
Except for that, the feedback you’ll have will highly depend on the apps you use on a daily basis. Some of them will be faster, others bugged and for most of them, you won’t notice any change.So, the best thing to do is to try and see how it goes for you :).
You may also like:
- 25 awesome Raspberry Pi project ideas at home
- 15 best operating systems for Raspberry Pi (with pictures)
- My book: Master your Raspberry Pi in 30 days
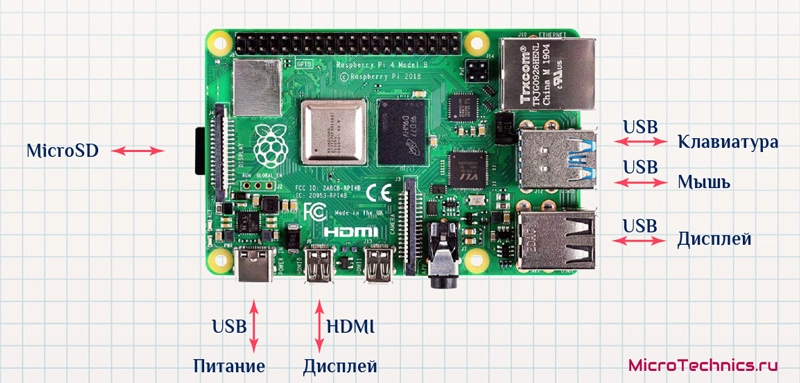
Характеристики Raspberry Pi 4 Model B
Одноплатный компьютер Raspberry Pi 4 model B был представлен 24 июня 2019 г. Модель пришла на смену Raspberry Pi 3+. Новинка получила множество обновлений и превосходит свою предшественницу по производительности.
Основные порты Raspberry Pi 4 Model B
Таблица основных характеристик.
| Описание | |
| Название: | Raspberry Pi 4 Model B |
| Процессор: | Broadcom BCM2711 4 ядра Cortex-A72 (ARMv8)64-bit SoC @ 1.5 GHz |
| RAM: | На выбор модели (LPDDR4-2400 SDRAM):
|
| Питание: | USB Type-C (5V, минимум 3А).Возможно питание через GPIO (5V, минимум 3А). |
| Портыи разъемы | 2 порта Micro-HDMI (одновременная поддержка двух мониторов с разрешением 4K) |
| 2 порта USB 2.0 |
2 порта USB 3.0
1 порт Gigabit Ethernet (RJ45, 1000Base-T)
1 порт microSD (для операционной системы и хранения данных). Рекомендуется использовать карты объемом минимум 8Gb. Протестирована работа с картами до 128Gb.
40 пиновый GPIO (интерфейс ввода/вывода общего назначения). Полностью совместим с предыдущими платами.
3.5мм Audio и Composite Output Jack
CSI Display Connector
CSI Camera Connector
Power over Ethernet (PoE). Требуется внешний PoE HAT.
Беспроводныеинтерфейсы:
Двухдиапазонный WiFi (2.4 GHz и 5.0 GHz IEEE 802.11ac/n)
Bluetooth 5.0, BLE (Bluetooth Low Energy)
Индикаторы:
Встроенные светодиоды: индикация питания, работа с microSD картой, режим работы Ethernet.
Эксплуатацияпри температурах:
от 0 до 50°C
Цена:
в России около 4000-6000 руб в зависимости от объема RAM.В США: 35$ за модель с 1Gb RAM, 45$ — 2Gb, 55$ — 4Gb.
Характеристики впечатляют. Производитель отдельно делает акцент на том, что плату можно использовать в качестве настольного компьютера с подключением двух мониторов. Конечно, нужно отдавать себе отчет в том, что сравнивать малинку с обычным компьютером можно с определёнными ограничениями, но для ряда задач она вполне может заменить настольный компьютер. Пользователь получает крошечный, абсолютно бесшумный компьютер, со встроенным WiFi, Ethernet-портом и четырьмя USB, два из которых USB 3.0.
Написание изображения
Есть несколько различных приложений, доступных для бесплатного использования, которые позволяют записывать ISO-образы на SD-карты. В этом уроке мы будем использовать Etcher.
Etcher — это бесплатная утилита с открытым исходным кодом для записи изображений на SD-карты и USB-накопители, поддерживающая Windows, macOS и Linux.
-
Вставьте SD-карту в привод SD-карты и запустите Etcher.
-
Нажмите кнопку «Выбрать изображение» и найдите zip-файл Raspbian. Если вы загрузили файл с помощью веб-браузера, он должен храниться в папке «Загрузки» в вашей учетной записи. Etcher автоматически выберет SD-карту, если присутствует только один диск. В противном случае, если подключено более одной SD-карты или USB-накопителя, перед прошивкой образа убедитесь, что вы выбрали правильный диск.
-
Нажмите кнопку «Прошивка», и начнется процесс прошивки. Etcher покажет индикатор выполнения и расчетное время прибытия во время мигания изображения. Процесс может занять несколько минут, в зависимости от размера файла ISO и скорости карты.
В Raspbian сервер SSH по умолчанию отключен. Для установки Raspbian без головы вы можете включить SSH , поместив файл с именем ssh без какого-либо расширения в загрузочный раздел. Просто откройте SD-карту в диспетчере файлов и создайте файл.
Это все! У вас есть загрузочная ОС Raspbian на SD-карте.
Сборка корпуса для Raspberry Pi 3
После установки радиаторов остается только установить Raspberry Pi в корпус — и на этом приготовления к запуску можно считать законченными.
Корпус, как и радиаторы, продается отдельно. Конечно, можно обойтись и без него — но будет очень неприятно, если плата микрокомпьютера погибнет преждевременно от разряда статического электричества или будет случайно повреждена каким-то иным образом.
Кроме того, крепление в корпусе придает всей конструкции законченный и эстетичный вид.
Тот корпус, который я купил, сделан из прозрачного акрила (оргстекла) и поставляется в виде набора для самостоятельной сборки.
Состоит он из 6 акриловых пластин: 4 боковушки, днище и подъемная крышка.
Все элементы оклеены с обеих сторон защитной транспортировочной пленкой. Я сначала этого не понял: больно хорошо пленка прилегает к пластинам, нигде нет воздушных пузырей и надрывов. Так что про себя подумал плохо о китайцах, приславших мутный и исцарапанный корпус, и собрал его «как есть» :).
Потом сообразил что к чему, разобрал все обратно на составляющие и снял с них защитную пленку.
Затем снова собрал корпус. Вот такая получилась красота.
Единственный недостаток — такой корпус быстро собирает на себя жирные отпечатки пальцев, что портит вид. Поэтому периодически нужно протирать его салфеткой.
Is there documentation available for Raspbian?
Because Raspbian is closely based on Debian, there is an enormous amount of documentation available for Raspbian. Aside from the Debian.org web site and the wealth of information there, a terrific source of documentation is the recently released The Debian Administrator’s Handbook which is available in hard-copy or as a free download. Note however that the current version of that handbook is based on debian squeeze while the first release of Raspbian is based on Debian wheezy. Therefore there may be differences in some areas.
Any slight differences between Debian and Raspbian or aspects of Raspbian that are unique to the Raspberry Pi hardware will be documented on this web site or on the Raspberry Pi section of the elinux.org wiki.
No space left on device, but I have plenty of free space on my SD card. What do I do?
The first thing to check is that the partition actually fills the SD card. Most images are built with partitions sized to fit on relatively small cards. The Raspberry Pi foundation image contains a tool called raspi-config which contains an option to enlarge the root partition. Other setups may require other procedures to resize the partitions which are beyond the scope of this FAQ.
If there is plenty of space on the root partition then it may be a /tmp issue. On many Raspbian systems, for performance reasons, the /tmp directory is a RAM disk with limited memory. Installers for applications will sometimes fill up this temporary space and you may see messages such as the one below.
cp: writing `/tmp/tmp.XwAcjvnTkE/rfc5834.txt.gz': No space left on device
A way of working around this is to edit the file:
/etc/default/rcS
change the last line from
RAMTMP=yes
to
RAMTMP=no
and then reboot.
Then try reinstalling your package.
Change the line back to RAMTMP=yes when you have finished.
SD-карта, USB-накопитель или сетевая мультизагрузка?
В первые годы существования Raspberry Pi выбор носителя для загрузки операционной системы был только один: SD-карта.
Однако по мере развития платформы добавлялось больше опций. С момента выпуска Raspberry Pi 3 стало возможным программировать плату для загрузки с USB.
Это привело к тому, что флэш-накопители USB, жесткие диски USB (HDD) и твердотельные накопители USB (SSD) заменили карты SD. В случае USB-накопителей это устройства с низким энергопотреблением, подходящие для Raspberry Pi. Однако для большинства жестких и жестких дисков USB требуются независимые источники питания, хотя и с некоторыми исключениями.
Например, команда лабораторий Western Digital (WD Labs) выпустила (в настоящее время более не выпускаемую) линейку жестких дисков PiDrive, которые подключены к разъему питания Raspberry Pi.
Raspberry Pi 3 также представил сетевую загрузку для платформы. Используя PXE (среда Pre eXecution), модели Pi 3 и более поздних версий можно загружать из образов, размещенных на сервере.
15 – CentOS
And the last system I suggest trying on your Raspberry Pi is CentOSCentOS is a well-known Linux distribution for its stability and its respect for Linux best practicesCentOS is based on the Red Hat distribution (like Fedora), so you’ll find many similarities with these systems
They have a version available for Raspberry Pi, and it’s working pretty well on Raspberry Pi 3B+ (not yet available on Pi 4)But if you’re used to Raspberry Pi OS, you must adapt yourself to some CentOS commands and operationLike on Fedora, some management commands are different
You can download 3 different versions: GNOME, KDE or MinimalYou will find all of them on this linkAnd if you need some help or information about CentOS, you can read my post on the subject here
Is there documentation available for Raspbian?
Because Raspbian is closely based on Debian, there is an enormous amount of documentation available for Raspbian. Aside from the Debian.org web site and the wealth of information there, a terrific source of documentation is the recently released The Debian Administrator’s Handbook which is available in hard-copy or as a free download. Note however that the current version of that handbook is based on debian squeeze while the first release of Raspbian is based on Debian wheezy. Therefore there may be differences in some areas.
Any slight differences between Debian and Raspbian or aspects of Raspbian that are unique to the Raspberry Pi hardware will be documented on this web site or on the Raspberry Pi section of the elinux.org wiki.
Заключение
Вот так прошло мое знакомство с микрокомпьютером Raspberry Pi 3.
В следующих статьях цикла будут рассмотрены такие темы как:
- подключение к Raspberry Pi сенсорного TFT-дисплея
- удаленное управление через SSH
- организация домашнего медиацентра
- совместное использование Raspberry Pi и Arduino
- сравнение Raspberry Pi с другими присутствующими на рынке одноплатными компьютерами
А для тех, кто заинтересовался перспективой покупки Raspberry Pi 3 хочу напомнить, что адекватная цена на этот микрокомпьютер колеблется в пределах $35-$40.
Именно по такой цене Raspberry Pi можно приобрести в Китае, в то время как у наших «серых» дилеров розничная стоимость этого микрокомпьютера начинается от 3000 рублей и может достигать 4500 рублей.
Не кормите кучу посредников — заказывайте Raspberry Pi по честной цене в Китае!