Что выбрать: raspberry pi или arduino
Содержание:
- Отличия между Raspberry Pi и Arduino
- Ease of Use on Raspberry Pi Pico vs Arduino
- Working with the Raspberry Pi Pico
- Шаг 6: Настройка остальных частей
- Best for Learning: Raspberry Pi vs Arduino
- Arduino vs. Raspberry Pi: Networking
- Ключевое отличие — Arduino против Малина число Пи
- Шаг 9: Шарнир экрана
- Установка веб-сервера на Raspberry Pi
- Что такое Raspberry Pi?
- Coding Raspberry Pi Pico vs Arduino
- Выбор
- Arduino & Raspberry Pi Community
- Compile and run the program
- Add-ons: Raspberry Pi vs Arduino
- Models for all Projects: Raspberry Pi vs Arduino
- Подключение внешних устройств к Raspberry Pi
- SoC of Raspberry Pi Pico vs Arduino
- Introduction
- Назначение
- Характеристики
Отличия между Raspberry Pi и Arduino
-
Отличие #1. Производительность и многозадачность
В Arduino установлен микроконтроллер, работающий на частоте 16Мгц и имеющий 32Кб постоянной памяти и 2Кб оперативной памяти. Arduino не поддерживает многозадачность, хотя в некоторых случаях многозадачность на Arduino может эмулироваться.
В Raspberry Pi установлен 64-битный процессор, работающий на частоте 1,2Ггц, и 1Гб оперативной памяти. Количество постоянной памяти зависит от объема установленной microSD-карты. Raspberry Pi поддерживает многозадачность. -
Отличие #2. Поддержка подключаемой периферии
Arduino не поддерживает подключаемую компьютерную периферию «из коробки». Распаянный на плате USB-порт служит только для загрузки программы в микроконтроллер.
Raspberry Pi обладает несколькими портами USB, HDMI-разъемом и 3,5мм аудиовыходом, и поддерживает подключение любой компьютерной периферии на уровне ОС. -
Отличие #3. Скорость реакции
Arduino реагирует на все поступающие сигналы в реальном времени, без каких-либо задержек.
Raspberry Pi допускает задержки в реакции на сигналы — незаметные для человеческого восприятия, но могущие быть критичными в некоторых процессах. -
Отличие #4. Потребление энергии
Потребление энергии Arduino измеряется в десятках миллиампер, благодаря чему устройство может работать от батареи или аккумулятора (без внешнего источника питания) длительное время.
Потребление энергии Raspberry Pi измеряется в сотнях и тысячах миллиампер, поэтому без внешнего питания устройство способно проработать от аккумулятора лишь несколько часов. -
Отличие #5. Работа с видео и звуком
Мощности используемых в Arduino микроконтроллеров хватает на синтез звука, но работа с MP3/OGG/WAV невозможна без установки дополнительных модулей. Работа с видео на Arduino невозможна вообще из-за малой мощности микроконтроллера.
Raspberry Pi поддерживает работу с видео и звуком «из коробки», не требуя никаких дополнительных модулей.
Ease of Use on Raspberry Pi Pico vs Arduino
(Image credit: Tom’s Hardware)
Other Raspberry Pi boards are computers. Once we have our OS on the SD card, we use them in the same manner as any computer. But with the Raspberry Pi Pico we see a change of workflow.
No matter our language choice, we need to flash the Pico with an image for that language. This then enables us to write and save code directly to the board. The format of choice for images is UF2, a USB flashing format from Microsoft which has been championed by Adafruit for their CircuitPython range of boards. We just need to press the BOOTSEL button as we plug in the micro USB cable, drop the UF2 file onto the RPI-R2 drive and, in a few seconds, we can start writing code. This ease of use is evident in the MicroPython workflow. Once we have the MicroPython UF2 file on the Pico, we can simply connect using Thonny and start writing code.
The C/C++ workflow is a little more advanced and something that would put off those new to the scene as it requires significant “hoop jumping” in which to create a final product. From a terminal, we need to write the project code in a text editor, then after downloading extra applications and dependencies, we can “build” the project into a UF2 file which is then manually copied to the Pico.
A slightly more automated process is available via Microsoft’s Visual Studio Code, in which we can write the project code and build via just a few clicks. That’s not the most user friendly process for newbies, but this is set to change and it is thanks to Arduino. The Arduino team announced that they are working on an Arduino core for the RP2040. What does this mean? Well it offers the chance to use the Arduino IDE with the Raspberry Pi Pico and other RP2040 based boards
The Arduino IDE workflow has been influenced by years of improvements and feedback; the entire process happens in app with very limited interaction from the user. ore advanced users can change the board, ports and libraries used in a project, features which have seen great improvement in recent Arduino IDE releases.
There are alternatives to the Arduino IDE, including Arduino Create, a cloud version of the IDE which is free for limited use, but to do anything “serious” we need to sign up for a paid plan. The Arduino Create IoT Cloud is a means to create applications based around the Arduino ecosystem and it works exceptionally well, but you will need to invest a little time to learn the process.
How easy to physically use are the Pico and Arduino boards? The first big difference is that the Raspberry Pi Pico comes unsoldered. This is no great issue as it is easy to solder your own pins, provided that you have a soldering iron. Typically Arduino boards comes pre-soldered, with the exception of DIP based board such as the Arduino Nano Every and Nano 33 IoT. With presoldered Arduinos we can start hacking straight out of the box.
Winner: Raspberry Pi Pico
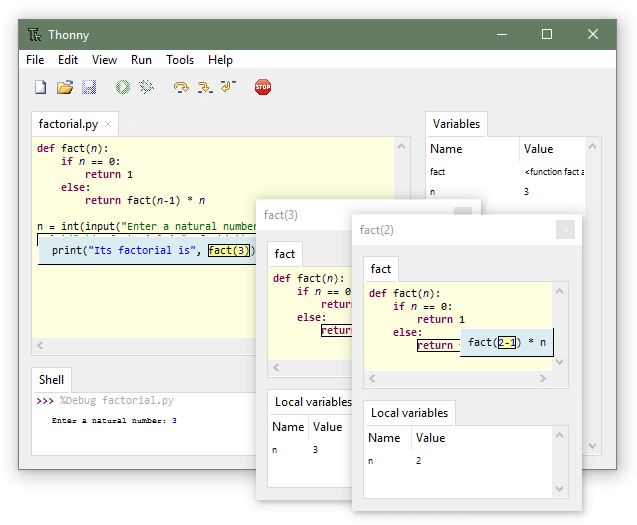
Working with the Raspberry Pi Pico
At launch, the Raspberry Pi Pico is officially supported to be programmed in two languages, C/C++ and MicroPython. Programming in MicroPython is easy, with integrated support with the beginner-friendly Thonny Python IDE.
 Source: Thonny
What about C/C++? Unfortunately, using C/C++ with the Raspberry Pi Pico is not as beginner-friendly as its Python counterparts.
To program the Raspberry Pi Pico in C or C++, you would have to write the code, then build it yourself with terminal tools. Or, you would have to set up a workflow with Microsoft Visual Studio Code extensions to flash the code to the Pi Pico.
As you can guess, it’s not the most user-friendly process, especially for hobbyists. Fortunately, Arduino is about to change this with their port of the Arduino IDE, which features their C++-adapted Arduino programming language
Шаг 6: Настройка остальных частей
Итак, мы создали все основные части, и теперь нам нужно установить меньшие и более простые части.
Начнем с клавиатуры, нам нужно отделить её от корпуса в который она входит (предназначена для использования с 7-дюймовым планшетом). Все, что нам нужно сделать, — это обрезать поддельную кожу вокруг клавиатуры и вытащить ее и ее контур, Вы увидите, что есть 4 провода, которые мы будем паять к нашему USB-хабу позже.
Трек-пэд также нуждается в минимальной настройке. Все, что нам нужно сделать, взять микро-USB-кабель для подключения его к USB-хабу. Наконец, нашему внутреннему Arduino нужно будет иметь пайки на всех его контактах, что проще всего сделать, поставив эти штифты и Arduino на макет, а затем паяя их на место, так как это будет держать их ровно. Тогда мы просто получим еще один микро USB-кабель для подключения Arduino к USB-хабу. Теперь все настроено!
Best for Learning: Raspberry Pi vs Arduino
Though professionals use them for very serious end products, both the Raspberry Pi and Arduino are also designed for educational purposes and that much is clear thanks to the thousands of projects and resources available online. The Raspberry Pi is the clear favorite for education as it works with many different programming languages, can be used to teach core computing concepts and used as a research tool. And you can literally plug it in and run it without an additional computer.
The Arduino ecosystem is geared towards writing code in their preferred programming language to communicate with the board. It does one thing at a time, but it does it really well. In a classroom environment the Raspberry Pi will dominate due to its versatility.
Also, what you learn from working with a Raspberry Pi is infinitely more transferable to other platforms. Python, the most popular language on Pi, runs on Windows, Mac and even Linux web servers. If you’re not using an Arduino board or something compatible, knowing Arduino code isn’t nearly as helpful as knowing Python.
Winner: Raspberry Pi
There may have been two horses in this race, but one was much farther ahead. The Raspberry Pi fits the needs of education. It is cost effective, easy to use, easy to store and it can be used across a plethora of subjects and projects. The Arduino is a great board to learn with but in the classroom versatility and ease of use are the key selling points.
Arduino vs. Raspberry Pi: Networking
The Raspberry Pi 4 Model B has both a built-in Ethernet port and Wi-Fi 5 connectivity, which allows easy access to any network with little setup. Once you’re connected, you can use the operating system to connect to web servers, process HTML, or post to the internet. You can even use it as a VPN or print server.
Unfortunately, Arduino devices typically aren’t built for network connectivity directly out of the box. Though it’s possible, they require a bit more tinkering to set up a proper connection. You’ll need an extra chip (shield) outfitted with an Ethernet port, and you’ll need to do some wiring and coding to get everything up and running just right, which is enough of a process in itself that some vendors sell comparable Arduino devices with a built-in Ethernet component.
Ключевое отличие — Arduino против Малина число Пи
В ключевое отличие между Arduino и Raspberry Pi заключается в том, что Arduino — это плата для разработки микроконтроллеров, а raspberry pi — это компьютер общего назначения, основанный на операционной системе Linux.
Выбор Arduino или Raspberry Pi зависит от разрабатываемого проекта. В этой статье обсуждаются наиболее распространенные Arduino Uno и Raspberry Pi B +. Как правило, по сравнению с Arduino, потребление энергии ниже, а скорость выше в Raspberry pi.
1. Обзор и основные отличия 2. Что такое Ардуино 3. Что такое Raspberry Pi 4. Сходства между Arduino и Raspberry Pi 5. Сравнение бок о бок — Arduino и Raspberry Pi в табличной форме 6. Резюме
Шаг 9: Шарнир экрана
Как ни странно, мы нашли эту часть проекта самой сложной, хотя она кажется такой легкой. Нам нужно сделать очень жесткий шарнир, и легче сказать, чем сделать. Хороший опыт — начать искать, — это старые ноутбуки или экран, вы можете найти их в магазинах БУ техники.
Как только шарниры будут найдены, сделайте надпись на нижней части экрана и в верхней части основания и заполните эти выемки пластичным пластиком, о котором мы говорили раньше. Теперь, пока все части теплые и податливые начинайте толкать шарнир в него и закреплять его на месте. Этот материал сильно засыхает, так что с шарниром никогда не будет проблем.
Если вы допустили ошибку, — используйте фен для повторного плавления пластика, для дальнейшей его замены или удаления.
Установка веб-сервера на Raspberry Pi
Мы будем использовать Raspberry Pi в качестве веб-сервера с nginx. Рассмотрим как установить его и другие компоненты, которые нам понадобятся, например, PHP.
Давайте разъясним некоторые основы. Прежде всего, вам нужны установленная операционная система Raspbian на ваш Raspberry Pi и сетевое подключение. Теперь вы можете подключить к плате клавиатуру и монитор и открыть терминал, или сделать, как я, и делать всё через SSH. Какой бы метод вы ни использовали, помните, что все команды должны выполняться как root; в противном случае вы получите ошибку разрешения. Это делается путем написания «» перед командой. Теперь, когда всё сказано, начнем.
Сначала давайте обновим репозиторий и пакеты. Если вы не знакомы с Linux, это означает обновление места, из которого устанавливаются пакеты (приложения), а затем обновление их самих.
Мы хотим установить NGINX, PHP и git (это необязательно, но сделает вашу жизнь проще). На вопрос отвечаем «y» и жмем Enter.
Теперь нам необходимо изменить каталог NGINX по умолчанию и заставить его работать с PHP.
Вам необходимо, чтобы этот файл выглядел так:
Теперь перезапустим NGINX.
Чтобы проверить, что всё работате, создайте тестовую страницу PHP.
И добавьте в файл test.php следующее.
Теперь откройте в браузере адрес ip_адрес_raspberry_pi/test.php (например, 192.168.0.2/test.php).
Если вы увидели страницу с информацией о PHP, как та, что показана ниже, то всё работает, и можно переходить к следующему шагу.
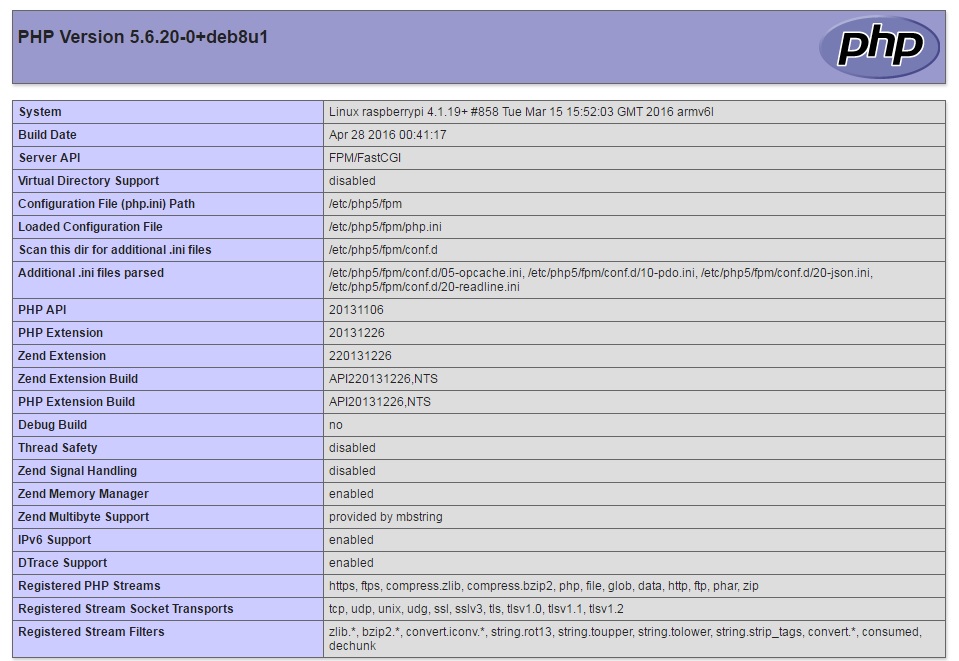 Тестовая страница
Если что-то не работает, то прочитайте этот раздел статьи снова и перепроверьте, может быть, вы где-то ошиблись и сделали что-то не так.
Последний шаг – это ввести следующую команду, которая открывает доступ к последовательному порту пользователю www-data, который используется NGINX.
После этого выполните еще один перезапуск и сделайте перерыв. Вы заслужили это.
Что такое Raspberry Pi?
Raspberry Pi работает под управлением операционной системы (ОС). Это дополнительный уровень программного обеспечения, обслуживающего оборудование. В Arduino приложение запускается непосредственно на микроконтроллере, но в Raspberry Pi приложение должно проходить через ОС для управления оборудованием.
Существуют разные версии, такие как Raspberry pi A, B, B +. Raspberry Pi B + содержит систему на кристалле Broadcom BCM 2836 (SoC). В нем есть процессоры и другие компоненты, соединенные в единую систему. Это процессор Broadcom BCM 2826 на базе ARM. Процессоры ARM являются ядром большинства устройств Интернета вещей. Raspberry Pi можно программировать с использованием таких языков, как Python, C ++.

Он также содержит графический процессор (GPU). Это помогает ускорить графику. Он имеет 40 универсальных входных выходных контактов (GPIO). Есть 4 порта USB и порт RJ45 Ethernet. Для связи с портами Ethernet и USB используется интерфейс USB Ethernet. Также есть разъем для камеры CSI. Порт HDMI помогает подключить устройство к монитору. DSI — это интерфейс монитора для дисплеев. Это альтернатива HDMI. Карта micro SD находится внутри слота для micro SD. Он находится на обратной стороне платы.
Coding Raspberry Pi Pico vs Arduino
(Image credit: Tom’s Hardware)
The Arduino IDE is the go to editor for Arduino projects, but there are alternatives in the form of PlatformIO and Arduino Create, a cloud IDE from Arduino. But the Arduino IDE is still what many use and think of when they see “Arduino.”
The Arduino IDE has improved over the years and now we see built in features such as multiple board management and a means to search and install libraries of packages for add-ons and accessories. Arduino Create is a cloud version of the Arduino IDE. It is designed for IoT projects, but it can still be used to tinker with even the most basic Arduino code. PlatformIO comes in three versions, a command line tool, a dedicated IDE, or it can integrate with your existing IDE for example Microsoft’s Visual Studio Code.
As we noted in our Raspberry Pi Pico review, the new platform has two officially supported languages, C and MicroPython. Currently C/C++ on the Raspberry Pi Pico is a workflow best left for advanced users. In fact, Raspberry Pi officially suggests using MicroPython with the Pico especially for new users.
If you would like to write C code on your Raspberry Pi Pico, then you have two main choices. Write the code in an editor (Vi / Vim. nano etc) and then build the code using terminal tools, or set up Microsoft’s Visual Studio Code and use a number of extensions to create a workflow to build and flash code to the Pico. Both of these approaches are possible but they are not the most user friendly. However, help may soon be at hand via an update to the Arduino IDE with support for the RP2040 chip.
If Python is your preferred language, then you are in luck as the Raspberry Pi Pico supports MicroPython, a version of Python 3 for microcontrollers. At launch, MicroPython can be written in two ways, directly into the Python Shell, known as the REPL (Read, Eval, Print, Loop) or we can use an IDE such as Thonny which has support baked in from version 3.3.0 onwards. The path of least resistance is via MicroPython: we can quickly write and deploy our code from the fantastic Thonny editor and we’re using a standard language that’s very popular and used across a variety of platforms.
Winner: Raspberry Pi Pico
Выбор
Рассмотрев характеристики представленных аппаратов каждый может сделать выбор в том, что лучше подходит для конкретного проекта — Raspberry PI или Arduino. В обоих случаях есть и свои плюсы, и минусы. К примеру, одноплатник стоит относительно дороже, но обеспечивает мультимедийные и интерфейсные возможности из коробки. Его великий минус — энергопотребление, которое может доходить до 2 А (10 Вт) в пиковом режиме работы.
Микроконтроллер же, в своей простоте отличается малой мощностью, но лучшей аппаратной расширяемостью, чем одноплатный компьютер. К примеру, у него элементарно больше аналоговых портов, что означает больше возможностей в деле получения информации от внешних датчиков. Кроме названого плюса — его цена существенно ниже чем даже у самого дешевого Raspberry PI. Опять же, для использования в средах где требуется точное соблюдение временных промежутков в выполняемых процессах он незаменим. Тем и плоха многозадачность Raspberry — в каждый конкретный момент выполняется множество разных операций. И если мощности процессора заняты, требуемое в определенное время действие может задержаться до освобождения ресурсов, что в некоторых случаях становится критичным.
Ну, а про потребление энергии вообще отдельный разговор. Микроконтроллер тратит десятые части ватта, что позволяет использовать его с питанием от батареи очень долгое время. В десятки раз быстрее Raspberry PI разрядит любой аккумулятор, в отличие от того же Arduino.
И еще одна деталь, которая служит существенным минусом у одноплатника. Речь идет о завершении работы. Операционная система требует правильного закрытия всех файлов на внутреннем накопителе, что в свою очередь приводит к специфичному и относительно долгому процессу выключения Raspberry PI или похожих компьютеров. Arduino в данном случае достаточно просто выдернуть из розетки.
В общем, для каждого конкретного случая нужно подбирать логическое устройство индивидуально, выбирая между микроконтроллером и одноплатным компьютером.
Arduino & Raspberry Pi Community
At the end of the day, the most exciting thing about the Arduino and Raspberry Pi coming together on the Raspberry Pi Pico is probably the community.
Both platforms pride themselves on open source, community-based development, and each has their fair share of experienced users. And when it comes to open source development, it is needless to say that more minds are always better.
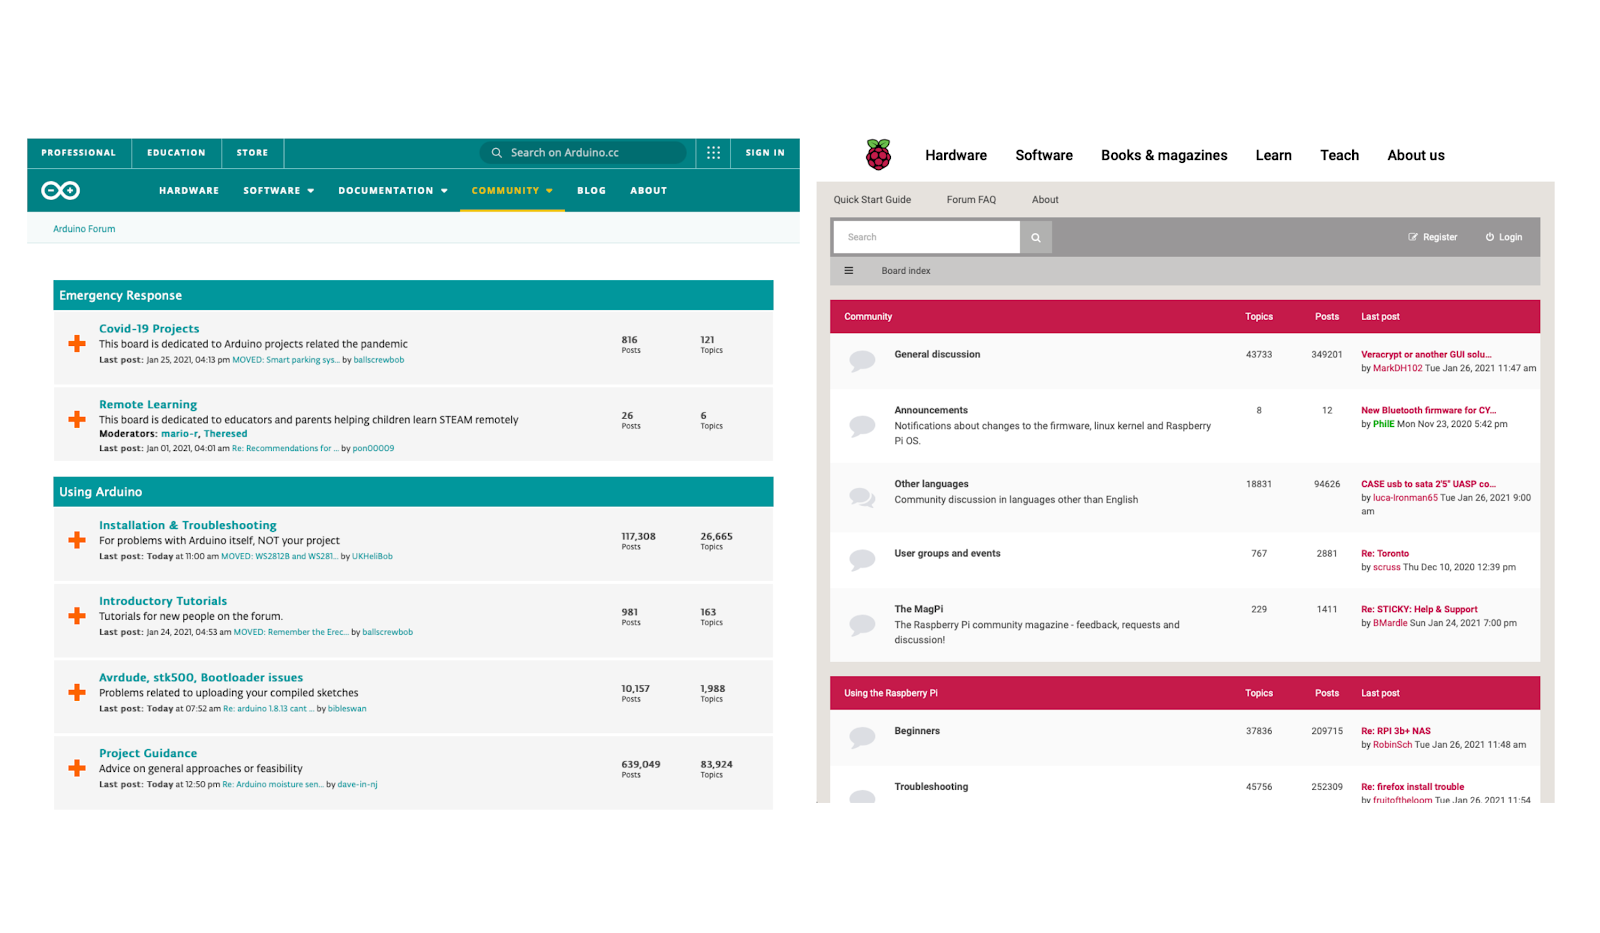
Each of these platforms has its own forums, offering help for any kind of problem you may encounter on your maker journey. This is further backed by thousands upon thousands of tutorials or articles on other online platforms. All the information you need to work with either platform is available with just a simple web search.
With the Raspberry Pi Pico and the upcoming Arduino support, you’ll be able to make use of the information made for both of them. We’re looking forward greatly to seeing what kinds of things will be achieved when two of such brilliant communities come together!
Compile and run the program
Don’t forget to link to the wiringPi library by using -lwiringPi.
$ g++ -o rpi_arduino_wiringpi_i2c rpi_arduino_wiringpi_i2c.cpp -lwiringPi
$ ./rpi_arduino_wiringpi_i2c
I2C communication successfully setup.
Sent data: 17
Data received: 17
Success!
It works!
With only 3 WiringPi functions, you’ve setup the I2C communication, sent a byte, and received a byte.
To go further, you could add more Arduino boards to the I2C bus (by using a different device ID for each one), also configured as slaves. Your Raspberry Pi board, as a master on the bus, would have to setup the communication for each device. After that, everything is the same: you just need to change the device ID parameter in the WiringPi functions, depending on which slave device you’re talking to.
Add-ons: Raspberry Pi vs Arduino
An Arduino Ethernet Shield 2 being used with a Leonardo board. (Image credit: Tom’s Hardware)
The Arduino and Raspberry Pi communities have a vast selection of first and third party accessories. Common add ons for the Raspberry Pi are HATs (Hardware Attached on Top) and mini HATs sometimes referred to as pHATs which connect to the GPIO pins. Add on boards for Uno compatible boards are called Shields and they fit atop the Arduino similar to HATs.
Pimoroni Explorer HAT Pro (Image credit: Tom’s Hardware)
Common between both boards is that they can both use electronic components such as LEDs, resistors and sensors. The Arduino can use many more electronic components as standard, given that the Arduino has analog inputs as standard. For a Raspberry Pi to use analog electronics, such as a potentiometer it would need an Analog to Digital Converter (ADC) such as an MCP3008.
Winner: Raspberry Pi
The Raspberry Pi accessory market dwarfs that of any other board. Third party manufacturers such as Pimoroni, 4tronix, Seeed have fulfilled the needs and desires of learners and makers. All purpose HATs such as the Explorer HAT Pro and Pibrella enable anyone to start using electronics. Specialist robotics boards and AI machine learning boards occupy the other end of the spectrum where advanced users demand more from the machine. The Arduino accessory market is also big, with shields and add on boards providing plenty of choice for the community, but the capabilities aren’t quite as vast.
Models for all Projects: Raspberry Pi vs Arduino
Raspberry Pi Boards of Various Generations (Image credit: Tom’s Hardware)
The Raspberry Pi has seen many models of the years, from the original single-core CPU 256MB Model B back in 2012, to the 8GB, quad-core CPU Raspberry Pi 4 of 2020. Right now, the mainstream model to buy is the Raspberry Pi 4 in 2GB form for $35, but if you don’t need much computing power a Raspberry Pi Zero W goes for just $10 (a Pi Zero goes for $5, but has no Wi-Fi).
Arduino Boards and clones, including the pink ElectroCookie Leonardo (Image credit: Tom’s Hardware)
The Arduino has seen many models in that same period. The Uno, Leonardo, Nano, Due and even a short lived project board with Intel. But the Arduino Uno has remained the go to board for many.
| Raspberry Pi 4 | Raspberry Pi Zero W | Arduino Uno | Arduino Portenta H7 | |
|---|---|---|---|---|
| Price | From $35 | $10 | $23 | €89.99 ($101.88) |
| RAM | 1GB to 8GB | 512MB | 2KB SRAM | Base model: 8MB, Custom: 64MB |
| CPU / Microcontroller | 1.5GHz quad-core ARMv8-A | 1GHz ARM1176JZF-S | 16MHz ATMega328P | STM32H747XI dual Cortex-M7+M4 32bit low power Arm MCU |
| GPIO | 40 | 40 | 14 including, 6 Analog inputs, 6 PWM | 28 including, 7 Analog inputs |
| Storage | Micro SD, USB | Micro SD, USB | 32KB Flash memory | Base model: 16MB Flash, Custom: Up to 128MB Flash storage |
| Network | Gigabit Ethernet, WiFi b/g/n & 5GHz AC | 802.11 b/g/n wireless LAN, Bluetooth 4.1, Bluetooth Low Energy (BLE) | Requires Shield Add On | Murata 1DX dual WiFi 802.11b/g/n 65 Mbps and Bluetooth 5.1 |
| Power | 5V 3A | 5V | 6 — 20V via DC input | 5V via USB C or VIN pin |
Подключение внешних устройств к Raspberry Pi
Отличие Raspberry Pi от Arduino
Среди любителей радиотехники и электроники каждый слышал о существовании таких устройств как Arduino и Raspberry Pi. Обе платы используются для решения схожих задач, оба прекрасно подходят для начинающих. Но по сравнению с Ардуино Raspberry – это многофункциональный компьютер, на котором может запускаться операционная система.
Из основных отличий можно выделить тактовую частоту – Raspberry работает в 40 раз быстрее Ардуино, и объем оперативной памяти – у Raspberry памяти больше примерно в 128000 раз. За счет простоты управления и использования разрабатывать аппаратные проекты на Ардуино предпочтительнее. Ардуино может работать с любыми датчиками или чипами, а Raspberry Pi не такая гибкая, для работы с датчиками требуются дополнительные аппаратные устройства. Raspberry Pi очень требовательна к питанию, напряжение должно быть строго 5 В на входе, в то время как для ардуино рекомендуемое питание 7-12 В, которое стабилизируется до 5 В.
Важное отличие заключается в среде, в которой пишется программа. С Arduino IDE работать намного проще, чем с Linux
Установка библиотек для написания программы требуется для обеих систем, но код на Ардуино будет написан проще и короче.
Raspberry Pi возможно использовать в режиме многозадачности, как обычный компьютер. Одновременно может работать несколько программ в фоновом режиме.
Для расширения возможностей можно совместно использовать обе платы. Для управления датчиками и сенсорами использовать Ардуино, а сложные вычислительные задачи оставить для Raspberry Pi.
SoC of Raspberry Pi Pico vs Arduino
(Image credit: Tom’s Hardware)
The older and more popular Arduino boards are powered by Atmel chips such as the ATMega328P but the later boards now feature Arm CPUs. For example has a dual core Arm Cortex M7+M4 CPU. While the ATMega328 is never going to compete with an Arm processor, it is a reliable chip for projects, proven by the countless number of Arduino projects on offer.
Arm chips are becoming more common with microcontrollers, Adafruit, Seeed and SparkFun have all developed boards with Arm chips. Microcontrollers do not necessarily need multiple cores and fast speeds as they are typically used for a single part of a process.
The RP2040 used in the Raspberry Pi Pico is a level above a typical microcontroller. First of all, we have a dual core Arm Cortex M0+ running at up to 133 MHz, much faster than an UNO’s 16 MHz 328P. SRAM on the RP2040 is 264KB, again much more than the Uno’s 2KB. With only 32KB of flash storage the Uno again falls short of the 2MB found on the Pico.
But how does the Pico shape up against Arduino’s flagship board the Portenta H7? Well the Portenta H7 features a dual core Arm Cortex M7 + M4 that can run up to 480 MHz and have up to 2MB of flash storage and 1MB of RAM. The Portenta H7 also comes with WiFi, Bluetooth, camera interface and a GPU. The Portenta H7 blows the Raspberry Pi Pico out of the water in every way, except the price. Retailing for €89.90 (excluding taxes) which is approximately $109, the Portenta H7 has a high price for the level of tech squeezed within it. To put it into perspective, $109 would buy 27 Raspberry Pi Pico boards.
Winner: Raspberry Pi Pico
Introduction
Raspberry Pi is an amazing minicomputer, and I would love to use it in some projects. There is just one tiny problem. I have little to no experience with Python. I used to do some Python coding a few years ago but only the basics. I’m more experienced in C++, specifically writing programs for Arduino. Wouldn’t it be nice if there was some way for those of us to utilize our Arduino programming skills on Raspberry Pi? Luckily, there is!
In this article, you will learn how to run sketches written for Arduino on Raspberry Pi! To achieve this, we will use RasPiArduino framework. That will allow us to compile the Arduino code into binaries which can run on Raspberry Pi. But before we can do that, we have to prepare a few things, both in the Arduino IDE and on Raspberry Pi.
Назначение
Любое сравнение компьютеров и микроконтроллеров, сторонниками обоих лагерей, начинается с их характеристик. В случае Arduino vs Raspberry PI технические параметры каждого относительно противника можно оценить таблицей:
| Одноплатный компьютер Raspberry PI | Микроконтроллер Arduino | |
|---|---|---|
| Процессор | Broadcom | ATMega |
| Частота | 700–1500 МГц | 16 МГц |
| Количество ядер | 1–4 | 1 |
| Память | 512–4096 Мб оперативной | 32 Кб flash, 1 Кб EEPROM, 2 Кб оперативной |
| Сеть, включая глобальную | Есть | Требуется использование дополнительных шилдов и базовые знания сетевого взаимодействия |
| Потребление энергии | 10 Вт | 0.33 Вт |
| Режим работы | Многозадачность | Реальное время |
| Наличие сред разработки | Множество в рамках применяемых в Linux и способных компилировать код для ARM-процессоров | Arduino IDE, AtmelStudio или похожие в случае клонов платформы |
| Звук | Все мультимедийные возможности большого ПК | Если нужен вывод чего-либо отличающегося от нескольких звуковых сигналов разных частот, необходимо использовать внешние платы расширения |
| Видео (обработка) | Есть | Нет |
| Периферия | Стандартная, предназначенная для работы с ПК | Подключается только с использованием специальных для каждого типа устройств шилдов. |
| Внешний источник хранения данных | SD-карта | Через плату расширения SD-карта |
| Управление контактными цепями (ШИМ-периферия) | Нет или сильно ограничено у клонов | Есть |
| Подключение аналоговых датчиков | Только через дополнительные платы расширения | Есть |
| Операционная система с интерфейсом пользователя | Linux, Android | Нет |
| Порты | GPIO 26–40 pin, UART, i2c | 14 цифровых, 6 из которых можно использовать как ШИМ, 6 аналоговых, USB, ICSP. У некоторых моделей больше. |
| Цифровые порты (ПК) | USB, mini HDMI, Composite | USB |
| Встроенный видеоадаптер | Есть | Нет |
Контекст вышесказанного нужно понимать не только как сравнение конкретно платформ Raspberry PI и Arduino, но и в общем смысле проведения параллелей между одноплатными компьютерами и микроконтроллерами. Последние, конечно, проигрывают в мощностях, набирая свое только за счет экономного использования энергии и широкого спектра подключаемых дополнительных плат.
Еще одним преимуществом, которое часть специалистов считает недостатком, служит выполнение задач реального времени, которые в не специализированных ОС произвести сложно, а микроконтроллер их осуществляет изначально. Может для DIY проектов последнее и не критично, тем не менее фактор может иметь значение в линиях производств, связанных непосредственно с изготовлением химической продукции, топлива или иных процессов требующих точного соответствия процедур действий определенным промежуткам времени. Сюда, по большому счету можно отнести технологии, связанные с авиацией, космосом, судоходством, автомобилями и прочими критичными нишами использования высокоинтеллектуальных устройств.
Теперь немного о цене владения. Тут пока лидирует Arduino, который на порядок дешевле конкурента. Посудите сами, сравнив цены типовых Raspberry PI:
| Модель | Цена |
|---|---|
| Raspberry PI 3 B | 4399 |
| Raspberry PI 4 B | 5199 |
с распространенными моделями Arduino:
| Arduino UNO R3 | 270–350 |
| Arduino MEGA 2560 R3 | 670–5000* |
*есть платы-аналоги, производимые сторонними изготовителями, а есть именно заводы Arduino. Оригинальные микроконтроллеры понятно дороже, хоть и не факт, что они лучше качеством.
Характеристики
- Микроконтроллер: RP2040
- Ядро: 2× ARM Cortex-M0+ (32 бита)
- Тактовая частота: 133 МГц
- Flash-память: 2 МБ
- SRAM-память: 264 КБ
- Пинов ввода-вывода всего: 26
- Контакты с АЦП: 3
- Разрядность АЦП: 12 бит
- Контакты с ШИМ: 16
- Разрядность ШИМ:
- Каналы DMA: 12
- Контакты с программируемым I/O: 8
-
Аппаратные интерфейсы:
- 2× UART
- 2× I²C
- 2× SPI
- 2× PIO
-
Встроенные периферийные устройства:
- Часы реального времени (RTC)
- Датчик температуры
- Напряжение логических уровней: 3,3 В
-
Входное напряжение питания:
- Через USB: 5 В
- Через пин VSYS: 1,8–5,5 В
- Габариты платы (без ног): 52,7×21×3,6 мм
- Габариты платы (с ногами): 52,7×21×12,3 мм