Raspberry pi 4 ubuntu server / desktop 18.04.4 image (unofficial)
Содержание:
- 15 – CentOS
- What’s next
- USB booting
- Ставим Zabbix 4.0
- Prerequisites
- That’s all, folks!
- Step 7: Install the Desktop Components (GUI) on an Ubuntu Server
- OS Category: Entertainment
- Root file system on a USB disk
- Boot Ubuntu Core
- Step 5: WiFi Setup Using Netplan
- Ubuntu Server Installation
- How to Install Ubuntu MATE on Raspberry Pi 3
- Install a desktop
- Step 7: Create Auto-Decompression Script
- How To Install Ubuntu To An SD Card
- Install Ubuntu 16.04 LTS
15 – CentOS
And the last system I suggest trying on your Raspberry Pi is CentOSCentOS is a well-known Linux distribution for its stability and its respect for Linux best practicesCentOS is based on the Red Hat distribution (like Fedora), so you’ll find many similarities with these systems
They have a version available for Raspberry Pi, and it’s working pretty well on Raspberry Pi 3B+ (not yet available on Pi 4)But if you’re used to Raspberry Pi OS, you must adapt yourself to some CentOS commands and operationLike on Fedora, some management commands are different
You can download 3 different versions: GNOME, KDE or MinimalYou will find all of them on this linkAnd if you need some help or information about CentOS, you can read my post on the subject here
What’s next
We are working to do a lot more to improve the user experience of Ubuntu on Raspberry Pi. This tutorial was non-typical. Usually, tutorials live at ubuntu.com/tutorials, where you can find ‘how-tos’ on getting , or other projects, like building a Raspberry Pi cluster using MicroK8s.
This tutorial utilises Ubuntu Core, Ubuntu Core is not developer-friendly, we recommend its use for appliances, for fire-and-forget devices and for production. If you want to try other applications or build applications for the Raspberry Pi on Ubuntu we recommend you look into snaps and Ubuntu Server and take it from there.
USB booting
The Raspberry Pi 3 (and Pi 2 v1.2 with the same BCM2837 SoC as the Pi3) is capable of booting from a USB drive. To do this you’ll first need to program USB boot mode (this is unnecessary on the 3B+ as USB booting is on by default). For the original Pi 2, or if you are having problems with USB booting, then you can copy the bootcode.bin file to an SD card and place all other files on a USB drive.
You must have bootloader files (confusingly referred to as the firmware on the Raspberry Pi) from after April 2017. So if necessary .
Edit the cmdline.txt file and change root=/dev/mmcblk0p2 to root=LABEL=writable (or root=LABEL=cloudimg-rootfs for the raspi2 images). If you are using a lot of drives then you may wish to switch to using the UUID of the partition.
If you haven’t already done so, , as Ubuntu’s u-boot script is hard coded for SD card use.
Ставим Zabbix 4.0
Создаем пользователя и базу для zabbix в MariaDB под рутом:
Далее устанавливаем zabbix
Импортируем схему и данные (вводим пароль от базы zabbix)
Редактируем конфиг:
Добавляем туда пароль от базы zabbix
Чтобы при перезагрузке сервера zabbix не вешал на пол часа систему из-за того MariaDB успела остановиться раньше чем zabbix (в этому случае zabbix будет пытаться долго и упорно сконнектиться с базой) — прописываем в настройках сервиса что требуется mysql:
В редакторе прописываем следующие строчки и сохраняем файл:
Стартуем сервер и агент zabbix и прописываем в автозапуск
Далее настраиваем фронтенд для zabbix, редактируем конфиг zabbix для апача
прописываем нашу таймзону там где комментарий # php_value date.timezone Europe/Riga и рестартуем апач
Выставляем права на файлы zabbix
Заходим в веб-морду zabbix http://raspberry-ip/zabbix/ и прописываем настройки zabbix, после завершения входим с дефолтными пользователем и паролем:
Username: Admin
Password: zabbix
Меняем сразу пароль на свой.
Качаем этот архив, распаковываем. Файл userparameter_rpi.conf копируем в папку /etc/zabbix/zabbix_agentd.d , а файл rpi_zabbix_cputemp.xml импортируем в шаблоны zabbix (Настройка-Шаблоны-Импорт). Добавляем импортированный шаблон «Raspberry PI CPU Temperature» — Настройка-Узлы сети-Шаблоны.
Перезапускаем агент:
Prerequisites
Verify Power Supply Size (3.5A strongly recommended)
Check your Raspberry Pi’s power supply size and make sure it is delivering at least 3.5A. There are a lot of USB C adapters for the Raspberry Pi that are only 3.0A. These will typically work fine, until you plug in something like a SSD which draws power from the Pi and there is nothing left to give.
Most SSDs are quite power efficient but HDDs draw significantly more. Older generations of SSDs used quite a bit more power than newer ones as well. If you are using an older drive or a drive that you know is power hungry you need to pay extra attention to having a quality power source with plenty of capacity.
A good alternative option to relying on the Pi to power the drive is using a powered USB hub* so your drive doesn’t need to draw power from the Pi’s limited power budget. Make sure you get one that is compatible with the Pi as some powered USB hubs won’t work properly with it so check the reviews and do your research to make sure people are using it successfully with the Pi.
Using a 3.5A power supply* or powered USB hub* will ensure your drive is getting enough power without impacting the Pi’s stability.
Recommended Power Solutions
Sabrent Powered USB 3.0 Hub
The Sabrent powered USB hub delivers a whopping 2.5A of dedicated power for your USB attached devices. This is almost as much as the Pi adapter itself is rated for (3.0A). It will easily power the most thirsty of setups such as NVMe enclosures.
Links: Amazon.ca*, Amazon.com*, Amazon.com.au*, Amazon.co.uk*, Amazon.es*, Amazon.it*, Amazon.nl*, Amazon.pl*, Amazon.se*
Note: Make sure Amazon doesn’t try to take you to the non-powered version and that it’s the one with the AC adapter that plugs in to provide extra power
CanaKit 3.5A Power Adapter
The CanaKit 3.5A adapter has an extra half an amp (500 mA) of capacity to give some breathing room to your accessories. This is bigger than the official Pi power supply which provides 3.0A.
Links: Amazon.ca*, Amazon.com*, Amazon.com.au*, Amazon.com.mx*, Amazon.sg*
Verify Storage Adapter Compatibility
You will need a USB 3.0 storage adapter. See my other article on USB booting not specific to Ubuntu for a lot more details on the storage adapters!
Get Latest Raspbian & Updates
To update your bootloader / firmware you should use Raspbian on a SD card. Right now support in third party operating systems to do anything with the new Raspberry Pi 4’s firmware or bootloader is very limited / nonexistent. You can use a third party operating system later once you set the boot mode, but to actually make these changes we will use official Raspbian.
First make sure that you have the absolute latest updates and firmware for the Pi. To upgrade all your packages and firmware to the latest version use the following command:
Once the update has completed restart your Pi with a sudo reboot command to apply the latest firmware / kernel updates.
Verify EEPROM Bootloader is up to date
We can check if your Pi’s bootloader firmware is up to date with the following command:
If your Raspbian is *very* out of date you may not have this utility and can install it using:
The output from rpi-eeprom-update will look like this if you are not up to date:
If it says any updates are available they be installed manually by adding ‘-a’ to the end of our previous command like this:
After the updates finish installing restart your Pi as firmware updates will not be applied until after a reboot. Now if you run rpi-eeprom-update to check for updates again it should say you are on the latest and up to date!
Changing rpi-eeprom’s Release Channel
Note: As of February 16th the firmware available in the “critical” branch is new enough to USB boot so I no longer recommend changing this. One reader even let me know in the comments that on the “stable” channel his storage was getting corrupted prompting a full reinstall!
By default you will only receive updates from Raspbian’s “critical” channel. This is a very conservative firmware update channel that will only give you very well tested firmware updates that are considered critical fixes for the device. Another channel that is available is “stable”.
Carlos and other commenters have reported that the current “critical” firmware didn’t work for them and they had to upgrade to the “stable” channel.
To switch to the stable channel we are going to edit the file /etc/default/rpi-eeprom-update:
Change the line FIRMWARE_RELEASE_STATUS=”critical” to:
Now you can run sudo rpi-eeprom-update and you should see a new update available.
That’s all, folks!
You are done! Up and running on Ubuntu Server.
For more details about Raspberry Pi specific packages included with this image and further customisations, such as accelerated video drivers and optional package repositories, you can refer to the .
You also might want to install some software on your Pi. Ubuntu has extensive repositories available, that you can browse at packages.ubuntu.com. You can also use the snap command to install snap packages. The Snap Store is where you can find the best Linux open source and proprietary apps to install on your Raspberry Pi and get started with any project!
Was this tutorial useful?
Thank you for your feedback.
Step 7: Install the Desktop Components (GUI) on an Ubuntu Server
Ubuntu server is designed to use minimal resources. A GUI will lead to high resource usage, however if you still want a GUI, you can install only what’s required. Sometimes you need the GUI on your Ubuntu server to handle simple day-to-day tasks that need quick interaction without going deep into the server settings. You also do have the option of installing a desktop environment. Install the default Unity desktop environment with the following command:
sudo apt-get install ubuntu-desktop
sudo apt-get install --no-install-recommends ubuntu-desktop
To install a very lightweight desktop environment run bellow command
sudo apt-get install xubuntu-desktop
or
sudo apt-get install lubuntu-desktop
Afterwards type
sudo reboot
and you are done. Congratulations. You successfully installed Ubuntu desktop on Ubuntu Linux server.
OS Category: Entertainment
Not everyone with a Raspberry Pi 4 wants to use it for daily computing or tasks. Many buy the Top OS Raspberry Pi 4 to power a media center or mini-game console. Subsequent operating systems frequently require larger microSD cards and may require active cooling solutions to run efficiently.
RetroPie

Retro Pi
The RetroPie project seeks to turn your Raspberry Pi into a gaming machine retro console. Raspberry Pi 4 owners may exploit the Pi 4’s enhanced horsepower to reproduce any of the over 50 consoles in the default package. With multiple contributions since the project began earlier this decade, the RetroPie community is strong and supports users of all Raspberry Pi models. The well-documented setup and settings of this OS make installation a breeze.
- Installation process: Requires host OS (Linux, macOS, or Windows) to format the microSD card. The graphical wizard completes the setup process on the first boot.
- Software store availability: Yes, through the APT or Snap commands
- Minimum SD card size: 8 GB
OSMC

OSMC
The Open Source Media Center, or short OSMC, is a free, open-source operating system that enables you to quickly change your Top OS Raspberry Pi 4 into your own personal media center that supports most multimedia types. Although the OSMC image is officially installed via the simple Mac or Windows installer, you can download and flash the OSMC image to your SD card directly. OSMC generally makes playing or streaming video from numerous sources exceedingly simple and efficient.
While the setup process is basic, the wiki on their website is relatively restricted, and you may need to rely on the community for specific responses.
- Installation process: Requires host OS (macOS and Windows officially supported) to flash the SD card and program main OS settings. The graphical wizard completes the setup process on the first boot.
- Software store availability: Yes, through the “add-on browser.”
- Minimum SD card size: 8 GB minimum, 16 GB if you plan to install several apps and add-ons
Kano

Kano Pi
Kano, the educational technology startup, lets all Raspberry Pi users download its Kano OS. This OS gives access to the Kano software suite, aimed to teach people of all ages how to code in an engaging, collaborative environment. While Kano does not expressly support the Raspberry Pi 4 when authoring, most community users claim that the OS runs successfully on the Pi 4 with very few limitations.
Kano users form an online portal around “Kano World,” where users can learn to code and share their work. Overall, it’s a terrific approach to expand your coding and software development principles understanding.
- Installation process: Requires host OS (Linux, macOS, or Windows) to format the microSD card. The graphical wizard completes the configuration process on the first boot.
- Software store availability: Yes, through their app store
- Minimum SD card size: 8 GB
Lakka

Lakka OS for Raspberry Pi
The Lakka OS team makes it easy and uncomplicated to flash their lightweight retro game OS onto an SD card for your Raspberry Pi 4. Like RetroPie, Lakka uses RetroArch’s front-end emulator to emulate over 50 consoles. However, because Lakka is built on LibreELEC OS lightning-fast operating system, users should expect a streamlined, better frame rate experience than RetroPie with less customization and fewer new features.
For Lakka users, less community aid seems to be available than for RetroPie users. Lakka users will need to rely more on detailed, thorough online documentation. Simultaneously, Lakka simplifies updating by including built-in patches similar to those seen on newer consoles.
- Installation process: Requires Host OS (Linux, macOS, or Windows) to format the microSD card, or it can be installed through NOOBS. Setup completes in the background on the first boot and requires a restart.
- Software store availability: None
- Minimum SD card size: 8 GB
Root file system on a USB disk
As of bullseye/linux 5.10.13-1, the xhci/USB3 controller is not initialized until the reset_raspberrypi is loaded. This is by default not included in the initramdisk, making it impossible to use a usb disk as root filesystem. To make it work create an updated initramdisk by booting the Raspberry Pi from a MicroSD card or via network with the same kernel. Add reset_raspberrypi to /etc/initramfs-tools/modules of the running file system and run update-initramfs -k all -u () Then copy the new /boot/initrd.img-{kernel}-amd64 to same location on your USB disk.
(Editor’s Note 2021-06: This does not seem to be case for EFI installs in as long as the flashed bootloader is current)
Boot Ubuntu Core
Insert the flashed SD card into your Raspberry Pi. Attach your monitor and keyboard to the Pi and connect it to your power source. Then, follow the instructions on screen.
- Press enter to configure
- Press OK to configure the network and setup an admin account on this all-snap Ubuntu Core system
- If you are using ethernet you simply need to connect your ethernet cable and select done. If you are wanting to use a local wifi network, use the arrow keys on your keyboard to navigate to wlan0 and hit enter. Here you will be able to configure your wifi settings.
- Select “Done” and the network config will progress.
Note: For this simple tutorial you will only need to input your network SSID and password. Once you have done that you won’t need to do any other network configuration. Using DHCP for IPv4 is fine.
- Next, you will need to enter the email address that is connected to your SSO account
Note: Don’t dawdle, for security reasons if you’re inactive for more than a minute the Pi will ask you to start over.
Now, if you made an SSO account for the first time during this tutorial, you will not have any SSH keys. If you don’t have any SSH keys follow this next step. If you do, feel free to jump to the next section.
Generating an SSH key pair
For this, you need to open a terminal on your computer and run the following commands:
This will generate a 2048-bit RSA key pair, which is secure enough for most use cases (you may optionally pass in the flag to the command, to create a larger 4096-bit key). You’ll see what this actually means in a few moments.
After entering the command, you should see the following output:

Press ENTER to save the key pair into the directory in your home directory or specify an alternate path.
If you had previously generated an SSH key pair, you may see the following prompt: “If you choose to overwrite the key on disk, you will not be able to authenticate using the previous key anymore.” Be very careful when selecting “yes”, as this is cannot be reversed and your existing key will be overwritten.
You should then see the following prompt:

Here, you enter a secure passphrase. A passphrase adds an additional layer of security to prevent unauthorized users from logging in.
You should then see something like the following output:

You now have a public and private key that you can use to authenticate. The next step is to place the public key on your Raspberry Pi so that you can use SSH-key-based authentication to log in.
So, now you will need to copy the contents of the file you just created to this site: https://login.ubuntu.com/ssh-keys
To do so you can run:
In the terminal and copy the result into the text field on the website. Click import and if you have copied everything correctly you will have the key set up.
Step 5: WiFi Setup Using Netplan
Starting from Ubuntu 18.04 LTS, Ubuntu uses Netplan to configure network interfaces by default. Netplan is a utility for configuring network interfaces on Linux. Netplan uses YAML files for configuring network interfaces. YAML configuration file format is really simple. It has clear and easy to understand syntax.
To be able to setup Wifi on Raspberry Pi, you first need to get the name of the wifi card by showing physical components using the following command:
sudo lshw
In my case it was wlan0. Then navigate to /etc/netplan/ using the cd command
cd /etc/netplan/
Edit the Netplan YAML configuration file /etc/netplan/50-cloud-init.yaml with the following command:
sudo nano 50-cloud-init.yaml
Add your WiFi access information. Make sure not to use tab for space, use the spacebar to create the blank.
# This file is generated from information provided by
# the datasource. Changes to it will not persist across an instance.
# To disable cloud-init’s network configuration capabilities, write a file
# /etc/cloud/cloud.cfg.d/99-disable-network-config.cfg with the following:
# network: {config: disabled}
network:
version: 2
ethernets:
eth0:
optional: true
dhcp4: true
# add wifi setup information here …
wifis:
wlan0:
optional: true
access-points:
«YOUR-SSID-NAME»:
password: «YOUR-NETWORK-PASSWORD»
dhcp4: true
Change the SSID-NAME and the YOUR-NETWORK-PASSWORD with your information. Close and save the file using ctrl+x and press yes.
Now, check whether there’s any error in the configuration file with the following command:
sudo netplan –debug try
If any error encounters then you can check with this command for detailed error information.
sudo netplan --debug generate
Apply the configuration file with the following command:
sudo netplan --debug apply
Finally, reboot your PI
sudo reboot
Ubuntu Server Installation
After this short introduction, let’s move into installation!
Download Ubuntu
Ubuntu exists in three versions for PC :
- Desktop (the traditional environment with a graphic interface)
- Server (something minimal close to Raspberry Pi OS Lite)
- Core (for IoT projects)
On Raspberry Pi, only there are a two versions available: Server and Desktop.But you can install the Server version and add a Desktop environment later, and I will show you how.
Here is the download link to Ubuntu for Raspberry Pi.They now release the Raspberry Pi version almost at the same time of the official release for PC. So, you’ll always find the latest one on this link.
Choose the one you prefer and click on the Download button.The desktop version is a little further down the page.For your information, I’m writing this post while testing on my Raspberry Pi 4.
Flash the SD card
Now, you need to flash the SD card as usual.I recommend using Etcher to do this, as it’s very intuitive:
- Download Etcher here if you don’t have it yet.It’s available on any operating system.
- Install Etcher (double-click on the downloaded file on Windows).
- Start it, a window like this will appear:
- On the left, click on select image and browse to the Ubuntu image location.
- Then insert your SD card into your computer.
- And click “Flash!” to start the SD card creation process.
After a few minutes, the SD card is ready to use!
Master your Raspberry Pi in 30 daysSale: 10% off today.Download the eBook.Uncover the secrets of the Raspberry Pi in a 30 days challenge.Learn useful Linux skills and practice multiples projects.Get it Now!
First boot
- Insert the SD card in your Raspberry Pi.
- Start it and wait a few minutes.
- On the login screen, enter the default username and password: ubuntu / ubuntu
- Follow the instructions to change it to something different:
On the Server version you arrive at an almost empty system, with many packages missing.Yes, it’s the principle of a minimal version, but I like to have at least the basics :).The following tips might help you to get started (by the way, if you installed the Desktop version, a graphical wizard will guide you, so you can probably skip the next sections).
If you plan to use Wi-Fi on this installation, it’s almost impossible to configure it right now (at least on 19.10).So, I recommend starting with an RJ45 cable if you can.If not, check the next paragraph to learn what you will need to configure.
Once connected to your network, the first thing to do is to update the system:
Note: if like me you don’t have a QWERTY keyboard, you can edit the /etc/default/keyboard file and set the XKBLAYOUT option to fit your hardware.
Wi-Fi configuration
Here is how to configure the wireless connection on your Raspberry Pi with Ubuntu Server.If possible, I recommend doing this from your computer by using SSH, so you can copy and paste the commands and configuration.
Anyway, here is what you need to do:
- Install the needed packages:
- Then, edit the /etc/network/interfaces configuration file:
- The file is empty, paste these lines into it:
- Save & exit (CTRL+X).
- Enable the Wi-Fi interface:
- It should work immediately (use ifconfig to check).If not, reboot your system:
From here, there is no big difference with a Raspberry Pi OS Lite system.You can use the classic Linux commands to manage your device (except the Raspberry Pi ones, there is no raspi-config on Ubuntu).
In the next part, I will show you how to upgrade this Server version with a Desktop interface.I just need to inform you that I didn’t manage to have Wi-Fi working in Gnome, so if it’s your only available connection method, it’s probably better to seek a solution before. I do give you a workaround in the next part, but it’s not perfect.
You may also like:
- Top Raspberry Pi HATs to easily add new features
- Can a Raspberry Pi 4 really Replace your Desktop PC?
- My book: Master your Raspberry Pi in 30 days
How to Install Ubuntu MATE on Raspberry Pi 3
Connect all the necessary components to your Raspberry Pi 3 board including the Pi display, keyboard, mouse, power adapter, Micro SD card, etc.
You need to create an Ubuntu SSO account for creating the first user after the Ubuntu Core image installation. So, create the account and import the SSH key of Raspberry Pi 3 in that. Then, follow the steps below:
Step-1: Download the Ubuntu MATE Image
- On your device, open the Raspberry Pi web browser.
- Go the site ‘http://ubuntu-MATE.org’ and click on the Raspberry Pi image in the center.
- A new Raspberry Pi specific page for downloading Ubuntu image will open. Click on the ‘Download Ubuntu MATE’ button.
- Choose your architecture (here Raspberry Pi) and click on the version 16.04.2 (Xenial).
- Then select your downlink to begin the image download.
If you have done this process on your PC, then copy the downloaded file on the Micro SD card and then insert it into your Pi board.
Step-2: Write the Ubuntu Image
You can directly write the image to the Micro SD card like you for the Raspberry Pi image. You can take help of some commands if you are using Linux environment or can use Win32 Disk Imager or 7-Zip application if you work in Windows OS.
Step-3: Boot up the board & Install Ubuntu MATE on Raspberry Pi 3
Now, it is the time to boot your circuit board. Reboot the Raspberry Pi, if it is already up and running. Connect the HDMI monitor to your Pi for watching what happens when you boot it up.
You can also do this without the monitor. You just need to remember the IP address of your board. Check my blog on how to find Raspberry Pi IP address in case if you don’t know.
After booting up your Pi, the Ubuntu MATE will also boot up automatically. When you see the screen showing window of ‘System Configuration,’ then follow the process below:
- Click on the ‘Continue’ button after you pick your language.
- Again click ‘Continue’ after choosing the nearest location to you on the map screen.
- Create the username and password to begin the process.
- When you see a message of the keyboard settings auto-detected, then select ‘Continue.’
- The system will reboot automatically after the installation process completed. Enter the username and password to access Ubuntu MATE on Raspberry Pi.
Conclusion
If you don’t know about the coding in Linux environment, then don’t worry. There are tons of online resources available which will guide you from starting up your PC to run the complex of codes to finish such process.
The Ubuntu MATE works great on the Raspberry Pi 3, and so I decided to use it for some time more. Though the official Raspbian is the most famous and widely used Operating System for Raspberry Pi, with the help of such guide and YouTube videos, you should try not-so-common distros on your board. Because every platform delivers unique and superior performances than the others at some particular stage.
Let me know your thoughts in the comment section below. Also if you know any other quick & easy process to install Ubuntu MATE on Raspberry Pi 3, then share your experience here.
Install a desktop
First you need to ensure your packages are updated to the latest version, run:
Then, you can use the command to install a desktop environment.
Here are some popular and lightweight options:
If you run into issues with either of these check out this blog. We’re working on fixing this imminently.
Learn more about Ubuntu flavours.
Once the install finishes, reboot your pi with:
And your new desktop will come up automatically
Alternatively, if you now decide you want an Ubuntu Desktop proper, a full-fat version, you can head over to our other tutorial to re-flash your Raspberry Pi with the Ubuntu Desktop.
Step 7: Create Auto-Decompression Script
During an update to Ubuntu or one of its many packages, apt will create a new kernel image. This image will be compressed, and will cause the Raspberry Pi not to boot after the update. In order to fix this, a script needs to be created to decompress the new kernel images after updates.
Create a script called auto_decompress_kernel in the boot partition. This can be done with most text editors. In Linux, I would recommend either nano or Atom, in Windows I would recommend Atom (Note for you Windows users using Text Edit, be sure to remove the «TXT» file extension. If you do not, this will not work). The script should contain the following code:
#!/bin/bash -e

#Set Variables
BTPATH=/boot/firmware
CKPATH=$BTPATH/vmlinuz
DKPATH=$BTPATH/vmlinux

#Check if compression needs to be done.
if [ -e $BTPATH/check.md5 ]; then
	if md5sum --status --ignore-missing -c $BTPATH/check.md5; then
	echo -e "\e; then
	echo -e "\e; then
	echo -e "\e[31mKERNEL FAILED TO DECOMPRESS!\e[0m"
	exit 1
else
	echo -e "\e[32mKernel Decompressed Succesfully\e[0m"
fi

#Hash the new kernel for checking
md5sum $CKPATH $DKPATH > $BTPATH/check.md5

if ; then
	echo -e "\e[31mMD5 GENERATION FAILED!\e[0m"
	else echo -e "\e[32mMD5 generated Succesfully\e[0m"
fi

#Exit
exit 0<br>
How To Install Ubuntu To An SD Card
 Ubuntu On A Raspberry PI
You can read more about Ubuntu on the Raspberry PI by visiting https://ubuntu.com/raspberry-pi.
The downloads page shows all the available versions of Ubuntu for the Raspberry PI 2, 3, 4 and 400.
If you want to use your Raspberry PI as a desktop computer then the only version available for the Raspberry PI 4 is a 64-bit version.
The easiest way to install Ubuntu to an SD-Card is to use the Raspberry PI Imager.
 Install Ubuntu On Raspberry PI
When you insert the SD-Card for Ubuntu for the first time you will be asked to choose the language.
 Choose Keyboard Layout
The next step requires you to choose the keyboard layout.
 Choose WiFi Network
If you aren’t using an ethernet cable then you will be asked to choose your wireless network.
 Choose Location
The penultimate step is to choose your timezone by selecting your country on the map or entering it into the box provided.
 User Setup
The final step is to create a user by entering your name, a name for your computer, a username and a password.
Install Ubuntu 16.04 LTS
Download Ubuntu for the Raspberry Pi 3 ARM Processor
You can download the zipped up image file from here – this is listed as “Ubuntu Classic Server 16.04 for the Raspberry Pi 3” on this page (shown below, highlighted in red).

Once you’ve downloaded this zipped file, you’ll need to extract it (using a tool such as 7-zip).
Format the SD Card
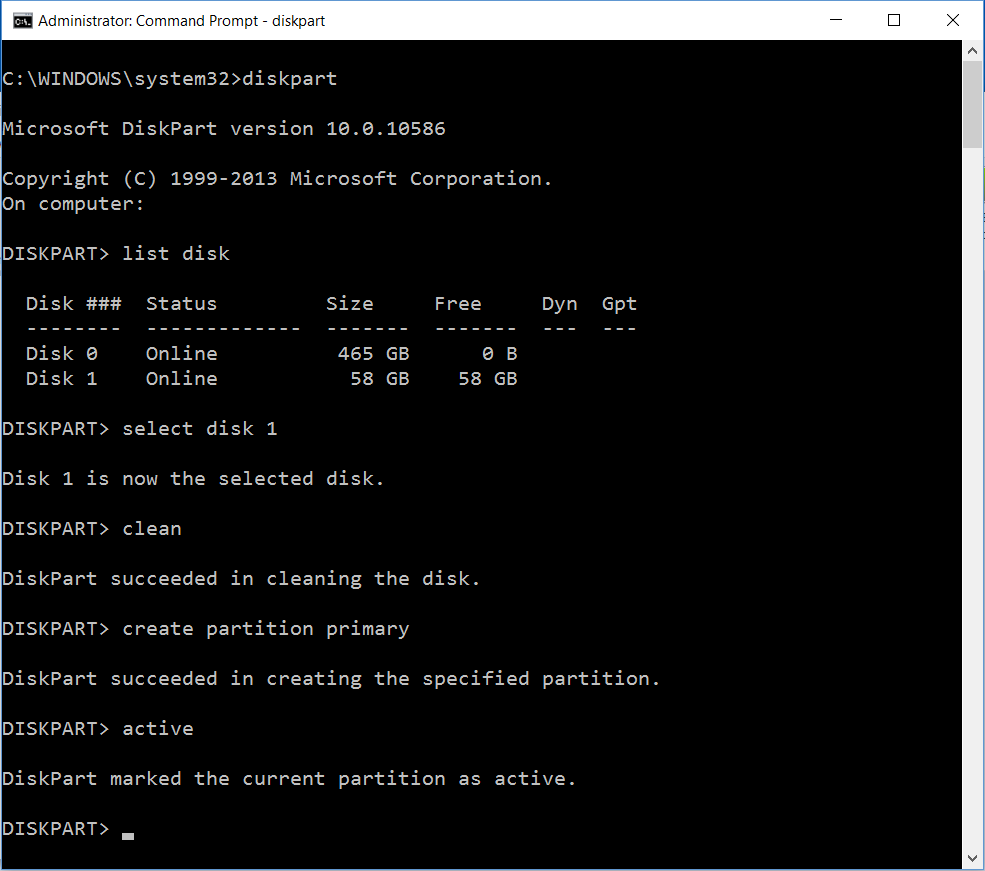
If you’ve a brand new card you might not need to format it, but if you’ve used your card for a previous installation, I think the easiest way to format a card is to use the diskpart tool which is shipped with Windows. I’ve previously blogged about how to do this at the link below:
The image below shows a summary of how I formatted my disk:
- First I call diskpart
- Then I list the disks (using list disk)
- Then I select the disk which is my SD card (using select disk 1, though your number might be different)
- Then I clean the disk (using clean
This sometimes fails with a permission error – I find that just calling clean again solves the problem
)
- Then I create a primary partition on the cleaned disk (using create partition primary)
- Finally I make this partition active (using active).
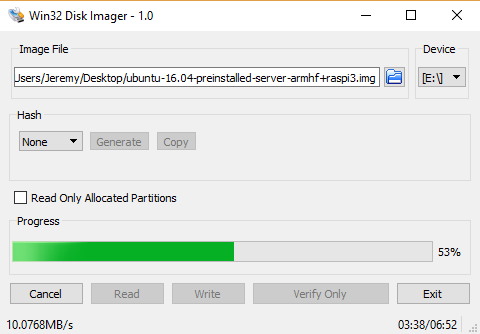
Write the Ubuntu image to the SD Card
Now that I have an un-zipped Ubuntu 16.04 image and a clean SD card, I need to flash this image to the card. I did this using a tool called “Win32DiskImager” which I downloaded from https://sourceforge.net/projects/win32diskimager/. There’s more information about this tool here: https://wiki.ubuntu.com/Win32DiskImager.
I browsed to the image file after opening “Win32 Disk Imager”, selected the drive letter associated with my SD card, and then I clicked on the “Write” button. It took my machine about 7 minutes to flash the image to my SD card.
Insert the SD card to the Raspberry Pi 3 and boot
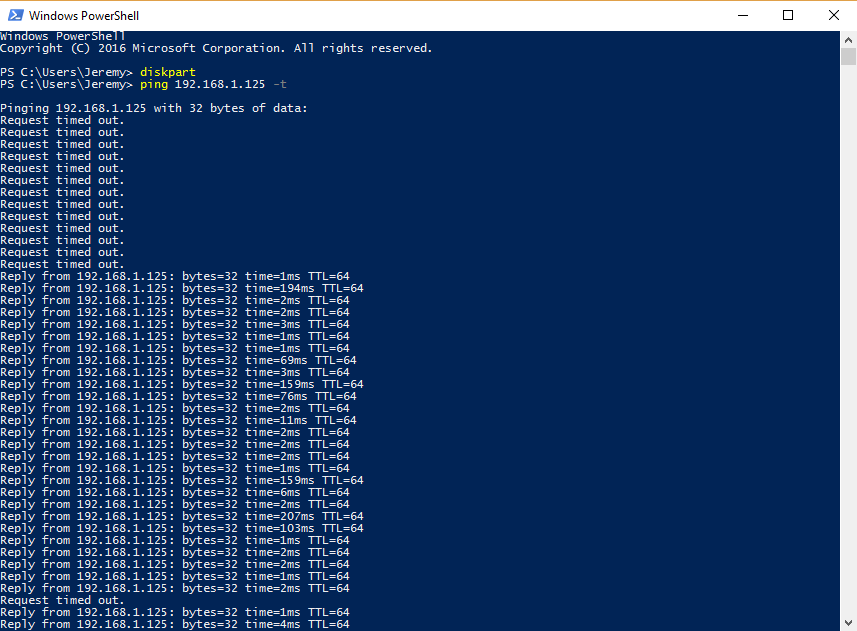
Now I insert the SD card into my Raspberry Pi 3, and connect the USB power supply. The easiest way to see what happens when you boot your Raspberry Pi 3 is to connect it to an HDMI monitor – I am lucky enough to have one of these monitor types.
However, I’ve also done this without a monitor – I happen to know that the wired IP address that my Raspberry Pi 3 always chooses is 192.168.1.125 – so if I insert the SD card into my Pi 3, and then switch it on, I know that if I run “ping 192.168.1.125 -t“, it’ll time out until the wired ethernet connects.
Connect to the Raspberry Pi 3 over ssh using PuTTY
I downloaded an installer for PuTTY from here – this allows me to SSH into my Raspberry Pi 3 from my Windows machine.
I find it helps to add the path to PuTTY to my machine path – I found the default path for the 64-bit installer to be “C:\Program Files\PuTTY“, which I then added to my machine’s path.
You can see your machine’s path from a PowerShell prompt using the command below:
Get-ChildItem -Path Env:Path | Select-Object -ExpandProperty Value
Once my path is updated, I’m able to type “putty” at a command prompt and a window opens like the one below:
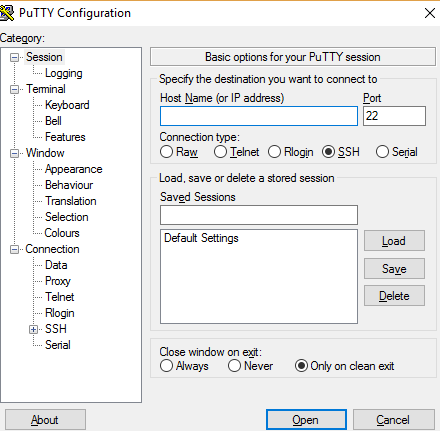
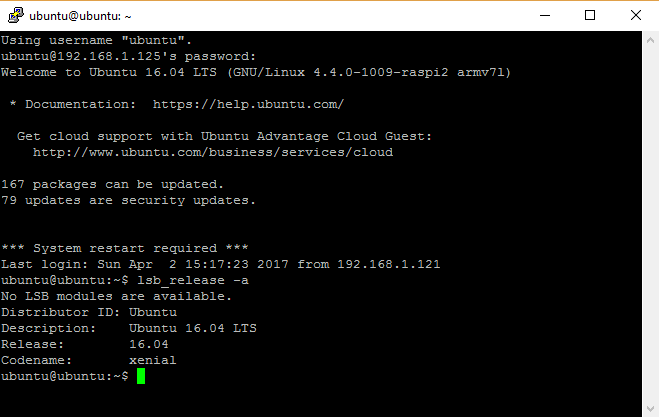
My Raspberry Pi 3 has IP address 192.168.1.125, and I typed this into the “Host Name” box in the window above. When I clicked on the “Open” button, the system shows me a window like the one below.
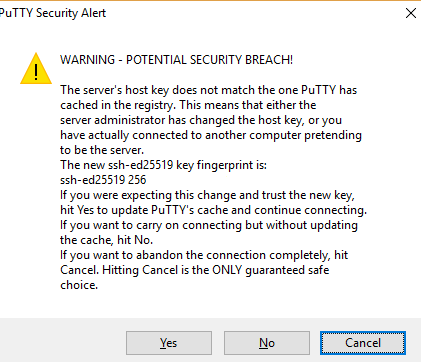
Since I was expecting this, I clicked on Yes, and a window opens asking for a username and password. The first time you log in, the username is ubuntu and the password is ubuntu. However, the first time you log in, you’ll be asked to change this password.
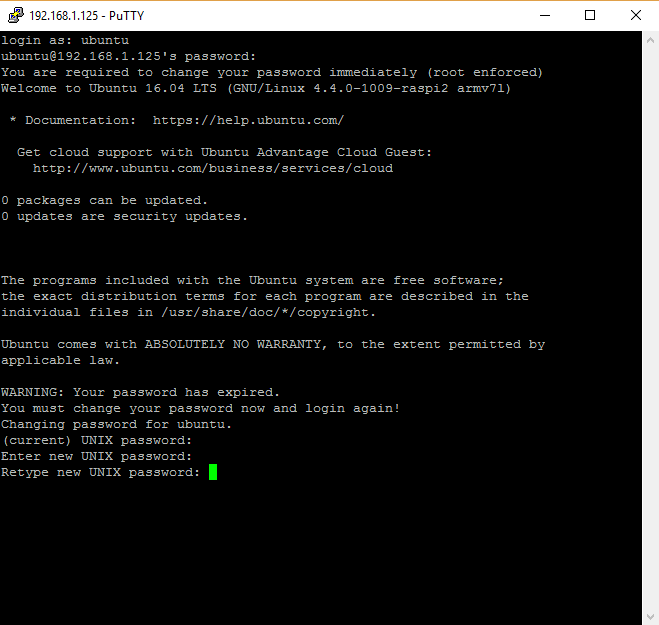
After I confirm the new password by typing it for a the second time, the PuTTY connection closes and I need to SSH in again – this time with the new password.
At this point Ubuntu 16.04 is installed onto the Raspberry Pi 3 and ready to be used – I can verify this by using the command below:
lsb_release -a
This prints distribution specific information, as shown below: