Android tv on raspberry pi 3 model b
Содержание:
- 1. Построить потоковую коробку Raspberry Pi с Kodi
- Conclusion
- Serial debug console
- Что мне нужно?
- Что такое ОмниРОМ?
- Compatible Mini Keyboard & Air Remote
- STEP- 1: Downloading & Installing “Android Pie on Raspberry Pi”
- STEP- 2: Downloading Open Gapps
- STEP-3 : Enabling “Developer Options”, “Root Access”, “Terminal”
- STEP- 4: Boot into “TWRP Recovery Mode”
- STEP- 5: Boot out from “TWRP Recovery Mode”
- STEP- 6: Installing Open Gapps in Android Pie
- STEP- 7: Google Play Store Sign in issue
- Step- 8: Optimize Android Pie 9.0
- In conclusion
- Записываем Android Things
- Управление
- Raspberry Pi из Китая
- Install Google Play Store on Android
- How to Install Android OS in Raspberry Pi 3
- Как скачать, установить и настроить образ ОС для Raspberry Pi.
- Подключение к сетевому принтеру
- Настройка
- How to Create a Raspberry Pi Android TV Box
- Installing Android TV Interface
- Подключаем аппаратную составляющую
- Подключаем Wi-Fi
- Enjoy Your Media With Android TV for Raspberry Pi!
- Android в коробке
- 3. KDE Plasma Bigscreen: открытый источник Raspberry Pi 4 Smart TV
- Running Android apps on Raspberry Pi
1. Построить потоковую коробку Raspberry Pi с Kodi

Если вы еще не видели Kodi в действии, сейчас самое время попробовать его. Для Raspberry Pi доступно несколько изображений Kodi, каждое из которых предлагает практически одинаковый опыт:
После установки надстройки позволяют получать доступ к видео- и аудиоконтенту через Интернет. Это приложения, которые представляют контент по вашему выбору. Например, в Kodi есть надстройка YouTube.
Однако будьте осторожны: поскольку некоторые надстройки являются незаконными, вам следует придерживаться тех, которые доступны в официальном репозитории дополнений Kodi.
Kodi также предлагает отчеты о погоде, поэтому вы можете проверить, не пропускаете ли вы солнечный свет во время просмотра YouTube.
Conclusion
This Android TV build for Raspberry Pi is buggy at the moment and not every app will work. I tried it with several games and TV apps, and some of them work fine, while others have graphic and display issues. Your experience might differ. With the instructions above you will have a working Android TV on your Raspberry Pi; just don’t expect everything to work. Enjoy!
Damien
Damien Oh started writing tech articles since 2007 and has over 10 years of experience in the tech industry. He is proficient in Windows, Linux, Mac, Android and iOS, and worked as a part time WordPress Developer. He is currently the owner and Editor-in-Chief of Make Tech Easier.
Serial debug console
The serial console is a helpful tool for debugging your board and reviewing
system log information. The console is the default output location for kernel
log messages (i.e. dmesg), and it also provides access to a full shell prompt
that you can use to access commands such as logcat .
This is helpful if you are unable to access ADB on your board through other
means and have not yet enabled a network connection.
The Raspberry Pi has pins that are multiplexed between various board functions.
Some board functions cannot be used simultaneously (for example, enabling
Bluetooth and using the UART0 port for peripheral I/O). For more information,
see the .
Note:
You can use the PIO CLI Tool to
do simple test operations on these interfaces.
The following pinout diagram illustrates the locations of the available ports
exposed by the breakout connectors of this board:
| GPIO Signal | Alternate Functions | |
|---|---|---|
| BCM2 | I2C1 (SDA) | |
| BCM3 | I2C1 (SCL) | |
| BCM7 | SPI0 (SS1) | |
| BCM8 | SPI0 (SS0) | |
| BCM9 | SPI0 (MISO) | |
| BCM10 | SPI0 (MOSI) | |
| BCM11 | SPI0 (SCLK) | |
| BCM13 | PWM1 | |
| BCM14 | UART0 (TXD) | MINIUART (TXD) |
| BCM15 | UART0 (RXD) | MINIUART (RXD) |
| BCM18 | I2S1 (BCLK) | PWM0 |
| BCM19 | I2S1 (LRCLK) | |
| BCM20 | I2S1 (SDIN) | |
| BCM21 | I2S1 (SDOUT) |
Что мне нужно?
- Rasberry Pi 3 или Raspberry Pi 4
- Карта microSD объемом не менее 16 ГБ
- Pendrive
- Изображение LineageOS для Raspberry Pi 3 or PI4 в зависимости от вашей модели
- Самый большой OpenGApps пакет
- Самый большой гравер приложение
- Установка LineageOS
Первое, что нам нужно сделать, это установить Android на RaspBerry Pi, и для этого мы будем опираться на LineageOS, операционная система, основанная на Google, которая оставляет нам Raspberry Pi, идеально настроенная для немедленной работы. Проблема в том, что этого не хватит для того, чтобы выполнять функции Android TV, поэтому нам придется устанавливать дополнительные пакеты, чтобы все было идеально.
Что такое ОмниРОМ?
OmniROM — это новая сборка Raspberry Pi на базе Android 11. Она поставляется в флэш-архиве .zip и может быть получена из Разработчики XDA. OmniROM уже довольно давно является заметным именем в сообществе XDA. За последние несколько месяцев они выпустили несколько сборок на базе Android 11 для нескольких телефонов. Этот опыт, вероятно, сделал их достаточно смелыми, чтобы создать сборку для Pi 4.
OmniROM для Pi 4 поставляется в двух вариантах: один в комплекте с приложениями microG, а другой позволяет устанавливать стандартные Gapps. Сборка microG больше ориентирована на конфиденциальность, поскольку она не полагается на сервисы Google Play или Play Store.
Еженедельные сборки предназначены для установки с Google Apps, когда вы записываете ПЗУ на SD-карту. Хотя сборка из коробки довольно стабильна, это пока только первая. Может быть несколько ошибок, поэтому не рекомендуется использовать его в качестве повседневного драйвера.
Кроме того, хотя новый OmniROM поддерживает установку на USB-носители и жесткие диски, вам необходимо будет создать свои собственные разделы, а затем отформатировать их на основе файловых систем, поддерживаемых Pi 4. Поэтому мы рассмотрим только процедуру для SD-карты, которые автоматически распознаются как загрузочный диск при подключении к вашему Pi 4.
Связанный: Как установить официальное обновление Android 11
Compatible Mini Keyboard & Air Remote
STEP- 1: Downloading & Installing “Android Pie on Raspberry Pi”
First of all, we need to download the “Android Pie” image to setup Raspberry Pi.
Formatting the SD Card
- Now, We need the SD Card Formatter tool to format the SD card.
- Once, the card is plugged in, It will automatically detect by the computer then you need to click on the format to format the Card.
Insert the SD Card to Raspberry Pi
Once the card successfully got flashed then plug it in the Raspberry Pi. Follow the setup wizard to boot into Android Home Screen.
STEP- 2: Downloading Open Gapps
Visit the Official Open Gapps Website
Select the Package as shown in the picture for minimum apps requirement. After that click on the download button to download the file.
STEP-3 : Enabling “Developer Options”, “Root Access”, “Terminal”
To enable Root Access, We need to navigate to “Settings” –> “Developer Options” –> Enable “Root Access”.
Enable Terminal
- To enable Terminal Access, We need to navigate to “Settings” –> “Developer Options” –> Enable “Local Terminal”.
- Now, we need to reboot the device.
- Press & Hold F5 key, this will bring Power Options and you can reboot the device.
STEP- 4: Boot into “TWRP Recovery Mode”
Boot Android into TWRP Recovery Mode
Open the Terminal App, Then type the below-given commands to Boot into “TWRP Recovery Mode”.
su
rpi4-recovery.sh
reboot
STEP- 5: Boot out from “TWRP Recovery Mode”
Boot into Normal Mode
Mount –> Boot & Mount –> System, Then use the below-given command to Boot into Normal Mode.
rpi4-recovery.sh boot
- Similarly, we can use the other method if the above method not working.
- Navigate to install and select the file from the storage. i.e recovery2boot.zip
- This file will boot our system into Normal Mode.
STEP- 6: Installing Open Gapps in Android Pie
Boot Android into TWRP Recovery Mode
Open the Terminal App, Then type the below-given commands to Boot into “TWRP Recovery Mode”.
su
rpi4-recovery.sh
reboot
Now, navigate to install and select the file from the storage. i.e open_gapps-arm-9.0-pico-xxxxxxxxxxx.zip.
Now, once the installation finishes. Then go back and select wipe –-> Wipe Factory Reset
Boot into Normal Mode
Mount –> Boot & Mount –> System, Then use the below-given command to Boot into Normal Mode.
rpi4-recovery.sh boot
- Similarly, we can use the other method if the above method not working.
- Navigate to install and select the file from the storage. i.e recovery2boot.zip
- This file will boot our system into Normal Mode.
STEP- 7: Google Play Store Sign in issue
- First of all, we need to download the Device ID APK.
- After that, we need to copy Google Service Framework (GSF).
Then open the google registration website to register the device and paste this GSF ID.
Once this process finishes, please go ahead and restart the system using the F5 key.
Step- 8: Optimize Android Pie 9.0
- First of all open settings and navigate to Apps & Notifications. Here you need to disable all the apps which you don’t need or require.
- After that we need to open Developer options from Settings –> System –> Developer Options and change the below-given settings.
Don't keep activities : Turn on
Windows animation scale : Animation off
Transition animation scale : Animation off
Animator duration scale : Animation off
In conclusion
- You are ready to use Android Pie on your Raspberry Pi 4.
- If you come across any issues or have some feedback related to this tutorial,
- Please share your thoughts. Smile (“_”)
Please check out my other articles:
- Android TV on Raspberry Pi Model B
- Chromium OS on Raspberry Pi-4
| Subscribe our YouTube Channel | |
| Support us on Patreon | |
| Like us on | |
| Share This Article with others |
Записываем Android Things
Для тех кто не знает, Android Things (кодовое название Brillo) — платформа встроенной ОС на базе Android, объявленная на Google I/O 2015 Она предназначена для использования на устройствах Интернет вещей (IoT) с ограниченной мощностью и памятью, обычно построены из разных платформ MCU. Будучи операционной системой IoT, она разработана для работы на устройствах, которые имеют от 32 до 64 МБ оперативной памяти. Она будет поддерживать Bluetooth с низким энергопотреблением и Wi-Fi.
- Сначала потребуется скачать Android Things из . Вам нужно будет войти в свою учетную запись Google и принять лицензионное соглашение.
- Распаковать скачанный архив
- Запустить инсталлятор. На Linux и MacOS команда запуска инстяллятора такая:
- Выберите вариант установки Android Things и при необходимости настройте Wi-Fi.
- Выберите Raspberry Pi 3 в качестве аппаратной платы.
- Выберите общий образ или свой собственный образ Android Things
- Следуйте остальным подсказкам утилиты, чтобы записать образ. Когда утилита завершит запись образа, извлеките внешний диск и достаньте карту microSD.
- Вставьте карту microSD в слот microSD на нижней стороне Raspberry Pi.
Управление
Для управления с клавиатуры в системе предусмотрены следующие кнопки:
F1 = Домой F2 = Назад F3 = Список приложений F4 = Меню F5 = Питание F11 = Уменьшение громкости F12 = Увеличение громкости
Возможно, к настоящему времени у вас уже есть мультимедийное устройство с Android TV или, что еще лучше, телевизор с Android TV, но если вы любите сильные эмоции, вы хотите, чтобы отвлекаться хорошо, и у вас есть Raspberry Pi 3 or Pi 4 дома вам понравится это руководство. Сегодня мы расскажем вам, как установить собственное мультимедийное устройство на Android TV с помощью знаменитой платы для разработки.
Raspberry Pi из Китая
Компания Radxa из Китая разработала одноплатный компьютер Rock 3A размером с кредитную карту. Это полноценный современный ПК, хотя и без поддержки Windows, но зато с возможностью установки современного твердотельного накопителя. Он нацелен на конкуренцию с топовыми моделями одноплатников семейства Raspberry Pi, которые превосходит по ряду параметров.
Как пишет портал Liliputing, на плате размерами 85х54 мм разработчики из Radxa уместили все базовые компоненты настольного компьютера начального уровня, включая слот М.2 под SSD-накопители с поддержкой NVMe. Сам драйв в комплект поставки не входит, но, тем не менее, возможность его установки в Rock 3A заранее предусмотрена.
Начало продаж Rock 3A компания Radxa запланировала на август 2021 г. Компьютер будет доступен для приобретения в трех конфигурациях, различающихся исключительно объемом оперативной памяти. Базовая модель с 2 ГБ RAM обойдется в $35 (2610 руб. по курсу ЦБ на 20 июля 2021 г.), версия с 4 ГБ будет стоить $55 (4100 руб.), а топовая модификация с 8 ГБ ОЗУ оценивается разработчиками в $75 (5515 руб.).
Поддержка SSD в Rock 3A ставит под сомнение актуальность компьютеров Raspberry Pi
Для сравнения, флагманский Raspberry Pi 4 Model B стоит те же $35 с 2 ГБ оперативной памяти. Он обладает почти идентичным набором интерфейсов, но слота М.2 нет ни в одной из его модификаций.
Install Google Play Store on Android
This is always the most complex part on an Android installation, for any device or system.As we don’t use an official Android image and device, there are additional steps to enable Google Play Store.
Master your Raspberry Pi in 30 daysSale: 10% off today.Download the eBook.Uncover the secrets of the Raspberry Pi in a 30 days challenge.Learn useful Linux skills and practice multiples projects.Get it Now!
Enable Developer options
We’ll need to go in recovery mode to install additional packages.To do this, we need to enable developer options and run a command as root.
Note: With Android 11 / LineageOS 18, there is no “Root access” option, and you don’t need to enable the developer mode. The only thing to do is to enable the “Advanced restart” in the settings. Then you can press F5 to choose to reboot in recovery mode. You can skip the next few paragraphs, and jump to the “Install Google Apps” section.
Let’s do this:
- Go into the Settings.
- Go to the end of the list (with the keyboard arrows) to find and click on “About Tablet”.
- Then find “Build number” and click on it several times.After about five clicks, a message appears to say that you enabled the developer options.
- You can now come back to Settings and open the “System” menu.In the “Advanced” part, there are the developer options.
- From here, there are two things to enable:
- Local terminal.We’ll need to use a command to reboot in recovery mode.
- Root access, we need it to run the command.Choose “Apps and ADB” in the list.
- Reboot the Raspberry Pi.Press and hold F5, and click on “Restart”.
Ok, you are ready to move to the next part.We now need to go in recovery mode.
Reboot in recovery mode
Back in Android, you should see a Terminal app available:Open it and enter the following commands:
Note: If the rpi4-recovery.sh script is not available in the terminal, you need to download this file from Konstagang.
Allow all asked permissions.If you are on Raspberry Pi 3, there is probably an equivalent, something like: .
The system will now reboot on recovery mode.Swipe to allow system modifications, you should get this screen:We can now move to the Google Apps installation.
Install Google Apps
Once in recovery mode, plug in your USB key with Google Apps on it.Then follow this procedure:
- Click on “Mount”.This is where you can choose which partition to mount.We need to mount the USB key, so check it in the list (USB-OTG in my case, I don’t know if it’s my USB key model or always this).
- Then, back on the main menu, click on “Install”.
- Click on “Select Storage” and choose the USB key.
- Finally, your files appear.Click on the Open Gapps file to install it:Swipe to confirm, there is nothing else to change.
- Don’t reboot after the installation, as it will come back to the recovery mode.
If everything is OK, you can now restart in normal mode, check the next part.
Reboot in normal mode
To enable the recovery mode, we also need to run the command to change the boot to normal mode.
- From the recovery mode menu, go into “Mount”.Ensure that the boot partition is checked.
- Then go to Advanced and Terminal.
- Enter almost the same commands:
Note: From Android 10 and over, the rpi4-recovery.sh script is no longer available in the terminal, you need to download this file from Konstagang.Put it on the same USB key with Gapps, and install it just after Gapps.It will reboot in normal mode.
That’s it, your Raspberry Pi will now restart in normal mode.Once on the Android desktop, you can see that Play Store is available in the apps.
Master Python on Raspberry PiSale: 10% off today.Get the eBook.Do more with your Raspberry Pi, learn the useful concepts and take the shortcuts.You miss half of the fun of using a Raspberry Pi if you don’t know anything about Python.Download here
Sign in on Play Store
The last step is to sign in on Google Play, as you would for any Android device.Open the Play Store app and try to sign in with your Google account:You may get some error messages during this process, asking if you want to close or wait:Keep choosing “Wait” until you manage to log in.
Once logged in, you can close the app and reboot the device.After the reboot, everything should be fine.You can now install any app or game you want on your Raspberry Pi :).
How to Install Android OS in Raspberry Pi 3
How To
Ok, tinkering is good, and you want to install Android OS on your Pi 3, that’s something interesting. Here I have shown a complete guide on how to install Android on Raspberry Pi 3 which will help you do your job more quickly and easily. Without any further ado, let’s check the article below.
The Raspbian is the best Operating System for Raspberry Pi and that we know. But, Google’s Android OS which also runs on ARM hardware like Pi, provides something great for the Pi 3 users. With this Linux-Based system, the next-gen coders will get a push to an advanced level of coding. As Google has not yet revealed the codes for installing Android on Pi 3, this may happen in short future for sure, but currently, you have other options to install, run, and use Android Operating System on a Pi 3 device.
Steps for installing Android OS on Raspberry Pi 3
Step-1: Get the files you need first
You need to first get the RTAndroid on your Raspberry Pi 3. You can follow the video tutorials available online for doing this.
To download RTAndroid, follow the steps below:
- Go to the official website of RT Android
- Go to ‘Download’ section
- Click on ‘Device Updates’
- Select ‘Raspberry Pi 3’
Step-2: Install the OS
With the help of RTAndroid, you will be able to install Operating System and then can download apps and games from Google Play Store.
Step-3: Use Linux for installation by running it in a virtual environment of Windows OS.
Step-4: Now, unzip the downloaded file of RTAndroid.
Step-5: Mount it on your Raspberry Pi SD card and run the script installed.
Getting Android for Raspberry Pi 3 is in-self an exciting and energetic term. Already able to do a lot more like a desktop PC with the Linux Distribution, if the Pi gets a support of an Android, then it can do tasks like your phone, and that’s for sure. But you should also remember some things when you are using your best Raspberry Pi starter kit.
- The RTAndroid developed by Embedded Software Laboratory provides a platform and environment for the Raspberry Pi devices, to execute real-time applications.
- You will face some limitations like:
- You will not be able to use the touchscreen even if you use the official touchscreen of Raspberry Pi device.
- You may face some issues in hardware accelerations.
Installing Android OS on Raspberry Pi 3 is not too much difficult, and if you follow the above steps, then you will find it as an easy and quick process. To install the OS, a 4GB SD card is enough to handle the Operating System and other media files of apps and games you download and install. Though the Android may make your Raspberry Pi work slower, as Google is thinking to support the most popular single board computer in the world after launching its latest Android 7.0 OS – Nougat, this may be solved in future. Hope this article is useful to you and will guide you to get an Android for Raspberry Pi. Let us know your thoughts on this.
Also, you will get the best Raspberry Pi starter kits, their projects, accessories, etc. on our site. How can we forget about the news topic related to latest releases of Raspberry Pi products and ASUS tinker board? Any information you want about the Raspberry Pi and all its relative, you can get it here.
Как скачать, установить и настроить образ ОС для Raspberry Pi.
Так как Raspberry Pi не обладает своей встроенной памятью, то для начала работы «компа» необходимо подготовить внешнюю карту. В ПК Raspberry Pi используется 4 Гб SD флеш-карта. На нее устанавливаются любые ОС, например: Debian, Raspberry pi android tv, FreeBSD, Fedora, Raspberry pi андроид, Gentoo и т. п.
Для того чтобы установить любую из них (всего таких разработано 33 ОС для миниатюрного ПК Raspberry Pi), необходимо выполнить несколько очень простых действий, таких как:
- cкачать с сайта разработчиков, например, образы ОС raspberry nougat или скачать raspberry pi android;
- разархивировать скачанный образ ОС — для дальнейшей работы понадобится .img файл;
- затем необходимо с помощью картридера подключить карту памяти к ПК;
- разархивируем ПО Win32DiskImager и активируем Win32DiskImager.exe, указав предварительно, путь к. img файлу с необходимой ОС (для этого необходимо кликнуть по изображению папки);
- потом выберете в поле «Device» из списка SD карту и нажмите на кнопку «Write», после этого активируйте «Yes» и таким образом прошейте любой из скачанных образов на SD Win32DiskImager. Теперь ждем пока прошитый образ полностью разместится на вашей карте памяти. После завершения этого процесса можно начинать подготовку к включению Raspberry Pi.
Вот, пожалуй, и все! Вам останется вставить в слот SD-карточку, подсоединить Ethernet, внешнюю клавиатуру, мышь, ТВ либо монитор в HDMI разъем к источнику питания, затем набрать логин и пароль. Причем для организации питания можно использовать любой мини-USB зарядчик, имеющий такие параметры — 5 В номинальное напряжение и ток номиналом 2 А.
Подключение к сетевому принтеру
Раз уж у нас есть офисные программы, то и печать документов, скорее всего, потребуется. В рассмотренной выше сети установлен единственный принтер, подключённый к ПК на Windows 10. Принтер уже сетевой, но нужно как-то добавить его в Raspbian. Для этого установим программы CUPS и samba-client:
apt install samba-client cups
CUPS не пустит нас в настройки просто так. Поэтому нужно добавить нашего текущего пользователя в группу lpadmin:
usermod -aG lpadmin pi
Управление в CUPS происходит через веб-интерфейс. Вводим в браузер адрес 127.0.0.1:631, затем переходим в раздел «Администрирование», нажимаем «Добавить принтер». Вводим имя пользователя pi и пароль, который задали при настройке системы (в начале статьи). Отмечаем «Windows Printer via SAMBA» и нажимаем «Продолжить».

Дальше важный момент. В поле «Подключение» нужно ввести адрес принтера в сети. В данном случае smb://192.168.1.6/hp1010. Из чего он состоит: smb:// — протокол SAMBA, 192.168.1.6 — локальный адрес компьютера, к которому подключён принтер, hp1010 — сетевое имя принтера.
Нажимаем «Продолжить». Вводим название принтера для нашей системы и на всякий случай ставим флажок «Разрешить совместный доступ к этому принтеру», нажимаем «Продолжить». Выбираем драйвер для принтера (список впечатляет), нажимаем «Добавить принтер». Сохраняем параметры. Печатаем для теста какой-нибудь документ и радуемся жизни.
Настройка
Первым делом нужно включить LibRC в настройках OSMC:
Система -> Настройки -> My OSMC -> Pi Config -> Hardware Support (логотип малинки)
Включаем параметр Enable LIRC GPIO support и выставляем gpio_in_pin — 18.
Перезагружаем малинку и подключаемся к ней по SSH c помощью Putty (прописываем IP малины и порт 22).
Рекомендую в своем домашнем роутере выставить фиксированный IP-адрес для малины, чтобы всегда можно было зайти по одному и тому же айпишнику. Логин-пароль: osmc/osmc.
Установим стандартный пакет для управления процессами
Теперь можно приступать к обучению пульта, убьем процесс LibRC и запустим получение данных с пульта:
Теперь, если посветить пультом в ИК-приемник, в терминале будут отображаться принятые сигналы:
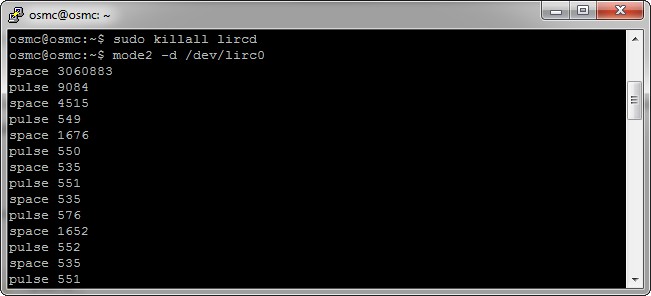
Если вдруг уже идут сигналы без нажатия кнопок на пульте, то это могут быть помехи от китайских блоков питания, ртутных ламп и пр. Итак, если сигналы идут, значит ИК-приемник мы подключили правильно и сигналы принимаются малинкой.
Начнем выставлять соответствия кнопкам пульта, для обучения существует специальная утилита irrecord:
Нажимаем два раза Enter и начинаем зажимать подряд все кнопки на пульте, пока утилита не сообщит нам о том, что она получила паттерн. Затем утилита попросит еще раз понажимать кнопки на пульте, зажимая их на 1 сек. После этого, irrecord предложит нам ввести название кнопок и записать их сигнал. Весь список кнопок выложен тут или его можно получить по команде:
Список самых необходимых кнопок (наглядная картинка расположения кнопок на пульте):
| KEY_POWER | Выключение/включение платы |
| KEY_MUTE | Выключение звука |
| KEY_VOLUMEDOWN | Убавление громкости |
| KEY_VOLUMEUP | Добавление громкости |
| KEY_PLAY | Воспроизведение |
| KEY_PAUSE | Пауза |
| KEY_PLAYPAUSE | Совмещённая кнопка Воспроиз./Паузы |
| KEY_STOP | Остановка воспроизведения |
| KEY_LEFT | Кнопка влево |
| KEY_RIGHT | Кнопка вправо |
| KEY_DOWN | Кнопка вниз |
| KEY_UP | Кнопка вверх |
| KEY_OK | Кнопка ОК/Enter |
| KEY_EXIT | Выход/Отмена |
| KEY_INFO | Краткая информация о проигрываемом файле |
| KEY_EPG | Телепрограмма |
| KEY_SUBTITLE | Субтитры |
| KEY_AUDIO | Переход в раздел «Музыка» |
| KEY_PREVIOUS | Предыдущий трек |
| KEY_NEXT | Следующий трек |
| KEY_0 … 9 | Цифровые кнопки от 0 до 9 |
| KEY_HOME | Вернуться на главный экран |
| KEY_TITLE | Техническая информация о проигрываемом файле |
| KEY_CONTEXT_MENU | Контекстное меню |
| KEY_REWIND | Перемотка назад |
| KEY_FORWARD | Перемотка вперёд |
Вводим название кнопки в терминал, жмакаем ее на пульте и ждем ответа от утилиты:
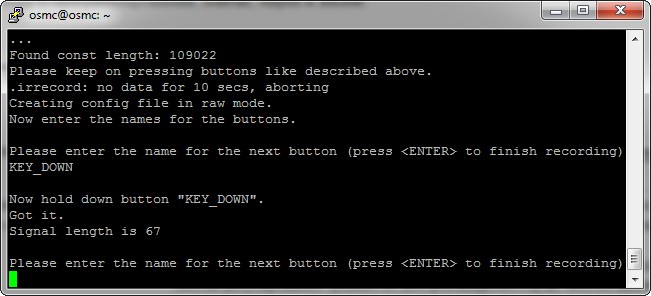
После того, как обучили все нужные кнопки, утилита попросит проверить битовую маску, для этого нужно быстро понажимать на каждую кнопку несколько раз.
Как будет написано, что файл конфигурации записан — идём опять в My OSMC, в раздел Remote. Выбираем наш файл конфигурации (по кнопке Browse), применяем, перезагружаем плату и начинаем управлять малинкой как белые люди — пультом!

How to Create a Raspberry Pi Android TV Box
For a do-it-yourself Raspberry Pi Android TV device, you’ll need a Raspberry Pi board, 5V/12A power supply (PSU), microSD card for boot medium, and optional but recommended case. On the software side, image mounting software, an extraction app, and the Raspberry Pi Android TV image are all required.What you’ll need for a DIY Raspberry Pi Android TV Box:
- Raspberry Pi board (Raspberry Pi 4 recommended)
- 5V/12A PSU
- Case (optional, recommended)
- microSD card
- Extraction software (i.e. 7Zip)
- Image mounting software (i.e. Etcher)
- Android TV Raspberry Pi image
- Peripherals (i.e. keyboard, mouse)
- Touchscreen (optional)
Total cost: $35 USD plus. Aside from the Raspberry Pi, you’ll need few items aside from the Raspberry Pi, case, PSU, microSD card, and some free software. Depending on what components you have lying around, you might be able to cobble together Android TV on the Pi for around $35. Alternatively, comprehensive kits include a Raspberry Pi, case, power supply, and microSD card for around $50 USD.
Installing Android TV Interface
As I said before, the interface looks like Android, not Android TV. To change this, you’ll need a launcher. Here is the list of Android TV Launcher Apps that You Can Use
Advertisement
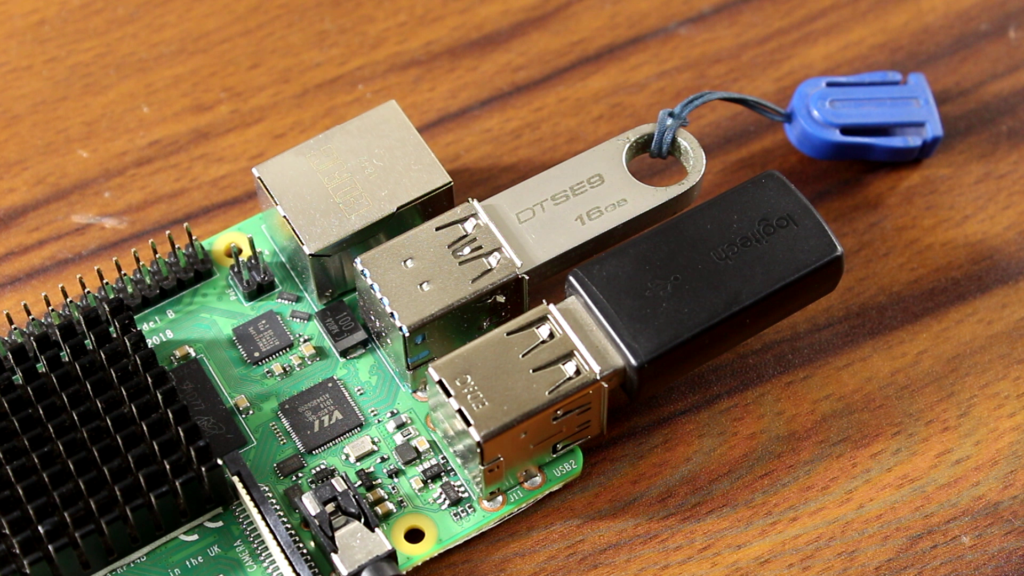
Again, another problem has started after connecting my Pendrive, the OS can’t detect it. It is missing from the file explorer too.

After a couple of minutes of researching, I realize that it is another bug of the OS. To fix this issue, I immediately download ES file explorer from its official website and install it.

In the file explorer, I found that the Pendrive still not properly detected so I remove it from the USB port and insert it again. Now it is detected and properly usable.

So, I open it and install the launcher. When the installation is successful, I click on the home button. Here, I get the two options “Trebuchet” & “Tv Home” I choose “TV Home” & click on “Always”.

Now the Android looks like this (shown in the picture below). It looks nice and also feels like an Android TV. This is not only a launcher available. There are several good ones. Here is the list of Android TV Launcher Apps that You Can Use.

Подключаем аппаратную составляющую
Подключите компоненты как показано на картинке
- Подключите кабель USB к J1 для питания.
- Подключите кабель Ethernet к локальной сети.
- (Необязательно) Подключите кабель HDMI к внешнему дисплею.
- Убедитесь, что на устройстве работает Android. Для этого нужно найти IP-адрес устройства:
- Если вы подключили дисплей, Android Things Launcher будет использовать его для отображения информации о плате, включая IP-адрес.
- Если вы назначили IP-адрес устройству с помощью DHCP, найдите этот адрес в сетевых настройках вашего маршрутизатора
- Подключитесь к IP-адресу с помощью инструмента adb
Raspberry Pi передает имя хоста Android.local через Multicast DNS. Если ваша хост-платформа поддерживает MDNS, вы также можете подключиться к плате, используя следующую команду:
Подключаем Wi-Fi
После прошивки платы настоятельно рекомендуется подключить ее к Интернету. Это позволяет вашему устройству отправлять отчеты о сбоях и получать обновления. Что бы подключиться к Wi-Fi сети, выполняем такие шаги:
Enjoy Your Media With Android TV for Raspberry Pi!
By now you should have a Raspberry Pi 3 or later pumping out videos and music using the LineageOS with an Android TV user interface. To all intents and purposes, you have a DIY Android TV box!
Admittedly, you may run into trouble with performance, so ensure your microSD card is up to scratch. Also, check you’re using an approved Raspberry Pi power supply. This will ensure the Pi gets the power it needs without risking undervoltage and microSD card corruption.
Like the feel of Android TV but aren’t getting the best results? Maybe buy an Android TV box instead.
The Best Android TV Box for All Budgets
Android TV boxes are a great way to add smart features and streaming to any television. Here are the best Android TV boxes.
Read Next
About The Author
Christian Cawley
(1530 Articles Published)
Deputy Editor for Security, Linux, DIY, Programming, and Tech Explained, and Really Useful Podcast producer, with extensive experience in desktop and software support.
A contributor to Linux Format magazine, Christian is a Raspberry Pi tinkerer, Lego lover and retro gaming fan.
More
From Christian Cawley
Android в коробке
Это относительно простой проект, требующий от вас:
- Установите специальный Android ROM на Raspberry Pi
- Установите определенное программное обеспечение Android TV
- Начать смотреть телевизор
Это действительно настолько просто. Если вы знаете, как установить операционную систему на Raspberry Pi , у вас не должно быть никаких проблем.
Прежде чем начать, убедитесь, что у вас есть:
- A Raspberry Pi 3 (в настоящее время не поддерживается Pi 3 B + или Pi 4)
- Хорошее качество microSD карт
- Надежный источник питания Raspberry Pi
- USB клавиатура и мышь (или комбинированный пульт)
- флешка
- Кабель HDMI
- Кабель Ethernet (опционально)
Вам также понадобятся следующие загрузки программного обеспечения:
- LineageOS 15.1 (Android 8.1) для Raspberry Pi 3
- Откройте пакет GApps Pico от opengapps.org
- Etcher SD-карта для записи программного обеспечения
Готов начать? Пошли.
3. KDE Plasma Bigscreen: открытый источник Raspberry Pi 4 Smart TV
https://youtube.com/watch?v=iOxMuexAPaQ
Эта модификация Pasma Bigscreen от Raspberry Pi, в которой используется модифицированный дистрибутив KDE Neon, включает Mycroft AI и libcec. Таким образом, помимо интеллектуального телевизора, вы получаете голосовое управление (Mycroft) и совместимость с существующим пультом вашего телевизора (libcec).
Как открытый проект, вы можете настроить свой собственный умный телевизор, не беспокоясь о конфиденциальности или цензуре.
На момент написания статьи приложения «Большой экран» ограничивались YouTube, Soundcloud и BitChute. Несмотря на это, стоит проверить — создать умный телевизор Raspberry Pi еще никогда не было так просто.
Running Android apps on Raspberry Pi
Now that you’ve got Android running on a Raspberry Pi, you’ll want to install some apps. This is easy thanks to F-Droid.
Here is how to install Android software onto your emteria.OS-powered Pi
Step 1: Start F-Droid
Find F-Droid on your home screen on in the apps menu and start it up. It won’t launch straight away as it will first need to update all its repositories – something you’ll be familiar with from installing software on Raspbian using apt-get. This might also take a while so please be patient.

Step 2: Find an app
F-Droid works very similarly to the usual Play Store on normal Android devices. There are categories you can look for apps in, and you can also search for something you like. Some of your favourite apps on Android may even be available.

Step 3: Install!
Select the app you want, then hit the install button. It’s as easy as that – F-Droid even includes some info on the apps as well. F-Droid also lets you keep the apps up-to-date, although it’s a bit more manual than the Play Store equivalent.

Three F-Droid apps to try out
- NewPipe. Play YouTube videos on your device with this small, lightweight app that doesn’t require the original YouTube app to work
- Terminal Emulator. As emteria.OS is a bit more hackable than stock Android, you’ll be able to make good use of this terminal emulator to run more advanced commands.
- Face Slim. Missing out on some social media time? Face Slim allows you to use Facebook much like the standard app.
Step 1: Use an APK
Android apps work by downloading a specific file which is then used to install the software onto the device. These files are called APKs (Android Package Kit), as that’s the file name extension (.apk). If you have the APK file, you can install an app on Android without having to go through a separate store.
Step 2: Install Netflix on Raspberry Pi Android
F-Droid specialises in free and open-source Android apps, so you may not find everything you want on there, such as Netflix. As Netflix is more concerned about you being able to watch the shows you’re already paying for, the APK for the app is available from its website. Open the browser in emteria.OS and head to Netflix.

Step 3: Run the APK
Once the APK file has been downloaded, open it from the Downloads menu. You may need to enable installing from unknown sources if you’ve turned that option off in the emteria.OS settings – otherwise it will go about installing the Netflix APK for you. It will appear in your app menu as usual, although you’ll need to perform manual updates every now and then!