How to ssh into a raspberry pi [beginner’s tip]
Содержание:
- Step 3 : Creating A New Key Pair
- Шаг 6. Зарегистрируйте свое устройство в общедоступном Wi-Fi.
- Part 1: Setting up the Pi
- Step 6: Connect
- Enable ssh on Raspberry Pi 4 with a monitor and keyboard
- Raspberry Pi Resources
- Генерация новых SSH-ключей
- Установка операционной системы
- Install a desktop
- Включение SSH на Raspberry Pi без экрана
- Шаг 4. Настройка точки доступа Wi-Fi
- How to SSH into the Raspberry Pi
- Подключение Raspberry Pi к Wi-Fi сети
- Enable the SSH server on your Raspberry Pi
- Подключение Raspberry Pi через SSH
- Part 2: Concealing the Pi
- Шаг 1. Скачайте и запишите образ Kali Linux на SD-карту
Step 3 : Creating A New Key Pair
If you want to create a fresh key pair then this is easy to do using the ssh-keygen utility.
Navigate to the SSH directory :
cd ~/.ssh
then run the ssh-keygen utility :
ssh-keygen
You will be prompted for a location to save the key file. Press ENTER to accept the default.
You will be asked for a passphrase. This is optional. If you use a passphrase you may be asked for it when using the key. It is an extra security step and you will have to decide if you want to make use of it. Either type a passphrase or leave it blank and press ENTER to finish.
If you use a passphrase do not forget it!
This process should create two files for you. A Public key named “id_rsa.pub” and a matching Private key named “id_rsa”.
Add the contents of the Public key to the authorized_keys file using :
cat id_rsa.pub >> authorized_keys
Some clients prefer PuTTY style keys. I would recommend creating this format now so you have the choice in the future. The following commands will install puttygen and create a PuTTY version of your new key :
sudo apt-get install putty-tools
then :
puttygen id_rsa -o id_rsa.ppk
You should now have three files :
- id_rsa
- id_rsa.pub
- id_rsa.ppk
Copy these files to a safe location. The Private key (id_rsa or id_rsa.ppk) is required by the client you use to connect to the Pi. This might be a PC, laptop or mobile phone. The Public key (id_rsa) is used by the Pi you wish to connect to.
You can use the same Public key on multiple devices as long as you have the Private key to match.
Once you have safely stored the keys somewhere else they can be deleted from the Pi :
rm id_rsa
rm id_rsa.pub
rm id_rsa.ppk
Шаг 6. Зарегистрируйте свое устройство в общедоступном Wi-Fi.
Ваш Pi почти готов на этом этапе, но если вы когда-либо подключались к общедоступной сети Wi-Fi, вы будете знать, что вам, как правило, нужно будет проходить аутентификацию с использованием портала авторизации, либо для оплаты, либо для регистрации вашего устройства. Поскольку ваш Pi теперь настроен на автоматическое подключение через VPN (и в противном случае он должен препятствовать подключению), эти порталы обычно блокируются.
Чтобы обойти это, настройте свой адаптер Wi-Fi USB так, чтобы он сопоставлял MAC-адрес с устройством, которое вы можете использовать для подключения и аутентификации сначала в общедоступной сети Wi-Fi, например со смартфоном. Когда у вас есть это, введите:
В окне редактирования добавьте следующее (заменив заполнитель XX для вашего MAC) и нажмите Ctrl + X, с последующим Y сохранить.
Наконец, выполните следующие команды, чтобы настроить автоматический запуск сценария при запуске Pi:
Перезагрузитесь, чтобы проверить все работает нормально. Вам также следует проверить наличие утечек DNS, чтобы убедиться, что ваше VPN-соединение работает правильно. Большинство провайдеров VPN предлагают инструмент, который поможет с этим.
Part 1: Setting up the Pi
The problem is that if I plug this in somewhere in the world and leave it I need it to phone home so I can gain remote connectivity to it. I know my home’s IP but I don’t know the Pi’s IP. I want it to be a plug in and run away type of scenario and not one that I’ll be hooking up any monitor or keyboard or anything.
Pre-configuration
Before beginning you need to have the following:
- Raspberry Pi with a Linux OS on it
- Raspberry Pi is configured to receive a DHCP address
- Raspberry Pi is configured to receive ssh connections
- A seperate linux server that is reachable by ssh from the internet. This server should have a static public IP.
It should be easy enough to figure out how to complete these on your own. With the above, you should be able ssh to the Pi remotely if you know its IP. Well you don’t know its IP and even if you did it is probably behind a firewall which makes it impossible to get to. Or so you think.
What you’ll need is a linux server that has a persistent IP. One that you can ssh into from anywhere in the world. Suppose it’s IP is 25.25.25.25. Even though my home network gets a dynamic IP from my ISP it usually stays the same for weeks and even years. All I’ve done is forwarded port 22 through the firewall to a linux server to make this work.
Setting up the ssh certificate on the Pi
From the Raspberry Pi you should be able to ssh to this linux server. Test it to be sure. So now you want to set it up so the authentication is certificate based (this way the Pi can be set up to auto ssh into the server without being prompted for a password).
Follow this guide for setting up automatic ssh login using ssh keys.
Creating the Reverse SSH tunnel
Now comes the fun part. Create a reverse remote ssh tunnel to that host to forward connections back to the Pi. Confused? Here look at this command you would issue from the Pi:
The Pi is ssh’ing to the server at 25.25.25.25 using the username “serverUser”. Upon doing so, it’s telling that server to open port 2222. Any connections coming into the server on port 2222 forward them over the tunnel back to the Pi on port 22. The -N tag is saying we don’t need to actually send any ssh commands once connected.
Once the Pi sets up that remote tunnel; from the server it connected to you can do this:
Now you should be ssh’d into the Pi using port 2222 on the linux server! Awesome!
Why did this work? The linux server is listening on port 2222 for incoming ssh connections. If it receives one, it will forward all traffic it receives into the previous ssh connection that was established already. That is essentially what the remote tunnel does.
Making it persistent (always on)
Next is to make this a persistent thing. You want the Pi to keep trying to build this ssh tunnel always and if it goes down try to bring it back. We’ll do this using a bash script and cron job.
Create a file on the Pi called ~/create_ssh_tunnel.sh and put this in it:
What this program is doing is checking to see if there’s a process running called ‘ssh’. If there isn’t then start the ssh tunnel.
Next make it executable by doing the following:
Now start the crontab.
Place this in as your cron job (every minute check if the ssh connection is up, if not, attempt to bring it up)
To troubleshoot any problems in this you can view the tunnel.log file.
Now let’s take a step back and look at what we’ve done. When the Raspberri Pi is on, it will check every minute to see if an ssh connection to your linux server exists. If it doesn’t it will create one. The tunnel it creates is really a reverse remote tunnel. Once the tunnel is up, anyone who ssh’s into port 2222 of the linux server will then be redirected to the Pi. Incredible!
Step 6: Connect
If configured correctly connections to the Pi can now be made without having to enter a password.
Although many clients can remember passwords the advantage with SSH keys is that you can use the same key file in all your clients. If you change the key file you won’t have to change the password in all the places you may have it remembered.
You can also store the Private key on a removable drive or within an encrypted container (i.e. Veracrypt). This means if your computer is stolen the connections to your devices won’t work even if someone can open your SSH client and see your saved sessions. No key file no access!
Enable ssh on Raspberry Pi 4 with a monitor and keyboard
Let’s first see how you can enable ssh on your Raspberry Pi 4, when using an external monitor + keyboard + mouse.
>> Video version:
Initialization
If this is the first time you boot your Pi with your new image, then follow the steps of the “Welcome” screen. You will:
- Select a country, language, keyboard layout, timezone.
- Connect to a Wi-Fi network.
- Change the default password (user: “pi”, password: “raspberry”).
- Update packages to their newest version.
The important thing you need for the following is that the Raspberry Pi 4 (ssh server) is connected to the same Wi-Fi network as your computer (ssh client).
Enable ssh from the Raspberry Pi 4
First, open a new terminal.
Execute .
You will see this menu.
Select “Interfacing Options” and press ENTER.
Then, select “SSH” and press ENTER.
Select “Yes”, press ENTER, and you’ll get a message “The SSH server is enabled”.
Then, you’ll see the raspi-config menu again, press ESCAPE to quit.
That’s it!
Find the Raspberry Pi’s IP address
To connect to the Pi from your computer, you’ll need to know the IP address of the Pi.
Well, as you’re already working from the Pi, that’s really easy.
Simply open a terminal and run . This will give you the IP address of the Pi inside the Wi-Fi network it’s connected to.
$ hostname -I
192.168.43.56
Here in my case: 192.168.43.56. Of course you will certainly have a different value.
>> Video version:
Connect to the Pi via ssh
If you’re using Linux, Mac OS, or Windows 10 (with at least the October 2018 update), you can simply use a ssh client from a terminal. If you’re using a previous version of Windows, you can download and use the Putty software.
So, open a new terminal on your computer. In Windows 10, search for “cmd” or “terminal” in the search bar.
Then, to be able to create a successful connection, you need 3 things:
- the IP address of the Pi: well that’s just what we got from the last step.
- username: this is the username you have on your Pi. The default one with Raspbian is “pi”. (on your Pi, execute to check the username)
- password: by default this is “raspberry”, but you should already have changed it in a previous step.
To create a ssh client and thus connect to the Raspberry Pi 4, execute: , and then provide the password.
you@your-computer:~$ ssh pi@192.168.43.56
pi@192.168.43.56's password:
Linux raspberrypi 4.19.118-v7l+ #1311 SMP Mon Apr 27 14:26:42 BST 2020 armv7l

The programs included with the Debian GNU/Linux system are free software;
the exact distribution terms for each program are described in the
individual files in /usr/share/doc/*/copyright.

Debian GNU/Linux comes with ABSOLUTELY NO WARRANTY, to the extent
permitted by applicable law.
Last login: Fri Jun 26 10:21:38 2020 from 192.168.43.138
pi@raspberrypi:~ $
Great, you’re now connected to the Pi with ssh! Working in this terminal (session) is the same as if you work directly on the Pi (with a monitor + keyboard).
Raspberry Pi Resources
Not sure where to start?Understand everything about the Raspberry Pi, stop searching for help all the time, and finally enjoy completing your projects.Watch the Raspberry Pi Bootcamp course nowMaster your Raspberry Pi in 30 daysDon’t want the basic stuff only? If you are looking for the best tips to become an expert on Raspberry Pi, this book is for you. Learn useful Linux skills and practice multiples projects with step-by-step guides.Download the e-bookVIP CommunityIf you just want to hang out with me and show your support, you can also join the Patreon community. I share behind-the-scenes content there and give you early access to my content. You’ll also get a shoutout when you join.More details hereNeed help to build something with Python?Create, understand and improve any Python script for your Raspberry Pi.Learn the essentials, step-by-step, without losing time understanding useless concepts.Get the e-book nowYou can also find all my recommendations for tools and hardware on this page.
This tutorial doesn’t work anymore? Report the issue here, so that I can update it!
Генерация новых SSH-ключей
Чтобы сгенерировать новые SSH-ключи, введите следующую команду (при этом имя хоста должно выглядеть по принципу <ВАШЕИМЯ>@<ВАШДЕВАЙС>; в нашем случае это eben@pi):
ssh-keygen -t rsa -C eben@pi
Кроме того, если достаточно места, имя хоста можно сделать более наглядным, но при этом его нужно поместить в кавычки. К примеру, так —
ssh-keygen -t rsa -C "Raspberry Pi #123"
После введения этой команды вас спросят, в каком месте сохранить ключ. Полагаем, его лучше сохранить в локации по умолчанию (/home/pi/.ssh/id_rsa), и для этого нужно просто нажать ↵ Enter .
Кроме того, вас попросят ввести парольную фразу. Это дополнительная мера безопасности, суть которой в том, что без парольной фразы ключ становится непригодным. То есть, если кто-то другой скопирует ваш ключ, то все равно не сможет получить доступ от вашего имени.
Если вы решили воспользоваться этой функцией, то введите парольную фразу и нажмите ↵ Enter , а затем, когда вас попросят, впишите ее снова. Если вы не хотите использовать парольную фразу, просто оставьте это место пустым.
Теперь в директории .ssh, находящей в вашей домашней директории, должны появиться файлы id_rsa и id_rsa.pub:
ls ~/.ssh
authorized_keys  id_rsa  id_rsa.pub  known_hosts
Файл id_rsa — это ваш личный ключ. Храните его на компьютере.
Файл id_rsa.pub — это ваш публичный ключ, то есть хранящийся на устройстве, к которому вы хотите подключиться. При каждом подключении два этих ключа будут проверяться на соответствие друг другу, и подключение состоится лишь в том случае, если эта проверка пройдет успешно.
Чтобы взглянуть на то, как выглядит ваш публичный ключ, введите следующее:
cat ~/.ssh/id_rsa.pub
Он должен выглядеть примерно так:
ssh-rsa <ОЧЕНЬ ДЛИННАЯ СТРОКА ИЗ СЛУЧАЙНЫХ СИМВОЛОВ> eben@pi
Установка операционной системы
- Вставьте SD карту в картридер и проверьте, какая буква была присвоена диску.
- Откройте Win32DiskImager, возможно понадобится запустить его от имени администратора.
- Выберите образ распакованной Raspbian OS.
- Выберите букву, присвоенную вашей SD карте, в выпадающем списке устройств. Убедитесь в том, что выбрали правильную букву диска, чтобы не повредить данные на каком-либо другом диске.
- Нажмите Записать (Write) и ждите завершения.
- Закройте Win32DiskImager, выньте SD карту и вставьте её в Raspberry Pi.
Примечание: после записи операционной системы вы заметите, что на SD карте осталось лишь несколько мегабайт. Это из-за созданного раздела, остальная часть свободного пространства скрыта. Вы сможете это исправить, как только мы подключимся к Raspberry Pi.
Install a desktop
First you need to ensure your packages are updated to the latest version, run:
Then, you can use the command to install a desktop environment.
Here are some popular and lightweight options:
If you run into issues with either of these check out this blog. We’re working on fixing this imminently.
Learn more about Ubuntu flavours.
Once the install finishes, reboot your pi with:
And your new desktop will come up automatically
Alternatively, if you now decide you want an Ubuntu Desktop proper, a full-fat version, you can head over to our other tutorial to re-flash your Raspberry Pi with the Ubuntu Desktop.
Включение SSH на Raspberry Pi без экрана
Если у вас нет запасного дисплея или клавиатуры HDMI для подключения Raspberry Pi, вы можете легко включить SSH, поместив пустой файл с именем ssh (без какого-либо расширения) в загрузочный раздел.
Чтобы включить SSH на Raspberry Pi, выполните следующие действия:
- Выключите Raspberry Pi и извлеките SD-карту.
- Вставьте SD-карту в кардридер вашего компьютера. SD-карта будет установлена автоматически.
- Перейдите в каталог загрузки SD-карты с помощью файлового менеджера ОС. Пользователи Linux и macOS также могут сделать это из командной строки.
- Создайте новый пустой файл с именем ssh без какого-либо расширения внутри загрузочного каталога.
- Извлеките SD-карту из компьютера и вставьте ее в Raspberry Pi.
- Включите свою плату Pi. При загрузке Pi проверит, существует ли этот файл, и если он есть, будет включен SSH и файл будет удален.
Это все. После загрузки Raspberry Pi вы можете подключиться к нему по SSH.
Шаг 4. Настройка точки доступа Wi-Fi
Если подключен USB-адаптер Wi-Fi, теперь вы можете настроить оба подключения Wi-Fi. Вернитесь к панели инструментов LuCI, под беспроводной, и удалите оба сетевых подключения. Устройство radio0 ваш встроенный Wi-Fi, в то время как Radio1 Ваш USB-адаптер Wi-Fi
Настройте встроенный Wi-Fi, нажав добавлять, Убедитесь в следующем:
- Режим установлен в Точка доступа
- ESSID установлен на имя сети по вашему выбору; по умолчанию это OpenWRT
- сеть установлен в ЛВС
- Под Беспроводная безопасность, шифрование установлен в WPA2-PSK
- ключ установлен подходящий пароль
Как только вы закончите, нажмите Сохранить затем вернитесь к беспроводной меню. Следуйте инструкциям ранее для первоначального подключения, чтобы установить Radio1 устройство (ваш USB-адаптер Wi-Fi) в существующую сеть. Здесь вам также нужно будет сканировать и изменять сети, когда вы находитесь в новом месте.
Теперь у вас должно быть запущено два соединения Wi-Fi, одно в качестве точки доступа для ваших устройств Wi-Fi, а другое в качестве интернет-соединения для вашего устройства с существующей сетью Wi-Fi. Попробуйте подключиться к вашему Pi на этом этапе с помощью смартфона или ноутбука, чтобы убедиться, что он работает.
Если это работает, отключите Pi от соединения Ethernet с ПК.
How to SSH into the Raspberry Pi
Step 1: Enable SSH
As you might remember from our FTP server how-to, the first thing we need to do is make sure that SSH is enabled on your Raspberry Pi. This can be done two ways: using the GUI or using Terminal. Which method you use is entirely up to you! We’ll cover both below.
Using the GUI
Head over to Preferences > Raspberry Pi Configuration and click on “Interfaces.” While there, select “SSH: Enabled.”
Using Terminal
Open Terminal and enter this command:
sudo raspi-config
Then head over to Advanced Options and select SSH. You are asked whether you would like the SSH server to be enabled. Select “Yes.”
Now the SSH server is enabled and you can exit the config.
Step 2: Determine your IP address
In order to connect to your Raspberry Pi, you have to know your Raspberry Pi’s IP address. If you’re going to connect to your Raspberry Pi from inside your home network, open Terminal and enter this command:
hostname -I
If you want to connect to your Pi from outside of your home network, you will have to set up port forwarding and determine your public IP address instead.
Obtaining your public IP address is very easy. Just head to a search engine – like DuckDuckGo, the default search engine on Raspbian – and type “what is my IP address.” Hit search and your search engine of choice should provide your answer. You IP address will be in this format: ###.###.###.### – where each # is a digit, of course.
Whether you want to connect on your home network (with a private IP address) or from outside your network (with the public IP address), you’re going to need to remember the digits, so write your IP address down!
Step 3: SSH into your Raspberry Pi
Windows
To connect to your Raspberry Pi with SSH, you’ll need a popular program called PuTTY. In the words of its creator, PuTTY is “a free implementation of SSH and Telnet for Windows and Unix platforms.” You can download PuTTY here. Just choose putty.exe’s 32 bit or 64 bit version, depending on which version of Windows you have.
Once you’ve finished downloading, go ahead and launch putty.exe. You’ll be greeted with a screen like this:
See the “Host Name (or IP address)” field? That’s where you’ll want to enter your Raspberry Pi’s IP address as determined in the previous step.
Make sure that the “Port” field has a value of “22.”
Now, click “Open.”
You’ll get a security alert next – go ahead and hit “Yes” on that.
Finally, log in to your Raspberry Pi. If you haven’t changed the defaults, your username will be “pi” and your password will be “raspberry”.
You are now connected to your Pi and can control the device remotely with Linux commands. If you don’t know much about Linux commands, here’s a comprehensive list.
Mac OS X
Establishing an SSH connection to the Raspberry Pi on Mac OS X is very straightforward, since the operating systems comes with Terminal installed. You just have to open Terminal and enter this command:
ssh pi@###.###.###.###
(###.###.###.### here represents your IP address, of course.)
After issuing the command, you’ll be prompted with a security alert. Type “yes” to continue.
Log in to your Raspberry Pi. If you’ve left the defaults unchanged, the username will be “pi” and the password will be “raspberry”.
You are now connected to your Pi and can control the device remotely with Linux commands. As mentioned in the Windows section, you can find a comprehensive list of Linux commands here.
Troubleshooting
If you can’t establish an SSH connection to your Raspberry Pi, here are a couple of things you can do:
- Make sure that you have enabled SSH on your Raspberry Pi
- Make sure that you’re using the correct IP address
- Make sure that you have the correct credentials
- If you’re connecting from outside of your home network, make sure that you have set up port forwarding
If you still have problems in connecting, please post a comment below.
Подключение Raspberry Pi к Wi-Fi сети
- Подключитесь к Raspberry Pi по SSH-соединению.
- Выполните поиск Wi-Fi сетей
sudo iwlist wlan0 scan | grep ESSID
и запомните имя интересующей вас точки доступа.
- Внесите информацию об интересующей вас Wi-Fi сети
sudo nano /etc/wpa_supplicant/wpa_supplicant.conf
- В конец файла добавьте следующие строчки:
network={ ssid="YourSSID" psk="password" key_mgmt=WPA-PSK }, где — имя точки доступа, — пароль, — тип шифрования.
- Для вступления изменений в силу перезагрузите Raspberry Pi
sudo reboot
- Перелогинтесь к Raspberry Pi по SSH.
- Для проверки подключения к Wi-Fi сети выполните команду:
iwconfig
Если подключение выполнено успешно, вы увидите информацию о точке доступа.
Enable the SSH server on your Raspberry Pi
By default, SSH is installed on the Raspberry Pi, but is disabled for security reasons. The first thing to do will therefore be to enable SSH on your Raspberry Pi.
To do this, simply plug the MicroSD card of your Raspberry Pi into your computer, go to the card, and create a file named ssh in the partition.
Here, we are talking about the boot partition (the one mount by default on Windows), and not the /boot/ directory in the main partition of the sd card.
Once done, all you have to do is put your SD card back into your Raspberry Pi, and SSH will be activated the next time you start it.
Note that now that SSH is enabled, any account created on your Raspberry Pi can be used to connect via SSH. So make sure to use strong passwords (including changing the default password of the user)!
Подключение Raspberry Pi через SSH
Чтобы подключиться к Pi через SSH, вам необходимо знать свой IP-адрес Raspberry Pi. Если вы используете Pi без экрана, вы можете найти IP-адрес в таблице аренды DHCP вашего маршрутизатора. В противном случае, если у вас подключен монитор, используйте команду ip, чтобы определить IP-адрес платы:
У пользователя Linux и macOS по умолчанию установлен SSH- клиент, и он может подключиться к Pi по SSH, набрав:
Измените на IP-адрес вашей платы Pi. Если вы не меняли пароль пользователя «pi», по умолчанию используется raspberry .
Когда вы подключаетесь через SSH в первый раз, вам будет предложено принять отпечаток ключа RSA. Введите «да», чтобы продолжить.
После того, как вы войдете в свой Raspberry Pi, вы увидите сообщение, подобное приведенному ниже.
Если вы открываете свой Pi для доступа в Интернет, рекомендуется принять некоторые меры безопасности. По умолчанию SSH прослушивает порт 22. Изменение порта SSH по умолчанию добавляет дополнительный уровень безопасности вашей машине, снижая риск автоматических атак. Вы также можете настроить аутентификацию на основе ключа SSH и подключаться без ввода пароля.
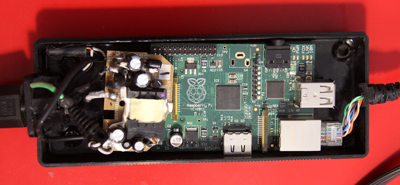
Part 2: Concealing the Pi
I found an old powerbrick for a laptop and gutted it.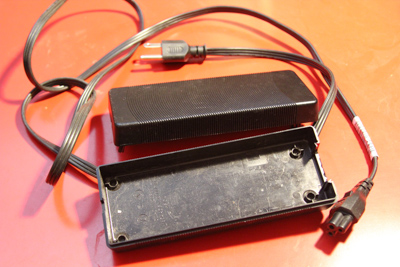
The raspberry pi almost fit. I had to solder off the S-Video port to get it to fit just right.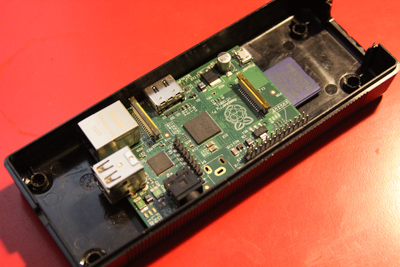
Then I had to hook power up to it. In order to do this I simply took apart a USB charger. Took the plastic casing off to save space and cut the cord to save even more space. Then I soldered where the powerbrick power feed is into the USB power feed. This way when I power up the brick, it’ll give power to the USB charger which will in turn power the Pi.
Lastly was finding a black ethernet cable so both cables coming out of the power brick are black and look inconspicuous.
Here are pictures of it in its special case: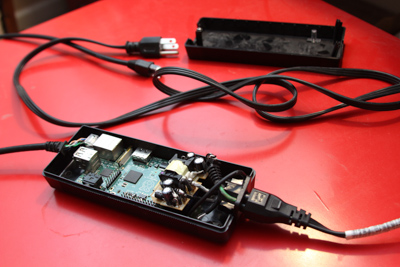
Шаг 1. Скачайте и запишите образ Kali Linux на SD-карту
SD-карта — это мозг вашей Pi, поэтому вам нужно скачать образ Kali Linux и записать ее на карту. Перейдите на сайт Re4son ( HYPERLINK «https://whitedome.com.au/re4son/sticky-fingers-kali-pi-pre-installed-image/» https://whitedome.com.au/re4son/sticky-fingers-kali-pi-pre-installed-image/), где вы найдете образ Kali Linux в сжатом файле. Обязательно выберите версию модели Raspberry Pi 3 B+ (верхняя ссылка).
Если вы используете Windows, то для записи образа на карту вы можете использовать Win32 Disk Imager. На Mac для записи вы можете использовать ApplePiBaker или Etcher. В нашей видео-инструкции выше мы использовали Etcher, так как это самый простой способ. Если в вашем случае происходят какие-то ошибки, то вы можете записать образ Kali на SD-карту через терминал следующим образом.
На Mac перед подключением SD-карты выполните в терминале следующую команду:
df -h
Она отобразит список всех дисков, подключенных в вашей системе. Затем вставьте SD-карту и снова выполните эту команду
Обратите внимание на имя вашей карты в файловой системе. Оно должно выглядеть как «/dev/disk2s1»
Вы должны быть очень внимательны — не ошибитесь в написании этого имени на последующих шагах.
Теперь мы будем использовать команду dd для загрузки образа Kali на карту. Для начала, размонтируем этот раздел, чтобы вы могли записывать на него. X — это правильный номер диска:
sudo diskutil unmount /dev/diskX
Затем выполните следующую команду, чтобы записать образ на SD-карту. Если после номера диска есть «s» (например, rdisk2s1), не включайте «s» и последующий номер. То есть «rdisk2s1» должен выглядеть как «rdisk2». Вот что получится в итоге:
sudo dd bs=1m if=Путь_до_образа_Kali of=/dev/rdiskX
Для начала процесса записи нажмите Enter и обратите внимание, что dd не выводит на экран никакую информацию о ходе процесса, до тех пор, пока не случится какая-нибудь ошибка или он не завершит работу. Чтобы просмотреть ход процесса, нажмите Ctrl-T
Дождитесь завершения процесса. Вы узнаете, что процесс завершен, когда увидите вывод dd о количестве переданных байт.