Vss mobile для windows
Содержание:
- 1. Method # Installation of this CMS on Windows
- Virtual Security System with Webcams or IP cameras
- 2. Method # Application using the Emulator
- Compare Virtual Security System with CCTV DVR Systems
- Как появился VSS
- Conclusion
- Get the SDK
- Где найти VSS
- CameraFTP Cloud Video / Audio Surveillance Service Prices
- Какова роль VSS
- Features of this application
- CameraFTP Virtual Security System features and system requirements
- Как лечить VSS
1. Method # Installation of this CMS on Windows
For this technique, download the CMS software and in the wake of downloading the file and extract the CMS. Presently spare the file on your PC. At that point, we should introduce the product on our computer. Here the bit by bit establishment process is given. Follow the means and afterwards, you will get your CCTV cameras on your system.
1. Step # Installation of this application
For the installation of this, go to the downloaded CMS. right-click on that setup file and pick the “Run as administrator“. Then the framework will request authorization for the installation. Presently the establishment procedure will start and the main window of the establishment will come as demonstrated as follows.

Welcome wizard of the software
This is a welcome wizard of the installation. Just click on the “Next” button.

Set the installation path of this CMS
On this screen of the establishment, you have to pick the installation directory for the installation. Snap-on the “Browse” button and pick the destination folder where you need to introduce the application.

Installation of this CMS
Now just click on the install “button” and the installation process will begin.

Installation of the software
Wait for some time until it finishes.

Finish the installation of the software
Now click on the Finish and the installation process will be finished. You can click on the “launch” button to run the software on your laptop.
1. Step # Login to the CMS
After installation of the software, run the software by clicking the icon present on your desktop.
Set username and password for this app
Now you have to create an account for the CMS. Put a fresh user name and the password and then click on the “Confirm” button.

Login to the software
Then put your created username and password and press the “Login” button.
3. Step # Add the camera or DVR into Software
Now you can see the control panel. Here you can find the option named “Resource Management” click on that option.

Resource Management in this app
After clicking on the “Resource Management” you can find the way to Add your cameras into the software.

Adding the device into this CMS
Now you will get the device manager. Here you can see an option named “Add“. Now a new window comes to you.

Put device details into the software
Presently you will some alternatives for including your cameras. You can pick one of them. Fill the camera detail in these crates. At that point click the “Save and Continue” button.
4. Step # Live View of your CCTV cameras on your computer
Presently go to the main window of the CMS. From that point forward, you can see your device name under the camera bunch name.

Live view into the software
Virtual Security System with Webcams or IP cameras
Virtual Security System supports webcams and regular IP cameras. For most home
and small business users, using a webcam has the following advantages:
- Extremely easy to setup. No technical background is required.
- Inexpensive. You can use the built-in webcam, or any cheap USB webcam.
- More features and flexibility, supports a broad range of resolutions and frame rates.
For professional surveillance, you can connect IP cameras to CameraFTP service
with or without Virtual Security System. However, going through Virtual Security
System has several advantages. Please see the comparison table below:
| Virtual Security System with Webcam | Virtual Security System with IP cameras | IP Cameras + CameraFTP service | |
|---|---|---|---|
| Camera Cost | $0 — $10/camera | $50 — $200/camera | $50 — $200/camera |
| Setup | Extremely easy | Easy for supported cameras, otherwise could be hard or no support at all | Requires a little computer skill |
| Supported service | Video / audio surveillance | Video surveillance, audio support is camera dependent. | Most cameras do not support uploading video / audio files. In this case, it supports … ? |
| Local recording | Yes | Yes | No |
| Plan flexibility (customize the frame rate and image / video resolution) | Complete flexibility | Complete flexibility | Camera dependent, usually with limited flexibility |
| Cloud recording | Yes | Yes | Yes |
| Local monitoring without subscribing for CameraFTP service | Yes | Yes | No |
| Casual and standard monitoring | Yes | Yes | Yes |
| Professional monitoring with night-vision / outdoor monitoring | No | Yes | Yes |
2. Method # Application using the Emulator
This technique likewise works for the two sorts of clients just as for MAC. In this technique, we will utilize an outsider software named emulator. Fundamentally, the idea of this strategy is, run the exact mobile application on the computer utilizing programming which is known as an emulator. An emulator is the product program for running the mobile application on the PC. For instance, you have android mobile having the application and by utilizing the emulator you can show this application on your PC to utilizing the emulator program.
So follow the means beneath for having your mobile application on your PC. Here we will utilize an emulator known as Bluestacks. A download connect is additionally there for downloading the setup file of Bluestacks. So download the setup file of the emulator and follow the means given beneath.
- Download an emulator or Bluestacks.
- Go to the downloaded record of the emulator and run it.
- Follow the establishment of ventures as educated by the emulator.
- After the establishment of the emulator, you can discover the symbol of this in your work area.
- Double-tap on that symbol for run the emulator.
- Presently it will request to pick a few alternatives like language setting, and so on.
- Pick these given choices as indicated by your requirements.
- Presently emulator approaches you for the sign in with your email account.
- Sign in with your email account.
- Presently on the emulator, you can discover the play store for Windows and Appstore for MAC.
- Open your application store and discover the application as on your cell phone.
- Presently associate your CCTV camera device into the application.
- At that point, you can see the live view on your CCTV cameras.
Compare Virtual Security System with CCTV DVR Systems
Virtual Security System can replace a CCTV DVR in most cases. For home users and
for small businesses, they can simply use the built-in webcam or any low-cost
USB webcams. For larger businesses , Virtual Security System supports IP cameras
from many different manufacturers, including high
resolution outdoor models with PTZ feature. Virtual Security System has a lot of
advantages over regular DVRs. Please see the comparison table below:
| Virtual Security System | DVR System | |
|---|---|---|
| Cost | $0 * (If you already have a PC with a built-in webcam; or buy USB webcams for about $10-20/camera) |
$250 — $500 |
| Setup | Extremely easy | Hard |
| Ease of use | Very easy | Hard |
| Local monitoring | Yes | Yes |
| Local recording | Yes | Yes |
| Cloud recording | Yes | Camera Dependent (Mostly no) |
| Remote monitoring / playback | Yes | Camera Dependent (Mostly no) |
| Audio Support 2-way audio? | Yes | Camera-dependent. (mostly no) |
| Cabling | No cabling for built-in Webcam; USB cables or USB extenders; Wi-Fi or Ethernet cables for regular IP cameras |
Complicated wiring: http://www.cctvcamerapros.com/Security-Camera-Cable-s/58.htm |
Virtual Security System vs. CCTV DVRs
Как появился VSS
Итак, судя по написанному выше, всё просто: нам надо просто брать появляющиеся блоки и сохранять их куда-то в сторонку, чтобы при необходимости вынимать обратно. Сразу возникает первый вопрос: а что именно надо сохранять в нашем теневом хранилище? Ведь действительно, можно просто писать в него все приходящие новые блоки и сохранять в метаданные, на какое место они (блоки) должны были быть записаны. А можно поступить чуть сложнее и записывать новые блоки сразу на полагающееся им место, а в хранилище отправлять содержимое перезаписываемых блоков. Что лучше и как выбрать? На самом деле право на жизнь имеют оба варианта, и какой выбрать — зависит исключительно от воли вендора. Первый подход (redirect-on-write, RoW, если оперировать грамотными терминами) быстро пишется, но долго читается. Зато если надо откатиться на первоначальное состояние, это делается моментально — мы просто удаляем наше теневое хранилище. Второй подход (copy-on-write, CoW) пишется медленней, читается быстрее и моментально удаляет копии предыдущих состояний. VSS, к слову, придерживается парадигмы CoW, а в снапшотах VMware реализован RoW.
Но на самом деле этот вопрос не самый важный из тех, которые стоит себе задать перед тем, как начать перехватывать появляющиеся блоки и складывать их в сторонке. Главный вопрос — в какой именно момент надо осуществлять перехват?
Давайте рассмотрим хрестоматийную ситуацию с файлом базы данных. (И если у вас уже заскрипел песок на зубах, смело пропускайте следующие два абзаца.) Итак: у нас есть банальная SQL Server база данных в виде mdf файла, и тут к нам прилетает какой-то запрос. SQL, как порядочное приложение, начинает старательно вносить изменения в файл, а мы старательно перехватываем каждый новый блок данных падающих на диск и пишем в нашу теневую копию. Всё хорошо и здорово, но тут выключили свет. Потом свет включили, сервер запустили и мы даже базу восстановили из нашей теневой копии, но тут оказывается, что SQL не запускается. Говорит — база в не консистентном состоянии. Это значит следующее: во время нормальной работы завершение каждой транзакции помечается специальным флагом. Сервер его видит и знает, что всё хорошо. А тут сервер загружается, видит, что из его базы торчит какой-то кусок данных, флага нет и, следовательно, что с этим всем делать — он понятия не имеет. То ли удалить, то ли дописать, то ли ещё что-то. Но у нас тут не угадайка, а всё должно быть однозначно и консистентно. Поэтому он принимает решение выключиться, дабы не поломать базу ещё сильнее.
Хорошо, но как избежать подобных приключений? Отличным вариантом будет подождать, пока SQL сервер допишет свою транзакцию, пометит её как завершённую, и потом мы быстренько заберём все появившиеся новые блоки. Отличный вариант, который надо срочно реализовывать! Вот только есть небольшая проблема: до этого мы говорили про одно приложение и один файл, с которым оно работает. Научиться общаться с условным SQL Server много ума не надо, но что делать с остальными миллиардами существующих приложений? А что делать, в конце концов, с самой ОС, у которой внутри огромное количество своих процессов и открытых файлов? Вот примерно с такими проблемами и столкнулись учёные мужи из Microsoft, когда пришли к выводу, что надо реализовать некий общий интерфейс, через который можно будет сразу всем прокричать нечто вроде: “Сейчас мы будем делать снапшот, так что быстренько сворачиваемся и сбрасываем буфера на диск! Приостанавливайте свою кипучую деятельность и приводите данные в консистентный вид!”. Ну а назвать эту штуку они решили, как вы уже догадались, Volume Snapshot Service. Или просто VSS.
И тут можно воскликнуть — но ведь в Windows 2008 был представлен Kernel Transaction Manager! Это разве не то же самое? Он же как раз занимается тем, что приводит файлы на диске в консистентное состояние. А вот и нет! То есть да, KTM приводит, но отвечает только за дисковые операции, а что там происходит с приложениями — его мало волнует. А ведь многим из этих приложений важна не просто целостность файлов, но и что в них записано. Классический пример — это Exchange и Active Directory
И тут мы подошли к важной теме:
Conclusion
This is a decent CMS software for observing and dealing with the CCTV cameras on your PC. This product is accessible for Windows clients just as for the MAC clients and working fine with both working frameworks. This product is additionally extremely amazing for dealing with the CCTV cameras. In this, you can such a large number of helpful alternatives for keeping up the CCTV framework. This product is likewise utilized for Face acknowledgement and individuals tallying.
In this post, we examined the two strategies for having the CCTV cameras on your PC. The two techniques are solid and functioning admirably for the two sorts of OS implies Windows and MAC. You can utilize one of them yet the first is increasingly valuable since it is the CMS software and the camera the board will be simple with the CMS programming.
So this is about “Vss Windows application Free Download“. We trust this data will supportive to you. In the event that you have any inquiries or recommendations please don’t hesitate to keep in touch with us in the comment box. Much obliged to you for visiting us. Have a pleasant day.
Get the SDK
- Run from the root of your extension project
This will place and in
If you are developing a web extension, you will need to reference the SDK script from your HTML pages. For example:
<scriptsrc="lib/VSS.SDK.min.js"><script>
To ensure the SDK script is packaged with your extension, update your extension manifest (typically ) and add a new entry to :
{"files"{"path""node_modules/vss-web-extension-sdk/lib","addressable"true,"packagePath""lib"}}
Note: setting is optional, but results in a simpler path for referencing the SDK script from your HTML pages. Not setting a part name would have required you to reference the full path in your tag ()
Где найти VSS
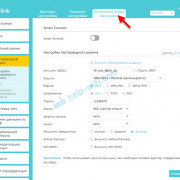
Обнаружить следы VSS можно двумя классическими способами: через GUI или в консоли. В зависимости от конкретной версии системы пути могут немного отличаться, но суть будет одинакова. Итак, есть у меня в лабе Windows Server 2019, и если сделать ПКМ на любом диске в проводнике, мы увидим два пункта: Configure Shadow Copies и Restore previous versions.

Если зайти в мастер настроек, то можно включить создание теневых копий для любого диска, задать расписание, по которому они будут создаваться и, что самое интересное, указать место хранения этих копий. Строго говоря, даже не самих копий, а так называемой diff area — места, куда сбрасываются перезаписанные на оригинальном томе сектора. То есть мы запускаем создание снапшота одного диска, а его данные физически храним на другом. Функция архиполезная и позволяет не просто снижать нагрузку на конкретном диске, но и делать фокусы а-ля снимаем снапшот одной ноды в кластере и цепляем его к другой.

После того, как вы всё настроите на свой вкус, появляется смысл в пункте Restore previous versions. Чисто технически туда и до этого можно было зайти, однако внутри, скорее всего, будет только гнетущая пустота.
Но всё это баловство с графическим интерфейсом, и как мы знаем, до добра это не доводит, поэтому открываем powershell (или даже cmd, почему нет) — и там у нас имеется два варианта из коробки: vssadmin и diskshadow. Первая утилита есть практически на любой системе, начиная с WinXP/Win2003. Нет её только на Windows 8. По какой-то таинственной причине из “восьмёрки” вырезали инструменты управления теневыми копиями, но потом осознали свою неправоту и вернули всё на место. А вот diskshadow доступен только на серверных вариантах Windows. Это уже более продвинутый вариант vssadmin, позволяющий работать не только в интерактивном режиме, но и выполнять целые скрипты, написанные на понятном этому интерпретатору языке. Да и просто это более адекватный и поддающийся контролю инструмент.
И запоминаем самое важное: это две разные утилиты, существующие в разных контекстах. Теневая копия, сделанная в одной утилите, будет видна другой, однако статус у неё будет неоперабельный
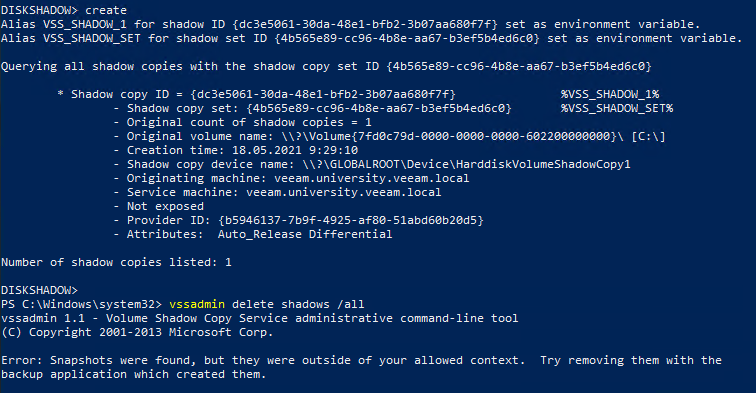 Вот отличный пример: мы создали снимок в diskshadow и пытаемся удалить его с помощью vssadmin. Сам снимок мы видим, но он не в нашем контексте, поэтому сорян, у нас нет здесь власти.
Технически ничего не мешает одновременно делать снимки с помощью vssadmin и diskshadow. Хотя есть вероятность, что получите сообщение типа Another shadow copy is in progress. Но это так, к слову пришлось. Не надо пытаться одновременно делать несколько снапшотов разными программами.
CameraFTP Cloud Video / Audio Surveillance Service Prices
CameraFTP Virtual Security System is optimized for webcams and some IP camera models. For baby
monitoring, pet monitoring, casual home and business monitoring, we recommend
using webcams instead of IP cameras. Using webcams has the following advantages:
- Free or low-cost camera hardwareYour computer is likely to have a built-in webcam, saving hardware cost. If you
need more cameras, you can simply buy USB webcams, which are significantly less
expensive than regular IP cameras. - Extremely easy to setup.
Just install the software and add the webcam to the Virtual Security System — no
need to wait for the device to be shipped, assemble the camera, connect
complicated cables, or configure the Wi-Fi network and camera. - Supports full video / audio surveillanceVirtual Security System supports video/audio surveillance as long as your
computer has a microphone. Many USB webcams also include a microphone, so they
will support video / audio surveillance. Most regular IP cameras do not
support audio - Complete flexibilityYou have complete flexibility in choosing a service plan – such as video
resolution and frame rate – which allows customization that is optimized for
both quality and cost; you also have the flexibility to move your camera around
as it is not mounted to the wall or ceiling. - Higher video resolutionCompared with regular IP cameras, many webcams can support higher video resolution
- Ultimate Security with Client-side encryptionMobile Security Camera software supports advanced client-side encryption. The
recorded data is transparently encrypted using your own encryption key; without
the encryption key, nobody, incl. DriveHQ customer support staff can see your
uploaded videos / images.
There are a few weaknesses of using webcams as your security cameras:
- Requires a laptop / desktop computer.Most users already have a spare computer, so this likely is not an issue. Using
a regular IP camera to directly upload data to CameraFTP.com can free up the
computer, however, this does not have the local recording feature as offered by
DVR systems;
Also, most of regular IP cameras don’t support uploading video/audio files, thus
you will lose the audio surveillance capability; moreover, regular IP cameras
only support certain video resolutions and frame rates, so you may not be able
to choose the best service plan. - Webcams usually don’t support good night-vision.Most webcams don’t support night vision, though there are exceptions to that
rule. If you are buying a new webcam, and if you need night vision, please make
sure you order a correct model. - USB cables have a very limited lengthThe length of a USB cable is usually limited to about 6-9 ft, which is too short
to mount your webcam on the ceiling.
Fortunately, for most
casual home / business monitoring, you don’t need to mount your webcam onto the
ceiling. And if you do need to, you can buy USB extenders, which can extend the
max length to 50 – 100 ft. - Seems no webcams that can support Wi-FiTo mount a webcam, you must wire the USB cable, which is not required for
regular IP cameras, as they support Wi-Fi.
Of course, there is also an advantage that USB-based webcams don’t require power
supply, so you don’t need to wire the power lines to the cameras.
Какова роль VSS
Не сомневаюсь, что 90% читающих прекрасно понимают, зачем нужны снапшоты, но ради оставшихся 10% потерпите несколько предложений. Или сразу идите в следующий раздел.
Итак, все кто остался, давайте представим, что есть у нас некий диск, на котором находятся файлы, с которыми кто-то работает и как-то их изменяет. Изменения эти накапливаются, а иногда очень хочется иметь возможность взять и вернуться во времени назад. И желательно откатывать изменения не для всего диска, а только для выбранных папок и файлов. Для этого и был придуман механизм теневых копий.
Сами снапшоты ничего не знают про ваши файлы и папки. Они работают на уровень ниже файловой системы — с блочными устройствами и блоками данных. Если придерживаться терминологи Microsoft, то снапшот — это место, именуемое Shadow Storage, куда записываются изменённые блоки данных и откуда их можно извлекать с целью переписать данные на оригинальном диске. Тут можно запомнить для себя два нюанса. Первый — только что сделанный спапшот занимает ровно ноль байт. Это просто пре-алоцированное место, куда файловая система может копировать измененные блоки (или наоборот, новые блоки, но не суть). И второй — теневая копия суть есть дифференциальный бекап. Все данные, которые вы изменили, не удаляются, а отправляются на хранение в этой зоне.
Features of this application
This CMS software has some great highlights. By utilizing it you are just ready to watch your CCTV cameras on your system yet in addition you can deal with your CCTV cameras on your computer. This CMS has riched with some great highlights like playback control, IP camera the executives, PTZ control, network functions, and so on.
- You can watch your CCTV camera on your PC.
- Watch and deal with the account of CCTV cameras.
- Playback at the remote area.
- Movement and sensor recording the board.
- you can take backup on your computer.
- You can likewise include your entrance Control and Videophones.
- Log the board.
- Change camera picture hues and other related choices.
- Network functions.
- PTZ controlling.
CameraFTP Virtual Security System features and system requirements
CameraFTP Virtual Security System features:
- Extremely easy to setup;
- Includes a regular CCTV DVR system’s features;
- Stores the recorded footage on CameraFTP cloud storage;
- Supports local viewing / playback;
- Supports remote viewing / playback;
- Supports local and remote real-time viewing;
- Supports numerous resolution and frame rate options so you can tailor a service plan that is right for you. Save at least 50% of your service fee without degrading your service quality;
- Works with all webcams, including night-vision webcams;
- Most IP cameras cannot upload video files, Virtual Security System can enable those cameras uploading video files.
System Requirements:
Windows 7, 8, 10, Vista, XP, Windows 2003, Windows 2008 and Window 2012 with at
least 1024MB RAM and 25GB of free disk space.
Как лечить VSS
Сразу, не отходя от кассы, открою вам тайну самого лучшего метода лечения большинства проблем с VSS — перезагрузка. Понимаю, что это кощунство и кошмар наяву для всех свидетелей аптайма, но суровая правда жизни такова, то можно сколь угодно долго биться с пациентом, чтобы потом всё починилось само от перезагрузки. Да, именно так. Это тот случай, когда само сломалось и само починилось.
Другая проблема — это железо. Помните про временные рамки для райтеров? Про десять секунд на снапшот? Для многих это ограничение становится проблемой из-за того, что СХД физически не успевает сделать требуемые действия за отведённое время. Как это лечится? А вот никак. Или покупаем более мощное железо, или ищем пути снижения нагрузки, чтобы операция была проведена за выделенный промежуток времени.
Если посмотрите одно из самых популярных KB1680: VSS Timeout when backing up Exchange VM, то легко обнаружите, что первые три шага для решения всех проблем с VSS — сделайте снапшот вручную и посмотрите чтобы это заняло менее 20 секунд, перезагрузитесь и попробуйте снизить нагрузку. Вот так и живём, да.
И что же делать, если VSS падает, в ивентах ничего нет, а понять, что происходит надо? Тут я могу порекомендовать три хороших статьи:
-
КВ от Veeam, посвящённое анализу поведения VSS с помощью diskshadow.
-
Другое KB от Veeam, посвящённое сбору информации с помощью vsstrace из Windows SDK. Но скажу сразу, это уже не для слабых духом.
-
И видео от моего коллеги, где он наглядно показывает, как работать с информацией из первых двух пунктов =) Рассказывает он действительно хорошо, но с непривычки голова у вас от объёма информации заболит, это я вам обещаю.
Также в гугле можно найти массу толковых советов по поводу приведения VSS в чувства, только рекомендую не бросаться на первый попавшийся случай, а постараться найти наиболее похожий именно на вашу проблему. По коду ошибки, например. Потому что слишком много возможных комбинаций ошибок, приложений и причин их возникновения.