Обзор и подключение dht11 (dht22) датчика влажности и температуры
Содержание:
- Принципы измерения температуры и влажности с помощью датчика DHT11
- Общий принцип работы
- Preparing Node-RED Dashboard
- DHT22 vs DHT11 (difference) Specifications:
- Схема подключения
- Conclusion
- Arduino Code – DHT11 and DHT22 with LCD
- Принцип работы датчика
- Динамическая загрузка данных датчика с помощью AJAX
- Installing the required Arduino libraries
- DHT11 and DHT22 Temperature and Humidity Sensors
- loop()
- Conclusion
- Troubleshooting – Failed to read from DHT sensor
- Temperature Accuracy
- Виды датчиков
- DHT11 Vs DHT22/AM2302
- Подключение к Orange Pi
- Schematic
- Программная часть
- 3Считывание данных с сенсора DHT11 при помощи Arduino
- 2Схема подключения датчика температуры и влажности DHT11
- 1Технические характеристики датчика температуры и влажности DHT11
Принципы измерения температуры и влажности с помощью датчика DHT11
Функционально схема устройства состоит из 3-х основных блоков: первый блок измеряет температуру и влажность с помощью датчика DHT11, второй блок считывает эти значения с выхода датчика и преобразует их в форму, удобную для восприятия, а третий блок отображает значения влажности и температуры на ЖК дисплее. Функциональная взаимосвязь этих блоков представлена на следующем рисунке.
Работа нашей схемы будет основана на последовательной передаче данных по одиночному проводнику. Вначале Arduino передает стартовый сигнал (то есть чтобы DHT модуль начал работу) DHT модулю, а затем DHT модуль (то есть модуль измерения температуры и влажности) выдает Arduino ответный сигнал, содержащий данные о температуре и влажности. Arduino собирает эти данные, обрабатывает и передает на ЖК дисплей 16×2.
В этом проекте мы будем использовать датчик DHT11. Этот модуль способен измерять температуру и влажность и выдавать их значения на выход в виде калиброванного цифрового сигнала. Этот датчик обеспечивает высокую точность измерений, высокую надежность и стабильность измерений. Принцип действия данного датчика основан на резистивном типе измерения влажности и NTC-типе (NTC — отрицательный температурный коэффициент) измерения температуры. Данный датчик имеет встроенный 8-битный микроконтроллер, что обеспечивает ему быстрый отклик на изменения окружающей среды и приемлемую стоимость. Датчик имеет 4 выходных контакта.
Модуль DHT11 работает по принципу последовательной связи по одиночному проводнику. Этот модуль передает данные в виде последовательности импульсов с определенным периодом. Но прежде чем он начнет передавать данные ему нужно подать команду инициализации с Arduino. Весь этот процесс занимает примерно 4 мс. Процесс передачи 40 бит данных будет включать в себя:
8-bit integral RH data + 8-bit decimal RH data + 8-bit integral T data + 8-bit decimal T data + 8-bit check sum (проверочная сумма).
Общий принцип работы
Измеряющая данные окружающей среды метеостанция на Ардуино состоит из нескольких основных компонентов:
- собственно плата управления Arduino (например, Uno). На нее поступает информация со внешних датчиков, контроллер выполняет вычисления и выводит информацию на экран;
- электронный дисплей — служит для отображения поступивших с контроллера данных в понятной человекочитаемой форме;
- сенсор влажности температуры. В подобных схемах популярны датчики DHT11 и DHT22. Они регистрируют данные среды и отдают их контроллеру;
- макетная плата — основа для сборки всех компонентов. На ней фиксируются все элементы метеостанции, по ней же прокладываются электрические соединения;
- соединительные провода — с «оголенными» концами под пайку или оснащенные штекерами.
Кроме того, в плату понадобится залить соответствующее программное обеспечение — скетч. Его содержимое зависит от набора элементов и выполняемых задач, примеры скетчей мы также рассмотрим ниже.
Preparing Node-RED Dashboard
The ESP32 is publishing temperature readings every 10 seconds on the esp32/dht/temperature and esp32/dht/humidity topics. Now, you can use any dashboard that supports MQTT or any other device that supports MQTT to subscribe to those topics and receive the readings.
As an example, we’ll create a simple flow using Node-RED to subscribe to those topics and display the readings on gauges.
If you don’t have Node-RED installed, follow the next tutorials:
- Getting Started with Node-RED on Raspberry Pi
- Installing and Getting Started with Node-RED Dashboard
Having Node-RED running on your Raspberry Pi, go to your Raspberry Pi IP address followed by :1880.
The Node-RED interface should open. Drag two MQTT in nodes, and two gauge nodes to the flow.
Click the MQTT node and edit its properties.

The Server field refers to the MQTT broker. In our case, the MQTT broker is the Raspberry Pi, so it is set to localhost:1883. If you’re using a Cloud MQTT broker, you should change that field.
Insert the topic you want to be subscribed to and the QoS. This previous MQTT node is subscribed to the esp32/dht/temperature topic.
Click on the other MQTT in node and edit its properties with the same server, but for the other topic: esp32/dht/humidity.
Click on the gauge nodes and edit its properties for each reading. The following node is set for the temperature readings. Edit the other chart node for the humidity readings.

Wire your nodes as shown below:

Finally, deploy your flow (press the button on the upper right corner).
Alternatively, you can go to Menu > Import and copy the following to your Clipboard to create your Node-RED flow.
DHT22 vs DHT11 (difference) Specifications:
| Parameter | DHT11 (RHT01) | DHT22 (RHT03) |
|---|---|---|
| Relative Humidity Range | 20 ~ 90% | 0 ~ 100% |
| Relative Humidity Accuracy: | ±5%RH | ±2%RH |
| Temperature Accuracy: | ±2°C | ±0.5°C |
| Resolution | 1%RH,1°C | 0.1%RH,0.1°C |
| Repeatability | ±1% | ±1% |
| Long Term Stability | ±1% per year | ±0.5% per year |
| Operating Temperature Range | 0 ~ 50°C | -40 ~ 80°C |
| Power Supply: | 3,3V ~ 5.5V | 3.3 ~5.5V |
| Supply Current: | 0.5mA ~ 2.5mA | 1 ~ 1.5mA |
| Idle Supply Current: | 100uA ~ 150uA | 40 ~ 50uA |
| Max sampling period(Max device update rate). | 1 second | 2s |
| Manufacturer | MaxDetect Technology Co. Ltd. |
The data sheet indicates it can cope with a cable length of more than 20m.
For less than 20m a 5k pull-up is recommended (most breakout boards have this
pull up resistor built-in). If you use more than a 20m cable run then the
resistor is not defined and you have to find it experimentally — for a longer
cable, resistance increases, therefore you need more current to pull up the
voltage successfully, so you you will need a smaller pull-up resistor .
Note : The AM2302 is similar to the RHT03 but has a lower max.cable
length and lower max. supply (5.5V). Check the device you have AM2302 is made
by Aosong.
Warning:The serial protocol used is strictly
Single-Master-Slave only, meaning that each DHT11 you use has
to have a dedicated processor pin and this pin must be bi-directional i.e. can
be changed from input to output on the fly.
Схема подключения
Чтобы подключить измеритель исходя из первого комплекта подключения, нужно использовать такой макет.
Подключение датчика температуры DHT11 к Ардуино, схема №1:
- Первый вывод DHT11 к Arduino UNO +5V (красный).
- Второй вывод к четвертому контакту Digital (синий).
- Третий контакт не задействован.
- Четвертый подключается к GND (черный)
Второй коннектор, отвечающий за передачу сигнала, нужно подключить не только к четвертому разъему интерфейса ввода/вывода, но и к питанию, через резистор. Подтянуть линию данных DHT11 к питанию необходимо для обеспечения правильной работы сенсора.
Принципиальную схему можно посмотреть ниже.
Лишен таких нюансов модуль датчика, потому как уже включает в себя «элементы подтяжки».
Как подключить датчик температуры и влажности по схеме №2 к Ардуино:
- VCC к +5V (питание, красный).
- OUT к цифровому разъему (данные, зеленый).
- GND к GND (земля, черный).
Принципиальная схема выглядит так.
Схема подключения №3:
- SCL дисплея в A5 (данные, оранжевый).
- SDA в А4 (данные, желтый).
- GND в GND (земля, черный).
- VCC в 5V (питание, красный).
- GND датчика в GND (земля, черный).
- DATA в A0 (данные, фиолетовый).
- VCC в 5V (питание, красный).
Питание с LCD дисплея и датчика подключите к одному разъему через соединительный провод 2 к 1.
Схемы готовы, теперь следует подключить их к компьютеру и с помощью скетча, запрограммировать на правильную работу.
Conclusion
In this article, I have shown you how DHT11 and DHT22/AM2302 temperature and humidity sensors work and how you can use them with Arduino. I hope you found it useful and informative. If you did, please share it with a friend who also likes electronics and making things!
I would love to know what projects you plan on building (or have already built) with this sensor. If you have any questions, suggestions or if you think that things are missing in this tutorial, please leave a comment down below.
Note that comments are held for moderation to prevent spam.
This work is licensed under a Creative Commons Attribution-NonCommercial-ShareAlike 4.0 International License.
Arduino Code – DHT11 and DHT22 with LCD
Sometimes you come up with an idea where you want to monitor temperature and humidity levels in your DIY incubator. Then you’ll probably need 16×2 character LCD to display prevailing conditions in your incubator, instead of a serial monitor. So, in this example, we’ll hook the LCD up to the Arduino along with the DHT11 and DHT22 sensors.
In case you are not familiar with 16×2 character LCDs, consider reading (at least skimming) below tutorial.
SUGGESTED READING
Next, we need to make connections to the LCD as shown below.
Wiring DHT11 and 16×2 Character LCD to Arduino UNO
Wiring DHT22 and 16×2 Character LCD to Arduino UNO
The following sketch will print the temperature and relative humidity values on the 16×2 character LCD. It uses the same code except we print values on LCD.
Temperature & humidity measurements on LCD
Принцип работы датчика
DHT22 (AM2302) использует упрощенную технологию единой шины для связи, в которой для обмена и управления данными в системе применяется только одна линия данных. В приложениях обычно требуется внешний подтягивающий резистор, около 5,1 кОм. Когда шина свободна, ее статус переключится на HIGH. SDA используется для передачи данных и синхронизации между микропроцессором и AM2302. Он принимает формат данных с одной шиной, 40 бит данных в одной передаче, старший бит первым. Соответствующая временная диаграмма показана ниже.
| Название | Данные по одной шине и формат сигнала |
| Start signal (Стартовый сигнал ) | Микропроцессор устанавливает SDA на LOW на период времени (не менее 800 мкс), чтобы информировать датчик для подготовки данных. |
| Response signal (Ответный сигнал) | Датчик устанавливает SDA на LOW на 80 мкс, а затем на HIGH на 80 мкс, чтобы ответить на сигнал запуска. |
| Data format (Формат данных) | После получения сигнала запуска датчик считывает строку данных (40 бит) через SDA, старший бит выводится сначала. |
| Humidity (Влажность) | Разрешение по влажности 16 бит, старший бит первым; Значение, считываемое датчиком, в 10 раз превышает фактическую влажность. |
| Temp. (Температура) | Разрешение по температуре составляет 16 бит, старший бит первый; Значение, считываемое датчиком, в 10 раз превышает фактическую температуру. Когда MSB (бит 15) равен «1», это указывает на отрицательную температуру; Когда MSB (бит 15) равен «0», это указывает на положительную температуру; Другие биты (бит 14 ~ бит 0) указывают на обнаруженное значение температуры. |
| Parity bit (Бит четности) | Бит четности = влажность высокая + влажность низкая + температура высокая + температура низкая |
Динамическая загрузка данных датчика с помощью AJAX
Если ваша веб-страница много весит, то полное ее обновление не слишком практично. Лучше использовать асинхронный Javascript и Xml (AJAX), чтобы мы могли запрашивать данные с сервера асинхронно (в фоновом режиме), не обновляя страницу.
Для выполнения AJAX на веб-страницах в JavaScript обычно используется объект . Он тихо выполняет GET запрос на сервер и обновляет элемент на странице. AJAX – это не новая технология или другой язык, а просто существующие технологии, используемые по-новому. Кроме того, AJAX также позволяет:
- запрашивать данные с сервера после загрузки страницы;
- получать данные с сервера после загрузки страницы;
- отправлять данные на сервер в фоновом режиме.
Ниже приведен скрипт AJAX, который мы будем использовать. Поместите этот скрипт непосредственно перед закрывающим тегом .
Скрипт начинается с тега , так как AJAX-скрипт – это не что иное, как javascript, и поэтому нужно писать его в теге . Чтобы данная функция вызывалась повторно, мы будем использовать функцию javascript . Она принимает два параметра: функцию для выполнения и интервал времени (в миллисекундах), через который выполнять указанную функцию.
Сердцем этого скрипта является функция . Внутри этой функции создается объект . Данный объект используется для запроса данных с веб-сервера.
Функция вызывается каждый раз, когда изменяется . Свойство хранит состояние . Возможны следующие значения:
- 0: запрос не инициализирован;
- 1: установлено подключение к серверу;
- 2: запрос получен;
- 3: обработка запроса;
- 4: запрос завершен, и ответ готов.
Свойство содержит статус объекта . Возможны следующие значения:
- 200: OK;
- 403: запрещено;
- 404: страница не найдена.
Когда равен 4, а – 200, ответ готов. Теперь обновляется содержимое элемента с webpage (, содержащей значения температуры и влажности).
Затем HTTP запрос инициируется с помощью функций и .
Installing the required Arduino libraries
The code below uses the Adafruit DHT sensor library which you can download here on GitHub. This library only works if you also have the Adafruit Unified Sensor library installed, which is also available on GitHub.
You can also download the two libraries by clicking on the buttons below:
DHT-sensor-library-master.zip
Adafruit_Sensor-master.zip
You can install the library by going to Sketch > Include Library > Add .ZIP Library in the Arduino IDE.
Another option is to navigate to Tools > Manage Libraries… or type Ctrl + Shift + I on Windows. The Library Manager will open and update the list of installed libraries.
You can search for ‘dht’ and ‘adafruit unified sensor’ and look for the library by Adafruit. Select the latest version and then click Install.
DHT11 and DHT22 Temperature and Humidity Sensors
The DHT11 and DHT22 sensors are used to measure temperature and relative humidity. These are very popular among makers and electronics hobbyists.
These sensors contain a chip that does analog to digital conversion and spit out a digital signal with the temperature and humidity. This makes them very easy to use with any microcontroller.
If you’re looking to use these sensors with the Arduino board, you can read the following tutorial:
Guide for DHT11/DHT22 Humidity and Temperature Sensor with Arduino
DHT11 vs DHT22
The DHT11 and DHT22 are very similar, but differ in their specifications. The following table compares some of the most important specifications of the DHT11 and DHT22 temperature and humidity sensors. For a more in-depth analysis of these sensors, please check the sensors’ datasheet.
| Temperature range | 0 to 50 ºC +/-2 ºC | -40 to 80 ºC +/-0.5ºC |
| Humidity range | 20 to 90% +/-5% | 0 to 100% +/-2% |
| Resolution | Humidity: 1%Temperature: 1ºC | Humidity: 0.1%Temperature: 0.1ºC |
| Operating voltage | 3 – 5.5 V DC | 3 – 6 V DC |
| Current supply | 0.5 – 2.5 mA | 1 – 1.5 mA |
| Sampling period | 1 second | 2 seconds |
| Price | $1 to $5 | $4 to $10 |
| Where to buy | Check prices | Check prices |
The DHT22 sensor has a better resolution and a wider temperature and humidity measurement range. However, it is a bit more expensive, and you can only request readings with 2 seconds interval.
The DHT11 has a smaller range and it’s less accurate. However, you can request sensor readings every second. It’s also a bit cheaper.
Despite their differences, they work in a similar way, and you can use the same code to read temperature and humidity. You just need to select in the code the sensor type you’re using.
loop()
In the loop(), you create a timer that will allow you to get new temperature and humidity readings from the DHT sensor and publishing them on the corresponding topic every 10 seconds.
Learn more about getting readings from the DHT11 or DHT22 sensors: ESP32 with DHT11/DHT22 Temperature and Humidity Sensor using Arduino IDE.
Publishing to topics
To publish the readings on the corresponding MQTT topics, use the next lines:
Basically, use the publish() method on the mqttClient object to publish data on a topic. The publish() method accepts the following arguments, in order:
- MQTT topic (const char*)
- QoS (uint8_t): quality of service – it can be 0, 1 or 2
- retain flag (bool): retain flag
- payload (const char*) – in this case, the payload corresponds to the sensor reading
The QoS (quality of service) is a way to guarantee that the message is delivered. It can be one of the following levels:
- : the message will be delivered once or not at all. The message is not acknowledged. There is no possibility of duplicated messages;
- 1: the message will be delivered at least once, but may be delivered more than once;
- 2: the message is always delivered exactly once;
- Learn about MQTT QoS.
Conclusion
The BME280 delivered easily the best results. The test is potentially unfair though given that they were brand new and are being compared against two-year old DHT22s and SHT71. I have not had much luck with reliability of the DHT22s, but the Sensirion SHT71 has proven itself dependable over two years so far.
If you have comments or suggestions feel free to contact me. robert -AT- kandrsmith.org
Acknowledgments
Though I designed and integrated the entire experiment, I must acknowledge the many open source projects, both software and hardware, that I used.
- Software was developed using the Arduino tools and environment, using some parts of the AdaFruit DHT22/DHT11 library, Brett Beauregard’s PID library and Markus Schatzl and Carl Jackson’s Sensirion library. Drivers for other sensors were based on datasheets and sample code published by their respective manufacturers.
- My data logger is EmonCMS from the Open Energy Monitor project.
- I am no longer using a JeeNode board, but am endebted to the work of Jeelabs for earlier iterations of this experiment.
- The plots and numerical analysis were generated in Flot, Octave, D3 and Plotly javascript.
- MySQL database, Apache web-server and of course the 10,000+ people who have contributed all across the Linux operating system.
- Javascript for the tabbed menu container around the 3D plots is from Online HTML Tools.
- Finally, thanks to the many correspondents for their interesting discussions and encouragement.
Almost vaguely related and possibly of interest is monitoring radon in the house.
2018-02-26 8:34 PM
Troubleshooting – Failed to read from DHT sensor
If you’re trying to read the temperature and humidity from the DHT11/DHT22 sensor and you get an error message in your Serial Monitor, follow the next steps to see if you can make your sensor work (or read our dedicated DHT Troubleshooting Guide).
“Failed to read from DHT sensor!” or Nan readings
If your DHT sensor returns the error message “Failed to read from DHT sensor!” or the DHT readings return “Nan”:

Try one of the following troubleshooting tips:
- Wiring: when you’re building an electronics project, you need to double-check the wiring or pin assignment. After checking and testing that your circuit is properly connected, if it still doesn’t work, continue reading the next troubleshooting tips.
- Power: the DHT sensor has an operating range of 3V to 5.5V (DHT11) or 3V to 6V (DHT22). If you’re powering the sensor from the ESP32 3.3V pin, in some cases powering the DHT with 5V solves the problem.
- Bad USB port or USB cable: sometimes powering the ESP32 directly from a PC USB port is not enough. Try to plug it to a USB hub powered by an external power source. It might also help replacing the USB cable with a better or shorter one. Having a USB port that supplies enough power or using a good USB cable often fixes this problem.
- Power source: as mentioned in the previous tip, your ESP might not be supplying enough power to properly read from the DHT sensor. In some cases, you might need to power the ESP with a power source that provides more current.
- Sensor type: double-check that you’ve uncommented/commented in your code the right sensor for your project. In this project, we were using the DHT22:
- Sampling rate: the DHT sensor is very slow getting the readings (the sensor readings may take up to 2 seconds). In some cases, increasing the time between readings solves the problem.
- DHT sensor is fried or broken: unfortunately, these cheap sensors sometimes look totally fine, but they are fried/broken. So, even though you assembled the right circuit and code, it will still fail to get the readings. Try to use a different sensor to see if it fixes your problem.
- Wrong baud rate or failed to upload code: if you don’t see anything in your Arduino IDE Serial Monitor double-check that you’ve selected the right baud rate, COM port or that you’ve uploaded the code successfully.
While building our projects, we’ve experienced similar issues with the DHT and it was always solved by following one of the methods described earlier.
Fatal error: Adafruit_Sensor.h: No such file or directory
There’s also a common error that happens when you try to compile the code. If you receive the following error:
You need to install the Adafruit Unified Sensor driver library. In your Arduino IDE, type in the search box “Adafruit Unified Sensor“, scroll all the way down to find the library and install it.

After installing the library, restart your Arduino IDE and the code should compile without the error message.
Temperature Accuracy
Though primarily interested in humidity, I present a brief comparison of the temperature measurements. I made no attempt here to establish an absolute temperature calibration and simply compare each sensor to the ensemble average of all nine sensors. A separate document covers absolute temperature calibration of the BME280 and also demonstrates that though the results here are strictly only relative, within a couple of tenths of a degree they are also good representations of the absolute accuracy.
Figure 10. Plots show temperature returned by each device compared to the average of all nine. The black line is just ‘sensor == ensemble mean’ as a visual guide, not a fit.
Figure 11. Plots showing deviation of each device’s own temperature from the average of all nine, plotted as a function of temperature.
All agree within about 0.5°C. The Bosch sensors consistently gave the highest values and looking at show the largest scatter, suggesting poorer repeatability. However, investigating in more detail, the Bosch thermometers are very weakly humidity sensitive. shows an apparent scatter but replotting temperature errors as a function of humidity () shows a tight correlation with very little dispersion. Repeatability at a fixed humidity is very good. The difference is small (0.1°C) and well within the manufacturer’s specification (1.0°C).
In contrast, the AM2320 (device G) shows little error as a function of humidity () but has the largest error as a function of temperature ().
Figure 12. Plots showing deviation of each device’s own temperature from the average of all nine, plotted as a function of humidity. Only for the BME280 is there a convincing detection of the thermometer being slightly humidity sensitive.
Виды датчиков
Для измерения параметров среды часто применяют три вида сенсоров:
- DHT11;
- DHT22;
- SHT1x.
Плюс первого — дешевизна, скорость работы и стабильность сигнала. Из минусов отметим сравнительно слабую программную реализацию библиотеки, высокую погрешность выполняемых измерений и не всегда подходящий диапазон рабочих температур. DHT22 выгодно отличается благодаря:
- малым погрешностям;
- высокой дальности сигнала;
- поддержке дробных значений.
Как и первый сенсор, DHT22 не работает без подгруженной библиотеки. Кроме того, для профессиональных задач его чувствительность и скорость реакции может стать недостаточной.
Датчики линейки SHT1x быстро срабатывают, имеют весьма низкую погрешность, экономичны и умеют «засыпать» при долгой неактивности. Из недостатков выделим:
- два цифровых интерфейса;
- невозможность работы без подключения программной библиотеки и диапазон от 0 до 50 градусов — как в других образцах. Его хватает не всегда.
По стоимости все три варианта примерно одинаковы. Для «домашних» установок чаще берут DHT11-22 за их сравнительную простоту в эксплуатации и настройке.
DHT11 Vs DHT22/AM2302
We have two versions of the DHTxx sensor series. They look a bit similar and have the same pinout, but have different characteristics. Here are the details:
The DHT22 is the more expensive version which obviously has better specifications. Its temperature measuring range is from -40°C to +125°C with +-0.5 degrees accuracy, while the DHT11 temperature range is from 0°C to 50°C with +-2 degrees accuracy. Also the DHT22 sensor has better humidity measuring range, from 0 to 100% with 2-5% accuracy, while the DHT11 humidity range is from 20 to 80% with 5% accuracy.
| DHT11 | DHT22 | |
| Operating Voltage | 3 to 5V | 3 to 5V |
| Max Operating Current | 2.5mA max | 2.5mA max |
| Humidity Range | 20-80% / 5% | 0-100% / 2-5% |
| Temperature Range | 0-50°C / ± 2°C | -40 to 80°C / ± 0.5°C |
| Sampling Rate | 1 Hz (reading every second) | 0.5 Hz (reading every 2 seconds) |
| Body size | 15.5mm x 12mm x 5.5mm | 15.1mm x 25mm x 7.7mm |
| Advantage | Ultra low cost | More Accurate |
Though DHT22 is more precise, more accurate and works in a bigger range of temperature & humidity; there are three things where the DHT11 beats the hell out of DHT22. It’s less expensive, smaller in size and has higher sampling rate. The sampling rate of the DHT11 is 1Hz i.e. one reading every second, while the sampling rate of DHT22 is 0.5Hz i.e. one reading every two seconds.
However, the operating voltage of both sensors is from 3 to 5 volts, while the max current used during conversion (while requesting data) is 2.5mA. And the best thing is that DHT11 and DHT22 sensors are ‘swappable’ – meaning, if you build your project with one you can just unplug it and use another. Your code may have to adjust a little but at least the wiring is the same!
Подключение к Orange Pi
Для подключения будем использовать контакты GPIO. Orange Pi имеет 40 контактов GPIO. Можно использовать контакты GPIO для связи и передачи питания на светодиоды, датчики, двигатели и даже другие микроконтроллеры, такие как Arduino. Расположение выводов для Orange Pi, более подробно описано здесь .
Прежде всего, отключим питание Orange Pi при подключении датчиков. С помощью соединительных проводов соединим следующие контакты (датчик с пи):
- DOUT к PIN 7 (GPCLK)
- GND к PIN 6 (GND)
- VCC к PIN 1 (VCC-3.3V)
Схема подключения DHT к Orange Pi
Настроив аппаратное обеспечение, нам нужно настроить программную часть.
Schematic
Before proceeding to the web server, you need to wire the DHT11 or DHT22 sensor to the ESP32 as shown in the following schematic diagram.
In this case, we’re connecting the data pin to GPIO 27, but you can connect it to any other digital pin. You can use this schematic diagram for both DHT11 and DHT22 sensors.

(This schematic uses the ESP32 DEVKIT V1 module version with 36 GPIOs – if you’re using another model, please check the pinout for the board you’re using.)
Note: if you’re using a module with a DHT sensor, it normally comes with only three pins. The pins should be labeled so that you know how to wire them. Additionally, many of these modules already come with an internal pull up resistor, so you don’t need to add one to the circuit.
Программная часть
Чтобы написать программу для отработки, нужно скачать с Github библиотеки DHT для датчика и LiquidCrystal_I2C для дисплея. Загрузите, разархивируйте, измените название библиотеки для сенсора на «DHT» и перенесите папки с файлами в директорию на диске \Arduino\libraries. Тоже самое, только без переименования, сделайте для библиотеки для LCD-дисплея, если вы подключили по схеме и его.
Теперь сам скетч. Написан он для вывода замеров на экран подключенного дисплея. Вносите соответствующие правки, если у вас в схеме применялись другие элементы или задействованы другие разъемы интерфейса входа/выхода. Посмотреть его можно здесь.
3Считывание данных с сенсора DHT11 при помощи Arduino
Давайте пойдём таким путём: скачаем библиотеку для датчика DHT11, установим её стандартным способом (распаковав в директорию \libraries\ среды разработки для Arduino).
Напишем вот такой простенький скетч. Он будет выводить в последовательный порт компьютера каждые 2 секунды сообщения об относительной влажности и температуре, считанные с датчика DHT11.
#include <dht11.h> // подключаем библиотеку
dht11 sensor; // инициализация экземпляра датчика
#define DHT11PIN 8 // вывод 8 будет шиной DATA

void setup() {
  Serial.begin(9600);
}

void loop() {
  int chk = sensor.read(DHT11PIN);

  Serial.print("h=");
  Serial.print(sensor.humidity);
  Serial.print("%\t");

  Serial.print("t=");
  Serial.print(sensor.temperature);
  Serial.println("C");

  delay(2000);
}
Загрузим этот скетч в Arduino. Подключимся к Arduino с помощью монитора COM-порта и увидим следующее:
Данные о температуре и влажности, полученные с датчика DHT11
Видно, что данные и о влажности, и о температуре считываются и выводятся в терминалку.
2Схема подключения датчика температуры и влажности DHT11
Рассмотрим схему подключения датчика температуры и влажности DHT11 к микроконтроллеру, в частности, к Arduino.
Схема подключения датчика температуры и влажности DHT11
Давайте посмотрим, что показано на рисунке.
| Обозначение на рисунке | Описание | Примечание |
|---|---|---|
| MCU | Микроконтроллер или одноплатный компьютер | Arduino / Raspberry Pi и др. |
| DHT11 | Датчик температуры и влажности | Выводы 1Pin, 2Pin и 4Pin задействованы в схеме, один из выводов датчика – 3-ий пин 3Pin – ни к чему не подключается. |
| DATA | Шина данных | Если длина соединительного кабеля от датчика к микроконтроллеру не превышает 20 метров, то эту шину рекомендуется подтянуть к питанию резистором 5,1 кОм; если больше 20 метров – то другой подходящий номинал (меньший). |
| VDD | Питание датчика | Допустимы напряжения от ~3,0 до ~5,5 вольт постоянного тока; если используется питание ~3,3 В, то желательно использовать питающий провод не длиннее 20 см. |
Соберём рассмотренную схему. Я также по традиции включу в цепь логический анализатор, чтобы можно было изучить временную диаграмму информационного обмена с датчиком.
Сенсор температуры и влажности DHT11 подключён к Arduino UNO
Сенсор DHT11 часто продаётся в виде готовой сборки с необходимой обвязкой – подтягивающими резистором и фильтрующим конденсатором (как на предыдущей фотографии). Для экспериментов с Arduino я рекомендую покупать именно такой.
1Технические характеристики датчика температуры и влажности DHT11
Итак, датчик DHT11 имеет следующие характеристики:
- диапазон измеряемой относительной влажности – 20..90% с погрешностью до 5%,
- диапазон измеряемых температур – 0..50°C с погрешностью до 2°C;
- время реакции на изменения влажности – до 15 секунд, температуры – до 30 секунд;
- минимальный период опроса – 1 секунда.
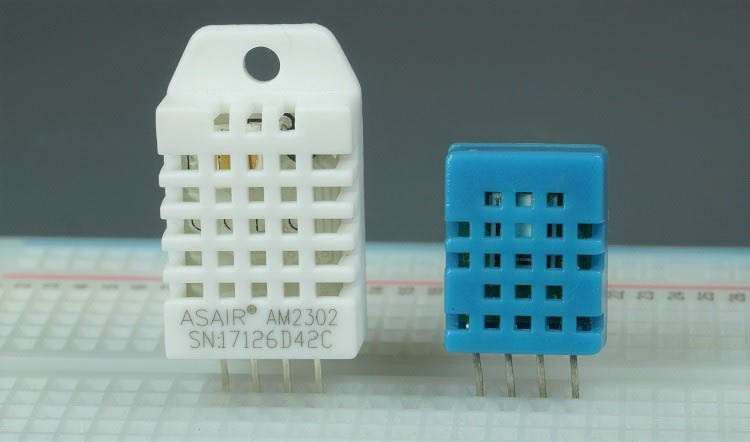
Габаритные размеры и внешний вид датчика температуры и влажности DHT11
Как видно, датчик DHT11 не отличается особой точностью, да и диапазон температур не охватывает отрицательные значения, что вряд ли подойдёт для наружных измерений в холодное время года при нашем климате. Однако малая стоимость, малый размер и простота работы с ним частично перекрывают эти недостатки. На рисунке приведён внешний вид датчика и его размеры в миллиметрах.